Are you ready to power up your Tesla right at home? Hooking up a Tesla Wall Charger might sound tricky, but with the right steps, you can do it yourself safely and quickly.
Imagine never worrying about finding a charging station again—your car will be ready whenever you are. In this guide, you’ll discover exactly how to install your charger, avoid common mistakes, and get the most out of your Tesla’s charging power.
Keep reading, and you’ll be charging like a pro in no time.
Choosing The Right Location
Choosing the right location for your Tesla wall charger is important. It affects how easy and safe the charging process will be. A good spot makes charging quick and hassle-free. Think about where you park and the space around it. Consider how close the charger will be to your electrical panel. Also, keep weather protection in mind to avoid damage.
Assessing Your Garage Or Driveway
Look at where you park your car most often. A garage offers shelter from rain and sun. If you use your driveway, pick a flat spot near the car. Make sure the charger cable can reach without stretching. Avoid places with obstacles or tight spaces. Safety and convenience matter here.
Considering Electrical Panel Access
Check where your home’s electrical panel is located. The charger needs a direct connection to it. A shorter distance can lower installation costs. Make sure the panel has enough capacity for a new charger. Hire a professional to inspect your panel first. This step avoids future electrical problems.
Evaluating Weather Protection
Outdoor chargers must handle weather changes. Choose a spot that stays dry and shaded if possible. If outside, use a weatherproof enclosure for the charger. Avoid placing it where water can pool or snow can pile up. Protecting your charger increases its lifespan and safety.
Gathering Required Tools And Materials
Starting a Tesla wall charger installation begins with gathering the right tools and materials. Proper preparation ensures a smooth and safe setup. Knowing what you need ahead saves time and avoids frustration. This section breaks down the essential items for the job.
Tesla Wall Charger Kit Components
The Tesla wall charger kit includes the main charging unit and a mounting bracket. You will also find the charging cable attached to the unit. The kit comes with screws and anchors for wall mounting. A user manual guides you through basic setup steps. Keep all parts in one place before starting.
Electrical Wiring And Breakers
High-quality electrical wiring is vital for a safe connection. Use wires rated for 240 volts and the charger’s amperage. A dedicated circuit breaker protects your home’s electrical system. Typically, a 60-amp breaker suits most Tesla chargers. Ensure breakers and wires match the charger’s power needs.
Safety Gear And Installation Tools
Safety gear protects you from electrical hazards during installation. Use insulated gloves and safety goggles at all times. Have a voltage tester to check power before handling wires. Basic tools include a drill, screwdriver, wire stripper, and pliers. Organize tools nearby to keep the work efficient.
Preparing Your Electrical System
Preparing your electrical system is the first step to install a Tesla wall charger safely. The charger needs enough power to work well. You must check your home’s electrical setup before starting. This helps avoid problems and keeps your home safe. Follow these steps to prepare your electrical system for the charger.
Checking Your Circuit Breaker Capacity
Look at your circuit breaker box. Find the breaker that controls your garage or where you want to install the charger. Check its amperage rating. Tesla chargers often need a 60-amp circuit or higher. Make sure the breaker can handle this load without tripping. If it is too low, the charger might not work correctly or cause electrical issues.
Upgrading Electrical Panel If Needed
Older homes may have electrical panels with low capacity. If your panel cannot support the charger’s power needs, consider upgrading it. A licensed electrician can replace your panel with a higher capacity one. This upgrade ensures enough power for the charger and other home needs. It also improves safety and prevents overloads.
Turning Off Power Safely
Before starting any electrical work, always turn off the main power. Locate the main breaker in your electrical panel and switch it off. Use a voltage tester to confirm power is off. This step protects you from electric shocks while working. Do not skip this safety measure under any circumstances.
Credit: brianmfischer.com
Mounting The Tesla Wall Charger
Mounting the Tesla Wall Charger is a key step for safe and efficient charging. It requires careful planning and accurate work. The charger must be fixed firmly on a suitable wall. Proper mounting ensures the charger stays in place and works well over time.
Marking The Mounting Spot
Find a flat wall near your parking space. The spot should be easy to reach with the charging cable. Use a tape measure to set the charger height at about 48 inches from the ground. Mark the four mounting holes on the wall with a pencil. Double-check the marks for accuracy before drilling.
Drilling And Securing The Charger
Use a drill with the right bit size for your wall type. Drill holes at the marked spots carefully. Insert wall anchors if the wall is drywall or brick. Hold the charger bracket in place and screw it tightly to the wall. Make sure the charger is stable and does not move.
Ensuring Proper Cable Management
Keep the charging cable neat and off the ground. Use cable hooks or clips along the wall to guide the cord. Avoid sharp bends or kinks in the cable. This protects the cable and keeps your space tidy. Proper cable management prevents trips and extends cable life.
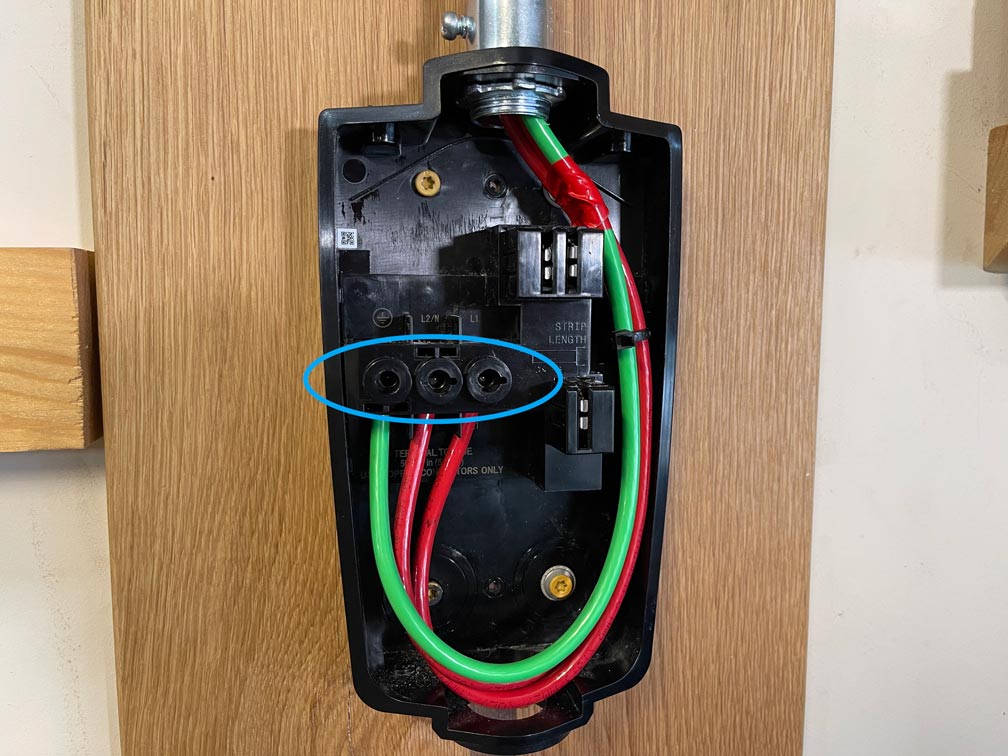
Wiring The Charger
Wiring the Tesla Wall Charger is a key step for safe and efficient charging. It involves careful connection to your home’s electrical system. Proper wiring ensures the charger works well and prevents hazards.
Follow clear instructions and safety rules. Use the right tools and materials. This part of the installation needs attention to detail and patience.
Connecting To The Circuit Breaker
Start by turning off the main power. Find a dedicated circuit breaker for the charger. This breaker controls the power supply to the charger only.
Connect the charger wires to the breaker terminals. Use wires that match Tesla’s specifications. Tighten all connections firmly to avoid loose contacts.
Label the breaker clearly for future reference. This helps in quick identification during maintenance or emergencies.
Following Tesla’s Wiring Guidelines
Tesla provides detailed wiring instructions. Follow them exactly to meet safety standards. Use the recommended wire gauge and type.
Make sure the charger is grounded properly. Proper grounding protects against electrical faults. Use the grounding wire as Tesla instructs.
Check the charger’s manual for any local code requirements. Different areas may have specific rules to follow.
Double-checking Connections
After wiring, inspect every connection carefully. Look for loose wires or incorrect placements. Tighten any loose screws or terminals.
Use a voltage tester to confirm power flow. Test the grounding connection for safety. Make sure no wires touch each other accidentally.
Double-checking prevents future problems and increases charger reliability. Take your time to ensure a safe setup.
Testing And Activating The Charger
Testing and activating your Tesla wall charger is a key step. It ensures the charger works safely and charges your car correctly. Follow simple steps to verify everything is set up right. This part of the process confirms power flow and proper connection.
Restoring Power
First, restore power at your circuit breaker. Flip the switch connected to the charger. Check if the charger shows any lights or signals. This step confirms the charger receives electricity. If no power is visible, recheck the breaker or wiring.
Running Initial Charger Test
Next, run the initial test on the charger. Connect your Tesla to the charger plug securely. Watch for indicator lights or messages on the charger. These signals show the charger is ready. The car should start charging automatically. If charging does not start, check the connection again.
Troubleshooting Common Issues
Sometimes, problems appear during testing. No lights may mean no power or wiring issues. A blinking red light might indicate a fault. Reset the breaker and test again. Check the charger cable for damage. Consult the Tesla manual for specific error codes. Simple fixes often solve common problems.
Maximizing Charging Speed
Maximizing charging speed is key to getting the most out of your Tesla Wall Charger. Fast charging saves time and keeps your car ready for the road. Simple steps can improve how quickly your Tesla charges.
Optimizing Circuit Breaker Settings
Check your circuit breaker to ensure it supports the charger’s power needs. Use the highest allowed amperage safely possible. This setting helps your charger deliver power faster. Avoid lowering the breaker size, as it limits charging speed.
Using Tesla App For Monitoring
The Tesla app shows real-time charging status and speed. Watch the app to see if your car charges at the expected rate. It alerts you to any issues slowing the charge. Regular monitoring helps keep charging efficient.
Scheduling Charging Times
Set your Tesla to charge during off-peak hours. Electricity is often cheaper and less busy then. This reduces strain on the power grid and may allow faster charging. Scheduling also helps manage your energy use better.

Credit: www.solstra.com.au
Maintaining Your Wall Charger
Maintaining your Tesla wall charger keeps it working well and safe. Regular care helps avoid problems and extends its life. Simple steps protect your investment and ensure fast charging every time.
Regular Inspection Tips
Check the charger and cable for any damage often. Look for cracks, frays, or loose parts. Make sure the plug fits tightly in the outlet. Test the charging process to confirm it works smoothly. Report any issues to a professional right away.
Cleaning And Weatherproofing
Keep the charger clean by wiping it with a soft cloth. Avoid harsh chemicals that might damage the surface. Clear dirt and debris from vents and connectors. Use a cover to protect it from rain and dust. Make sure the area around the charger stays dry and clear.
Updating Firmware
Check for firmware updates through the Tesla app regularly. Updates improve performance and fix bugs. Connect your charger to Wi-Fi for easy updates. Follow prompts to install new software safely. Updated firmware keeps your charger running efficiently and securely.
Credit: www.youtube.com
Frequently Asked Questions
How Do I Install A Tesla Wall Charger Safely?
To install a Tesla Wall Charger safely, hire a certified electrician. Ensure your electrical panel supports the charger’s power needs. Follow Tesla’s installation guide carefully. Proper grounding and circuit breakers are essential for safety and compliance with local codes.
What Tools Are Needed For Tesla Wall Charger Setup?
You need a drill, screwdriver, wire stripper, voltage tester, and a wrench. Additionally, have mounting hardware and electrical wiring ready. Using the right tools ensures a secure and efficient installation process for your Tesla Wall Charger.
Can I Install A Tesla Wall Charger Outdoors?
Yes, Tesla Wall Chargers are designed for outdoor use. They have weatherproof enclosures that protect against rain and dust. Ensure the charger is mounted on a sturdy surface and follow local electrical codes for outdoor installations.
How Long Does Tesla Wall Charger Installation Take?
Installation typically takes 2 to 4 hours. This varies based on your electrical panel condition and mounting location. Hiring a professional electrician can ensure a quick, safe, and compliant setup process.
Conclusion
Hooking up a Tesla wall charger can save time and bring convenience. Follow safety steps and use the right tools for best results. Check local codes and get professional help if unsure. A proper setup ensures fast and safe charging at home.
Stay patient and careful during installation. Enjoy the ease of charging your Tesla anytime. This simple guide can help you start your project confidently.