Are you looking to brighten up your room by adding a ceiling light but don’t know where to start? You might think it’s complicated or expensive, but adding a ceiling light to an existing switch can be simpler than you imagine.
In this guide, you’ll discover easy steps that anyone can follow, even if you’re not an expert. By the end, you’ll have the confidence to enhance your space with better lighting—saving money and improving your home’s comfort. Keep reading, and let’s make your lighting upgrade quick and hassle-free!

Credit: www.youtube.com
Tools And Materials Needed
Safety is the most important part of adding a ceiling light to an existing switch. Working with electricity can be dangerous. Taking the right precautions keeps you safe and prevents damage to your home.
Follow simple safety steps before starting any electrical work. These steps protect you and make the project easier.
Turn Off The Power At The Circuit Breaker
Always switch off the power at the main breaker. Do not rely on the wall switch alone. Use a voltage tester to check that the wires have no power. This step stops electric shocks and accidents.
Use Proper Tools And Equipment
Choose tools designed for electrical work. Use insulated screwdrivers and wire strippers. Avoid damaged or worn tools. Proper tools make the job safer and faster.
Wear Safety Gear
Wear rubber-soled shoes and safety goggles. Gloves protect your hands from sharp edges. Safety gear reduces the risk of injury during the project.
Check Local Electrical Codes
Follow local rules and codes for electrical installations. These rules ensure safety and proper function. Ignoring codes can cause hazards or fail inspections.
Work In A Dry Area
Never work with electricity in wet or damp places. Water increases the risk of electric shock. Make sure the area is dry before starting the work.
Label And Organize Wires
Label wires before disconnecting them. Keep wires organized to avoid confusion. Clear labeling helps when connecting wires later.
Consult A Professional If Unsure
Call a licensed electrician if you feel unsure or unsafe. Professionals have the knowledge to handle complex wiring. It is better to be safe than sorry.
Safety Precautions
Removing the switch cover is the first step to add a ceiling light to an existing switch. It gives you access to the wiring behind the switch. This step is simple but important for safety and ease of work.
Turn off the power at the circuit breaker before touching the switch. Safety first. Use a screwdriver to remove the screws holding the cover plate. Keep the screws safe for later use.
Locate The Screws On The Switch Cover
Most switch covers have two screws, one at the top and one at the bottom. Sometimes the screws are hidden under small plastic caps. Check carefully and remove any caps to reach the screws.
Use The Right Screwdriver
Use a flathead or Phillips screwdriver depending on the screw type. A proper fit helps avoid stripping the screw heads. Turn the screws slowly and steadily.
Remove The Switch Cover Plate
After removing the screws, gently pull the cover plate away from the wall. It may stick slightly due to paint or dust. Wiggle it softly to avoid damage to the wall or cover.
Inspect The Switch And Wires
With the cover off, look at the switch and wires. Check for loose or damaged wires. This visual check helps prepare for connecting the ceiling light safely.
Locate The Existing Switch
Installing a ceiling light fixture is a key step in adding light to a room. It makes a space brighter and more inviting. This process involves securing the fixture and connecting wires safely.
Careful installation ensures the light works well and stays fixed. Follow each step to install the ceiling light properly and avoid common mistakes.
Turn Off The Power
Cut power to the room at the breaker box. Use a tester to confirm no electricity flows to the switch. Safety first.
Prepare The Ceiling Box
Check the ceiling box for sturdiness. Use a support brace if needed. The box must hold the fixture’s weight securely.
Connect The Wiring
Match the fixture wires to the house wires by color. Connect black to black, white to white, and ground to ground. Use wire nuts to secure connections.
Attach The Fixture To The Ceiling
Lift the fixture and align it with the ceiling box. Screw it tightly to hold the fixture in place. Make sure it sits flush with the ceiling.
Install Bulbs And Test
Screw in the correct bulbs for your fixture. Restore power and test the light by flipping the switch. The light should turn on smoothly.
Turn Off Power
Always turn off the power at the breaker before starting electrical work. This step keeps you safe and prevents shocks. Double-check with a tester to ensure the power is off.
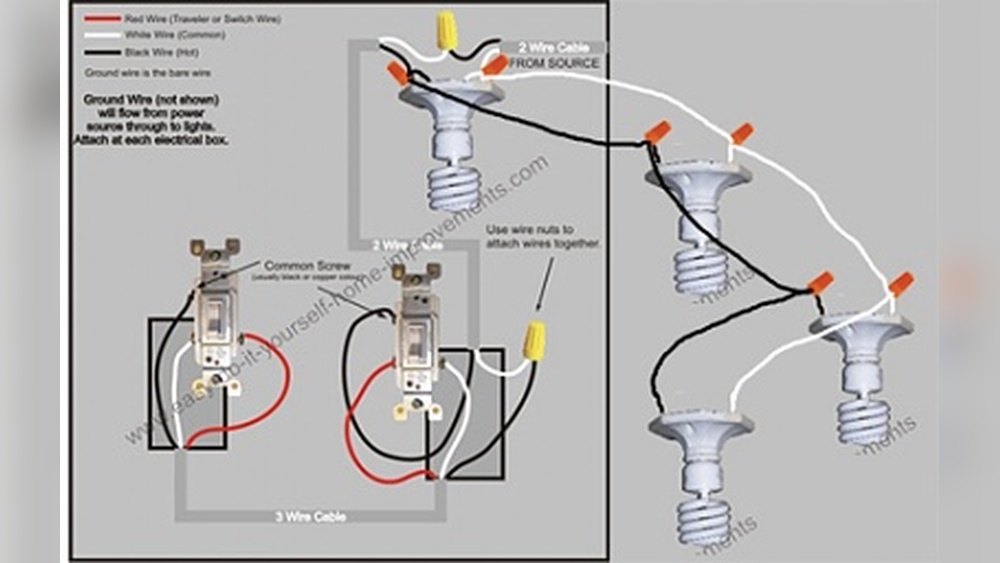
Identify The Wires In The Switch Box
First, turn off the power at the breaker. Safety is key. Open the switch box cover. Look for three types of wires: black (hot), white (neutral), and green or bare (ground). Use a voltage tester to confirm power is off. Label each wire with tape if needed. This step helps avoid confusion later.
Connect The Ground Wire
Connect the ground wire from the light fixture to the ground wire in the switch box. Use a wire connector to twist them together. Attach the ground wire to the green screw on the switch. This connection keeps the circuit safe from electrical faults.
Attach The Neutral Wires
Find the white neutral wire in the switch box and the white wire from the light. Twist them together using a wire connector. Neutral wires complete the electrical circuit. This connection is important for the light to work properly.
Connect The Hot Wires To The Switch
Connect the black wire from the power source to one terminal on the switch. Attach the black wire going to the light to the other terminal. Tighten the screws firmly. This setup allows the switch to control the light’s power.
Secure All Connections And Test
Double-check all wire connections. Make sure no bare wire is exposed. Push wires gently back into the box. Replace the switch cover. Turn the power back on at the breaker. Test the switch by turning the light on and off.
Remove The Switch Cover
Restoring power and testing the new ceiling light is a crucial step. It confirms your wiring is correct and everything works safely. Take your time and follow each instruction carefully to avoid any issues.
Restore Power At The Breaker
Go to your electrical panel. Find the breaker you switched off before starting the installation. Flip it back to the ON position. This action restores electricity to the switch and ceiling light fixture.
Check The Light Switch
Return to the light switch. Flip it ON slowly. Watch the ceiling light carefully. It should turn on immediately. If it does, the wiring is correct and power is restored.
Test The Ceiling Light Functionality
Turn the switch ON and OFF several times. The light should respond each time. No flickering or delays. If the light works smoothly, the installation is successful.
Troubleshoot If Light Does Not Turn On
Double-check all wire connections. Ensure the wires are tight and secure. Make sure the light bulb is properly screwed in. Replace the bulb if needed. If still no power, turn off breaker and review wiring steps.

Credit: diy.stackexchange.com
Identify Wiring Setup
Troubleshooting helps fix problems fast when adding a ceiling light to a switch. It saves time and avoids safety risks. This section covers common issues and clear solutions.
Check The Power Source
First, confirm the power is off at the breaker. Use a voltage tester on the wires. No power means safe to work. Power on means stop and reset.
Verify Wiring Connections
Loose or wrong wires cause lights to fail. Match wire colors: black to black, white to white, green or bare to ground. Tighten all wire nuts securely.
Test The Light Fixture
A faulty bulb or fixture stops light from working. Try a new bulb first. If that fails, test the fixture on another power source.
Inspect The Switch
Old or broken switches can block power. Remove the switch cover and check for loose wires. Replace the switch if it looks damaged or worn.
Look For Tripped Breakers
Breakers trip to stop overloads. Check your breaker box and reset any tripped breakers. This restores power to the circuit.
Use A Continuity Tester
A continuity tester checks wire and switch function. No continuity means a break or bad switch. Replace damaged parts to restore the circuit.
Check For Short Circuits
Shorts cause sparks or breaker trips. Look for exposed wires touching metal or each other. Fix damaged insulation and keep wires separated.

Credit: www.do-it-yourself-help.com
Frequently Asked Questions
How Do I Safely Add A Ceiling Light To Existing Switch?
Turn off power at the breaker first. Use a voltage tester to confirm no power. Connect the new light wiring to the existing switch wiring. Follow electrical codes and use proper connectors for safety.
Can I Use The Existing Switch For A New Ceiling Light?
Yes, you can use the existing switch if it controls the correct circuit. Ensure the switch can handle the light load. Connect the ceiling light wiring to the switch wiring properly to maintain control.
What Tools Are Needed To Add A Ceiling Light To A Switch?
You will need a voltage tester, wire strippers, screwdrivers, electrical tape, wire nuts, a drill, and a ladder. These tools help safely connect and mount the new ceiling light to the existing switch.
Do I Need A Junction Box To Add A Ceiling Light?
Yes, a junction box is required by code for ceiling light connections. It protects wiring and prevents fire hazards. Mount the box securely to a ceiling joist or support.
Conclusion
Adding a ceiling light to an existing switch is simple with clear steps. Always turn off power before starting any work. Use the right tools and follow safety rules closely. Take your time to connect wires correctly and securely. Test the light once everything is in place.
This small project can brighten your room quickly and safely. You can enjoy better lighting without calling a professional. A little care makes a big difference. Ready to light up your space?