Have you ever reached for your chain light switch, only to find it won’t turn on or feels stuck? It’s frustrating when something as simple as a light won’t work, especially when you don’t want to call a professional.
The good news is, fixing a chain light switch is easier than you think. In this guide, you’ll learn step-by-step how to diagnose the problem and get your light working again quickly. Keep reading, and by the end, you’ll have the confidence to handle this common issue on your own.
Identify The Problem
Before fixing a chain light switch, you must identify the problem first. Understanding what is wrong helps you find the right solution quickly. This step saves time and effort.
Many issues can cause a chain light switch to stop working. It might be a power problem, a broken chain, or visible damage. Careful inspection is key to spotting the issue.
Check For Power Issues
Start by checking if the light has power. Make sure the bulb works by testing it in another socket. Look at the fuse box for any tripped switches or blown fuses. Use a voltage tester to check the switch’s power if available.
Inspect The Chain Mechanism
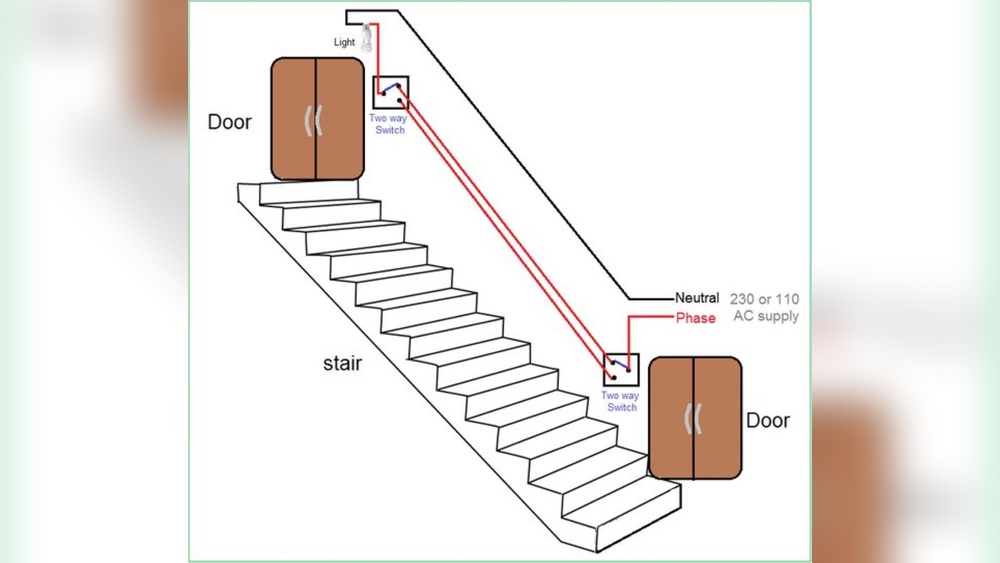
Pull the chain gently to see if it moves freely. Sometimes the chain gets stuck or disconnected inside. Check if the chain feels loose or too tight. The mechanism might need cleaning or realignment.
Look For Visible Damage
Examine the switch for cracks, burns, or corrosion. Damage can cause the switch to fail. Look at the chain itself for broken links or wear. Also, check the wiring if it is exposed or frayed.

Credit: diy.stackexchange.com
Gather Necessary Tools
Before fixing a chain light switch, gather all needed tools. Having the right tools makes the job easier and safer. Take time to prepare well. This helps avoid stops and mistakes during repair.
Essential Repair Tools
Start with a flathead screwdriver and a Phillips screwdriver. These help remove screws and open the switch cover. A voltage tester is important to check if power is off. Wire strippers are useful for handling wires safely. Needle-nose pliers help hold small parts. A replacement switch or new chain may be needed. Keep a flashlight nearby for better visibility.
Safety Equipment
Wear insulated gloves to protect from electric shock. Safety goggles keep dust and debris out of your eyes. Use a non-slip mat to stand on while working. Ensure the work area is dry to avoid slipping. Always turn off power at the circuit breaker before starting. Safety comes first in every step of the repair.
Turn Off The Power
Turning off the power is the first step to fix a chain light switch safely. Electricity can cause serious harm. Always make sure the power is off before you start any repair work. This step protects you from electric shocks and accidents. Follow the next steps carefully to cut the power at the source.
Locate The Circuit Breaker
Find your home’s circuit breaker panel. It is usually in the basement, garage, or a utility room. Open the panel door and look for the switch that controls the light circuit. The breaker may have labels like “Lights” or “Living Room.” Flip the switch to the OFF position. This stops electricity from flowing to the switch you want to fix.
Confirm Power Is Off
After switching off the breaker, check if the power is really off. Use a non-contact voltage tester or a simple light bulb tester. Touch the tester to the chain switch wires or terminals. No light or beep means the power is off. If the tester shows power, turn off the correct breaker again. Never work on a live circuit.
Remove The Switch Cover
Removing the switch cover is the first step to fix a chain light switch. This step gives you access to the internal parts. Handle everything carefully to avoid damage or injury.
Unscrew The Cover Plate
Start by turning off the power to the switch. Use a screwdriver to remove the screws holding the cover plate. Place the screws somewhere safe to avoid losing them. Gently pull the cover plate away from the wall. The plate might stick slightly. Do not force it hard.
Handle Internal Components Carefully
Once the cover is off, you can see the switch parts. Avoid touching wires with bare hands. Use tools if needed. Take care not to bend or break any parts. Keep the area well lit to see clearly. Working slowly helps prevent mistakes.
Fix The Chain Mechanism
Fixing the chain mechanism of a chain light switch is often the key to restoring its function. The chain can wear out, stretch, or get stuck. Small problems here stop the switch from working properly. A few simple steps can solve these issues quickly. Let’s look at how to adjust or replace the chain and lubricate the moving parts for smooth operation.
Adjust Or Replace The Chain
Start by examining the chain closely. Check for any signs of damage or stretching. A loose or broken chain will not pull the switch correctly. If the chain is too long, shorten it by removing some links. For a broken or very worn chain, replace it with a new one. Make sure the new chain fits well and moves freely without catching.
Attach the chain securely to the switch. Test the pull action several times. It should feel smooth and responsive. Adjust the length again if needed. A properly adjusted chain ensures the switch turns on and off easily every time.
Lubricate Moving Parts
Lubricating helps reduce friction and wear in the chain mechanism. Use a light oil or silicone spray designed for small moving parts. Apply a small amount to the chain links and the switch’s moving parts. Avoid over-oiling, which can attract dust and dirt.
Work the chain back and forth to spread the lubricant evenly. This makes pulling the chain easier and quieter. Regular lubrication can extend the life of your chain light switch and keep it working smoothly for a long time.
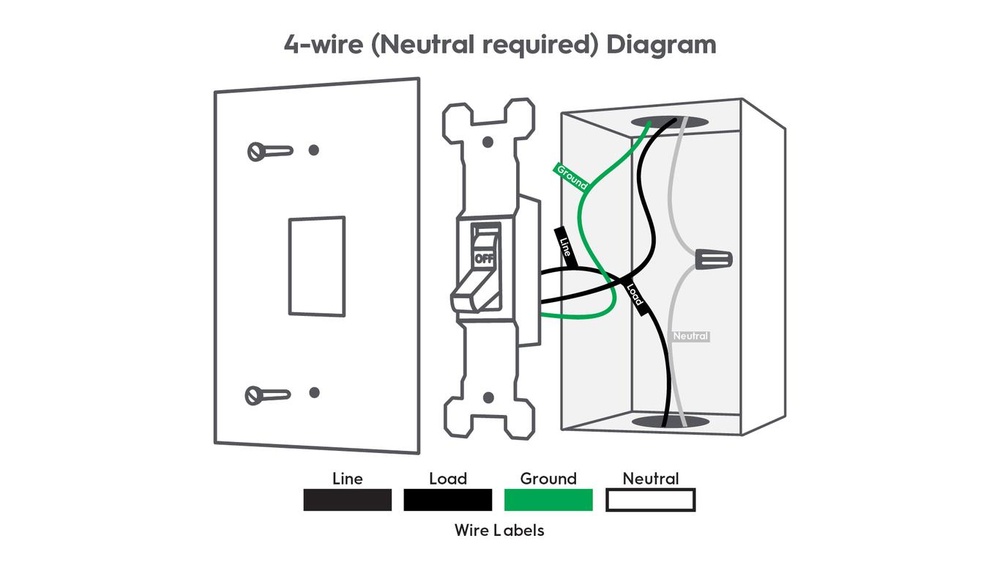
Check Electrical Connections
Checking the electrical connections is a key step in fixing a chain light switch. Loose or damaged wires can stop the switch from working properly. Inspecting these connections helps find the problem fast.
Make sure the power is off before touching any wires. Safety first. Look closely at the wires attached to the switch. See if they are loose or broken. Fixing these issues can bring the switch back to life.
Tighten Loose Wires
Loose wires often cause chain light switches to fail. Use a screwdriver to tighten any loose screws holding the wires. Pull gently on the wire to check if it feels secure. If it moves, tighten the connection more.
Be careful not to overtighten. Tighten just enough to hold the wire firmly. A solid connection lets electricity flow correctly. This simple step can fix the problem quickly.
Replace Damaged Wiring
Damaged wires can block electricity flow and stop the switch from working. Look for cracks, cuts, or burnt spots on the wires. If you see any damage, replace the wire with a new one.
Use wire cutters to remove the broken part carefully. Strip the insulation from the new wire’s ends before connecting. A fresh wire ensures safe and smooth operation of the switch.
Test The Switch
Testing the chain light switch is a key step in fixing it. It helps to know if the switch works or if it needs replacement. This step is simple and safe when done correctly. Follow the instructions carefully to avoid any issues.
Restore Power
First, restore power to the light fixture. Turn the circuit breaker back on or plug the lamp in. Make sure the area is dry and safe before doing this. Power must be on to test if the switch works.
Operate The Switch
Pull the chain gently several times. Listen for a click or feel a slight resistance. The light should turn on and off with each pull. If it does not, the switch might be faulty. Repeat the test to be sure of the results.

Credit: www.familyhandyman.com
Replace The Switch If Needed
Replacing a chain light switch can solve many problems. A faulty switch might cause the light not to turn on or off properly. If cleaning or tightening the switch does not help, replacing it is the best option. This section guides you through choosing and installing a new switch safely and correctly.
Choose A Compatible Replacement
Select a switch that matches your chain light’s voltage and current. Check the old switch for brand and model numbers. Use these details to find a similar or compatible replacement. Choose a switch with the same number of terminals. A wrong switch may not fit or work properly. Buying from a reliable store ensures quality and safety.
Install The New Switch
Turn off power at the circuit breaker before starting. Remove the old switch carefully without damaging wires. Connect the wires to the new switch terminals exactly as before. Tighten the screws firmly but do not overtighten. Attach the new switch to the light fixture. Pull the chain gently to test the new switch. Restore power and check if the light works correctly.
Prevent Future Issues
Preventing future problems with your chain light switch helps keep it working longer. Small efforts now save time and money later. Understanding simple care and safe use protects your switch from damage.
Regular Maintenance Tips
Check the chain and switch parts often for wear or dirt. Clean gently with a dry cloth to remove dust. Tighten loose screws carefully to keep the switch stable. Replace worn parts quickly to avoid bigger issues. Test the switch regularly to ensure it works smoothly.
Safe Usage Practices
Pull the chain gently without jerking or yanking. Avoid pulling the chain with wet or oily hands. Keep the area around the switch dry and clean. Do not hang heavy objects on the chain. Teach children to use the switch carefully to prevent damage.

Credit: www.youtube.com
Frequently Asked Questions
How Do I Fix A Chain Light Switch That Won’t Work?
First, turn off the power to the switch. Check the chain for breaks or disconnections. Tighten or replace loose parts. If the switch is faulty, replace it with a new one to restore proper function.
Why Does My Chain Light Switch Keep Sticking?
A sticking chain switch often results from dust buildup or worn internal parts. Clean the switch carefully and lubricate moving components. If it still sticks, consider replacing the switch to prevent further issues.
Can I Repair A Broken Chain On My Light Switch?
Yes, you can repair a broken chain by replacing it with a similar one. Use pliers to remove the old chain and attach the new one securely. Ensure the chain length suits your usage before finalizing.
What Tools Are Needed To Fix A Chain Light Switch?
You will need a screwdriver, replacement switch or chain, pliers, and electrical tape. Turn off power before starting. Use the screwdriver to open the switch cover and pliers to handle small parts safely.
Conclusion
Fixing a chain light switch is easier than it seems. Start by turning off the power for safety. Check the switch for loose parts or wear. Replace any broken pieces carefully. Test the switch before putting everything back. A working chain switch brings light and comfort.
Take your time and follow steps closely. You can handle this simple home repair yourself. No need to call a professional right away. Keep tools ready and stay safe during the process. Small fixes like this save money and hassle.