Are you tired of harsh lighting that makes your room feel cold or too bright? Imagine having the power to set the perfect mood with just a simple switch.
Installing a light dimmer switch can transform your space instantly, giving you control over brightness and saving energy at the same time. If you’ve ever wondered how to do it yourself, you’re in the right place. In this guide, you’ll learn easy steps to install a dimmer switch safely and quickly—even if you’re not an expert.
Keep reading, and soon you’ll enjoy the perfect lighting for every moment.
Tools And Materials Needed
Installing a light dimmer switch is a simple project. Having the right tools and materials is key. This section lists everything needed for the job.
Essential Tools
Gather basic tools before starting. A flathead screwdriver and a Phillips screwdriver are necessary. Wire strippers help prepare the wires. A voltage tester ensures the power is off. Needle-nose pliers assist in bending wires. Electrical tape keeps connections secure.
Materials Required
Choose a compatible dimmer switch for your light fixture. Purchase wire nuts to connect wires safely. Use a wall plate that fits your switch. Have extra screws handy for mounting. Make sure the dimmer matches your bulb type.

Credit: support.brilliant.tech
Safety Precautions
Installing a light dimmer switch can improve your home lighting. Safety must come first. Electrical work can be risky without care. Follow clear safety steps to avoid accidents. This guide helps keep you safe during installation.
Turn Off Power At The Circuit Breaker
Always switch off the power before starting. Find the correct circuit breaker and turn it off. Use a tester to confirm no electricity flows to the switch. This step prevents electric shock.
Use Insulated Tools
Choose tools with insulated handles. These protect you from electric shock. Avoid using metal tools without insulation. Keep tools dry and in good condition.
Wear Protective Gear
Wear safety glasses to protect your eyes. Use rubber-soled shoes to reduce shock risk. Avoid loose clothing that can catch on wires.
Check For Damaged Wires
Inspect wires before connecting the dimmer switch. Look for cracks, burns, or frayed insulation. Replace any damaged wires to prevent hazards.
Follow Manufacturer Instructions
Read the dimmer switch manual carefully. Follow each step as explained. Different models may have specific requirements.
Choosing The Right Dimmer Switch
Choosing the right dimmer switch is key for a smooth installation and good lighting control. It affects how well your lights work and how much energy you save. Picking the correct type makes your room more comfortable and stylish.
Types Of Dimmer Switches
There are several types of dimmer switches. The most common are rotary, slide, and touch dimmers. Rotary dimmers turn a knob to adjust light. Slide dimmers use a small lever to change brightness. Touch dimmers work with a simple tap or swipe. Some dimmers also come with remote controls for convenience.
Choose a type that fits your room style and user needs. Simple switches suit small rooms. Advanced ones work well in living areas or offices.
Compatibility With Bulbs
Not all dimmers work with every bulb. Incandescent bulbs work with most dimmers. LED and CFL bulbs need special dimmers made for them. Using the wrong dimmer can cause flickering or buzzing. It can also shorten bulb life.
Check your bulb type before buying a dimmer switch. Look for dimmers labeled compatible with LED or CFL if you use those bulbs. Proper pairing ensures smooth dimming and saves energy.
Preparing The Work Area
Preparing the work area is the first step to install a light dimmer switch safely. A clean and organized space helps avoid mistakes. It also makes the process faster and easier.
Before starting, gather all tools and materials needed. Check the power source and switch location. Clear the area around the switch to have enough room to work.
Turn Off The Power
Safety comes first. Switch off the circuit breaker that controls the light. Use a voltage tester to make sure the power is off. Never work on a live wire.
Remove Obstacles And Cover Furniture
Move furniture and objects away from the work area. Cover the floor and nearby items with a drop cloth. This protects surfaces from dust and debris.
Gather Tools And Materials
Collect all tools before starting. Common tools include a screwdriver, wire stripper, voltage tester, and electrical tape. Have the dimmer switch and instructions ready too.
Turning Off The Power
Turning off the power is the first and most important step before installing a light dimmer switch. This step keeps you safe from electric shocks and prevents damage to your electrical system. Always double-check to make sure the power is off before touching any wires or switches.
Safety should never be skipped. Take your time to find the right circuit breaker. Use simple tools to confirm no electricity flows to the light switch.
Locate The Correct Circuit Breaker
Go to your home’s electrical panel. Look for the breaker that controls the room where you will install the dimmer. Usually, it is labeled with room names or numbers. If not, turn off breakers one by one and test the switch until the power is off.
Switch Off The Circuit Breaker
Flip the correct breaker to the OFF position. This stops electricity from reaching the light switch. You may hear a click sound when the breaker turns off. This confirms the power is disconnected.
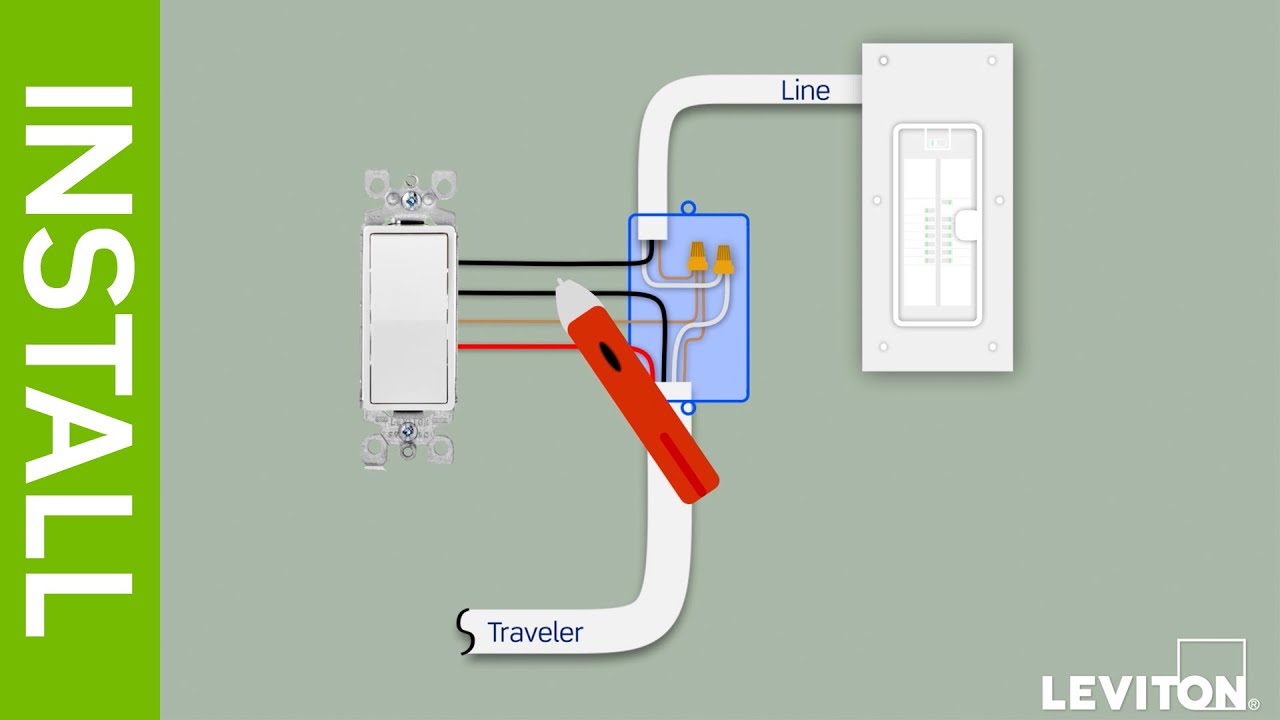
Test The Power With A Voltage Tester
Use a non-contact voltage tester to check the light switch wires. Hold the tester near the wires. If no light or sound shows, the power is off. This step ensures your safety before starting work.

Credit: www.gelighting.com
Removing The Old Switch
Removing the old switch is the first step in installing a light dimmer switch. It requires careful attention to safety and detail. Taking your time helps avoid damage and electrical hazards.
Turning off the power is crucial before you begin. This protects you from electric shock. Use a voltage tester to double-check the power is off.
Turn Off The Power
Locate your home’s circuit breaker panel. Switch off the breaker that controls the light switch. Use a voltage tester on the switch to confirm no power flows. This step ensures your safety during the removal process.
Remove The Switch Cover Plate
Unscrew the cover plate using a screwdriver. Carefully pull the plate away from the wall. Keep the screws in a safe place for later use. Removing the plate exposes the switch and wiring.
Unscrew And Pull Out The Old Switch
Unscrew the mounting screws holding the switch to the electrical box. Gently pull the switch out without pulling the wires. Handle the wires carefully to avoid damage.
Identify And Label The Wires
Look at the wires connected to the switch. Note their colors and positions. Use small pieces of tape to label each wire. This helps during the installation of the new dimmer switch.
Disconnect The Wires From The Old Switch
Loosen the terminal screws or remove wire nuts securing the wires. Carefully detach the wires from the old switch. Keep the wires untangled and ready for the new switch connection.
Wiring The Dimmer Switch
Wiring the dimmer switch is a key step in installing it correctly. This part ensures your light dims smoothly and safely. Taking time to understand the wiring process helps avoid electrical issues. Follow the steps carefully for a successful setup.
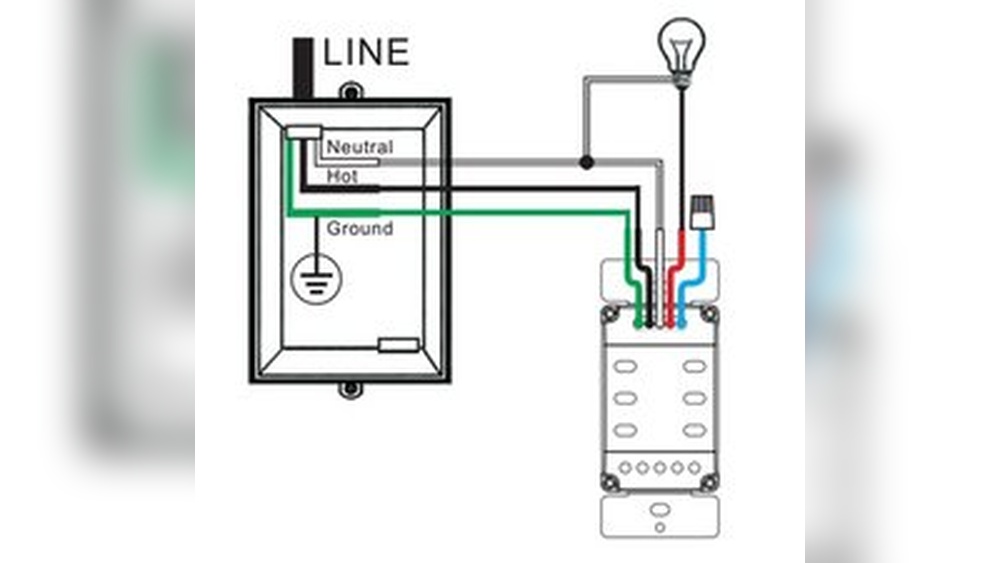
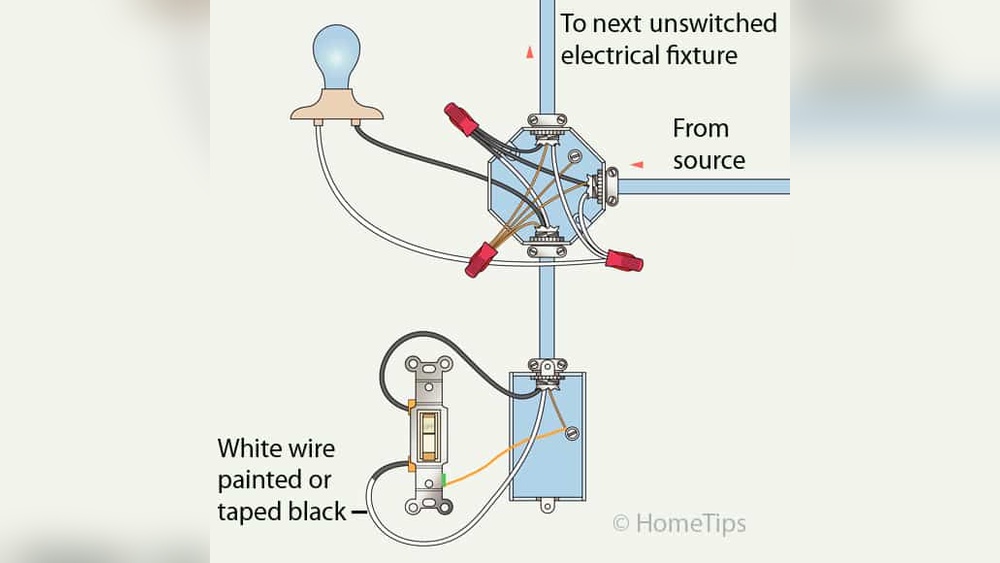
Identifying Wires
First, turn off the power at the breaker box. Use a tester to confirm no electricity flows. Look at the wires inside the switch box. Usually, you find a black (hot) wire, a white (neutral) wire, and a green or bare copper (ground) wire. The black wire carries electricity to the switch. The white wire returns electricity to the panel. The ground wire protects from electrical shock. Knowing each wire’s role makes connecting easier.
Connecting Wires Safely
Match the dimmer switch wires to the house wires by color. Connect black to black, white to white, and green to ground. Twist wire ends together and secure with wire nuts. Wrap electrical tape around nuts for extra safety. Gently push wires back into the box. Attach the dimmer switch to the wall. Turn the power back on and test the dimmer. Proper connections prevent shorts and ensure the dimmer works well.
Securing And Testing The Switch
Securing and testing the light dimmer switch is a crucial step in the installation process. This step ensures the switch works correctly and stays in place safely. Proper securing prevents loose connections that could cause problems later. Testing confirms the dimmer adjusts the light as expected.
Take your time during this stage to avoid issues. Careful handling makes sure the switch operates smoothly and lasts longer.
Securing The Dimmer Switch To The Wall Box
Start by gently pushing the wires back into the wall box. Align the dimmer switch with the mounting holes. Use the screws provided to attach the switch firmly. Do not overtighten the screws; this can damage the switch. The switch should sit flush against the wall. Check that it does not wiggle or move.
Attaching The Faceplate
Place the faceplate over the switch. Match the screw holes on the faceplate and switch. Insert the screws and tighten them evenly. The faceplate should fit snugly without gaps. A well-fitted faceplate protects the switch and looks neat.
Testing The Dimmer Switch Functionality
Turn the power back on at the circuit breaker. Slowly rotate the dimmer knob or slide the control. Watch the light change from bright to dim smoothly. Check for flickering or buzzing sounds. If the light does not respond, turn off the power and recheck wiring. Confirm the dimmer switch controls the light as expected.
Troubleshooting Common Issues
Troubleshooting common issues with light dimmer switches helps avoid frustration. Many problems have simple fixes. Understanding these issues can save time and money.
Some dimmer switches do not work properly at first. Others cause flickering or buzzing sounds. Checking wiring and compatibility often solves these problems.
Check For Loose Or Incorrect Wiring
Loose wires can stop the dimmer from working. Turn off the power before checking. Make sure all wires connect firmly. Match the wires by color: black to black, white to white. Tighten any loose connections carefully.
Confirm Dimmer Switch Compatibility
Not all dimmers work with every bulb type. LED bulbs need specific dimmers. Check the package for compatibility. Using the wrong type causes flickering or no dimming. Replace bulbs or dimmer if needed.
Fix Flickering Or Buzzing Noises
Flickering often comes from loose wiring or bad bulbs. Buzzing usually means the dimmer is overloaded. Reduce the number of bulbs or lower wattage. Secure all wiring and try again.
Reset The Circuit Breaker
The circuit breaker may trip during installation. Switch it off and on to reset. This restores power to the dimmer. If it trips again, check wiring or consult an electrician.
Credit: www.youtube.com
Frequently Asked Questions
What Tools Are Needed To Install A Light Dimmer Switch?
You need a screwdriver, voltage tester, wire stripper, and electrical tape. Turn off power before starting. These tools ensure a safe, proper installation.
Can I Install A Dimmer Switch Myself Safely?
Yes, if you follow safety steps and instructions carefully. Turn off power at the breaker. Use a voltage tester to confirm no electricity flows before wiring.
Will A Dimmer Switch Work With Led Bulbs?
Yes, but only use dimmer switches compatible with LED bulbs. Check packaging for compatibility. Using the wrong dimmer can cause flickering or damage.
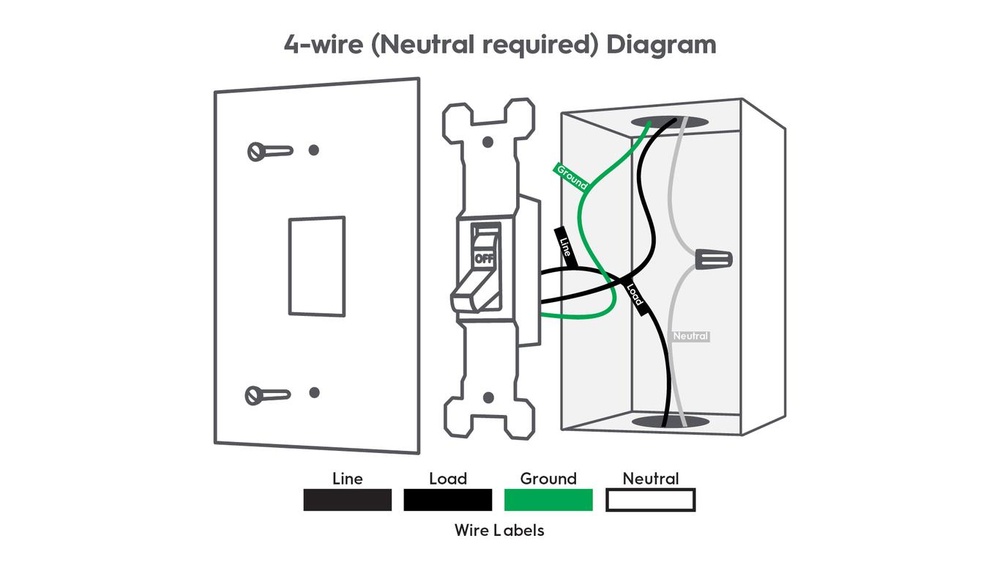
How Do I Know If My Wiring Supports A Dimmer Switch?
Most home wiring supports dimmers if it includes a neutral wire. Check your switch box for three wires: live, neutral, and ground. Consult an electrician if unsure.
Conclusion
Installing a light dimmer switch can change your room’s mood easily. It saves energy and extends bulb life. Always turn off power before starting the work. Follow each step carefully for safety and success. With the right tools, the process is simple.
Enjoy adjustable lighting that suits any time or occasion. This small upgrade makes a big difference at home. Give your space a fresh, cozy feel today.