Are you ready to make your home smarter and control your lights with just a tap on your phone? Connecting your TP-Link light switch to WiFi is easier than you think.
Once set up, you’ll enjoy the convenience of turning your lights on or off from anywhere, scheduling them to fit your routine, and even saving energy without lifting a finger. This guide will walk you through every step, making sure you get your smart switch connected quickly and without any hassle.
Let’s get started and unlock the full potential of your TP-Link light switch!
Prepare Your Tp Link Light Switch
Preparing your TP Link light switch before connecting it to WiFi is important. This step ensures a smooth and safe setup. It helps avoid common problems and makes installation easier.
Follow the steps below to get your light switch ready for connection.
Check Compatibility
First, check if the TP Link light switch works with your home WiFi. Most switches need a 2.4 GHz network. Look at the product details or manual to confirm. Also, make sure your phone or tablet supports the TP Link app. This prevents connection issues later.
Gather Necessary Tools
Collect all tools before starting the installation. You will need a screwdriver, voltage tester, and wire stripper. A ladder might help reach the switch if it is high on the wall. Having tools ready saves time and avoids interruptions during the process.
Turn Off Power Safely
Always turn off the electricity to the switch from the circuit breaker. Use a voltage tester to check if wires are safe to touch. This step prevents electric shock and protects you from accidents. Safety first, even if you feel confident handling electrical parts.

Credit: www.youtube.com
Install The Light Switch
Installing the TP Link light switch is a key step to connect it to your WiFi. It involves careful handling and proper setup. Follow each step closely to ensure safety and functionality. Turn off the power before starting to avoid accidents.
Remove Old Switch
Begin by removing the cover plate of the old switch. Use a screwdriver to unscrew the switch from the wall box. Gently pull the switch out, exposing the wires behind it. Note the wire positions or take a photo for reference. Disconnect the wires carefully by loosening the screws or detaching wire nuts.
Connect Wiring Correctly
Identify the wires: live, neutral, ground, and load. Match the wires with the terminals on the new TP Link switch. Connect the live wire to the terminal marked “L” or “Live.” Attach the neutral wire to the “N” terminal. Connect the ground wire to the green or ground terminal. Secure the load wire if your switch controls a light fixture. Double-check all wire connections for tightness and accuracy.
Secure The New Switch
Push the connected wires gently back into the wall box. Align the new switch with the mounting holes. Use screws to fasten the switch firmly to the wall box. Avoid over-tightening to prevent damage. Attach the cover plate to finish the installation. Restore power and test the switch to confirm it works properly.
Download The Kasa App
To connect your TP Link light switch to WiFi, you need the Kasa app. This app lets you control your light switch from your phone. It is easy to use and free to download. Follow simple steps to get the app on your device. Then, set up your account to start using your smart switch.
Find The App On Your Device
Open the app store on your smartphone or tablet. For Android, use the Google Play Store. For iPhone, open the Apple App Store. Type “Kasa Smart” in the search bar. Look for the app by TP-Link Technologies. Tap “Download” or “Get” to install it. The app will appear on your home screen after installation.
Create Or Log Into Account
Open the Kasa app after installation. You will see options to log in or create an account. If you have an account, enter your email and password. If not, tap “Sign Up” to create one. Use a valid email address and set a simple password. Follow the instructions to complete the setup. Logging in lets you manage your light switch remotely.

Credit: www.tp-link.com
Connect Switch To Wifi
Connecting your TP Link light switch to WiFi lets you control lights from your phone. This step is simple and takes just a few minutes. Follow each part carefully to get your switch online and ready to use.
Start by powering on the switch, then use the app to set it up. Enter your WiFi details, and finish by confirming the connection. Let’s go through each step clearly.
Power On The Switch
First, turn on the power to your TP Link light switch. Make sure the wall switch is properly installed and connected. The switch light should start blinking, showing it is ready to pair. If it does not blink, try turning it off and on again.
Follow App Setup Instructions
Open the TP Link Kasa app on your smartphone. Create an account or log in if you already have one. Tap the “Add Device” button and select “Light Switch” from the list. The app will guide you step-by-step to connect the switch.
Enter Wifi Credentials
Next, enter your home WiFi name and password carefully. Use the 2.4 GHz network since most switches do not support 5 GHz. Double-check the spelling to avoid connection errors. The app will send these details to your switch.
Confirm Connection
Wait a few moments for the switch to connect to your WiFi. The blinking light will turn solid, showing a good connection. The app will notify you when the process finishes. Test the switch by turning your lights on and off using the app.
Troubleshoot Common Issues
Connecting your TP Link light switch to WiFi usually works well. Sometimes, small problems stop the switch from connecting. Troubleshooting helps fix these issues quickly. Try simple steps first to get your switch online again.
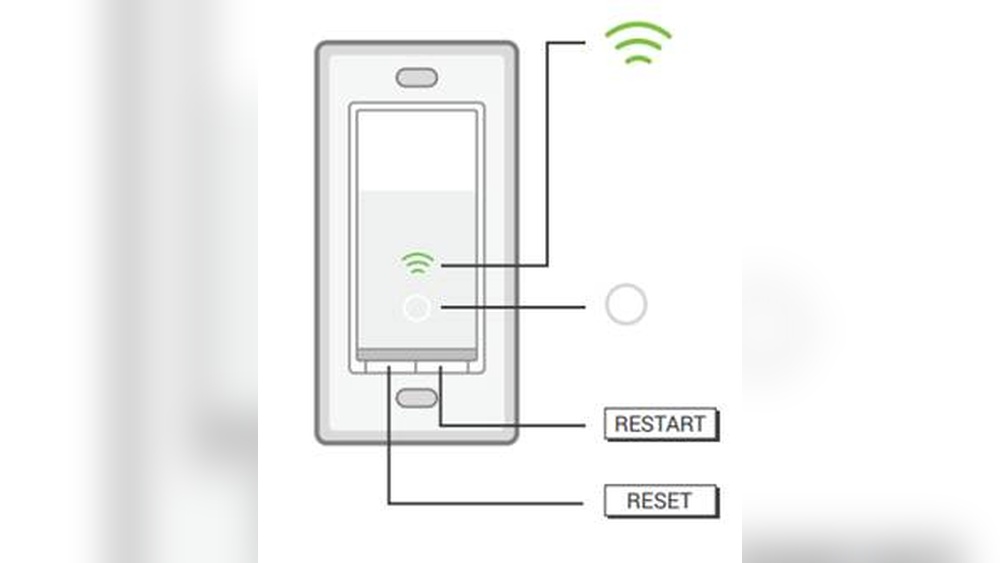
Reset The Switch
Resetting the switch can solve many connection problems. Press and hold the reset button for 5 seconds. Wait for the switch to restart. After this, try connecting it to WiFi again. Reset clears errors and refreshes settings.
Check Wifi Signal Strength
Weak WiFi signals cause connection issues. Move the switch closer to your router if possible. Walls and furniture block signals. Use a signal strength app to check the WiFi near the switch. Strong signals improve connection stability.
Update Firmware
Old firmware can cause bugs and errors. Check for firmware updates in the TP Link app. Download and install any updates available. Updated firmware improves performance and fixes known problems. Keep your switch’s software current.
Control And Customize Settings
Controlling and customizing your TP Link light switch settings makes your home smarter. You gain full control over lighting with simple options. Adjust settings to fit your daily routine easily. Manage your lights from anywhere using your phone or voice.
Set Schedules
Set schedules to turn lights on or off automatically. Choose specific times for each day. This saves energy and keeps your home safe. You can create different schedules for workdays and weekends. No need to remember switching lights manually.
Use Voice Control
Connect your switch to voice assistants like Alexa or Google. Control your lights using simple voice commands. Turn lights on, off, or dim them without lifting a finger. Voice control makes it easy for everyone in the home.
Share Access With Family
Share control of your light switch with family members. Everyone can adjust settings from their own phone. It keeps the home lighting flexible and convenient. You decide who has permission to control the lights.

Credit: www.youtube.com
Frequently Asked Questions
How Do I Connect Tp Link Light Switch To Wifi?
First, power on the switch and open the Kasa app. Select “Add Device,” choose your switch model, and follow the setup steps. Connect to your 2. 4 GHz Wifi network and enter the password. Once connected, the app confirms successful setup.
What Wifi Frequency Does Tp Link Light Switch Support?
Tp Link Light Switches support only 2. 4 GHz Wifi networks. They do not connect to 5 GHz networks. Ensure your router’s 2. 4 GHz band is enabled for smooth connection and device functionality.
Can I Use The Tp Link Light Switch Without Wifi?
No, the switch requires a stable Wifi connection to function properly. It communicates with the app and smart home systems through Wifi. Without Wifi, remote control and automation features won’t work.
Why Isn’t My Tp Link Light Switch Connecting To Wifi?
Check that your phone is on 2. 4 GHz Wifi during setup. Ensure the switch is powered and near the router. Restart your router and switch if needed. Also, verify the correct Wifi password is entered.
Conclusion
Connecting your TP Link light switch to WiFi is simple and quick. Follow the steps carefully for a smooth setup. Once connected, control your lights from anywhere using your phone. This makes your home smarter and more convenient. Enjoy easy access and better control every day.
Keep your device updated for best performance. Start improving your home lighting experience today.

