Have you ever wanted to create a working clock but didn’t have the usual fasteners or tools? Imagine making a paper clock that actually moves, using just simple materials you already have.
This guide will show you how to do exactly that. By the end, you’ll have a fun, hands-on project that teaches you about time and creativity—without any tricky parts. Ready to see how easy and satisfying it can be? Let’s get started!
Materials Needed
Gathering the right materials makes this craft easy and fun. You will need simple things found at home or a local store. Each item plays a key role in building your paper clock without a fastener.
Paper
Choose sturdy paper like cardstock for the clock base. Plain white or colored paper works well. Avoid thin paper that can tear easily.
Scissors
Use sharp scissors to cut the paper cleanly. Blunt scissors can cause rough edges and make the clock look messy.
Glue Or Tape
Glue sticks or double-sided tape help attach parts firmly. They hold pieces without making the paper wet or wrinkled.
Markers Or Pens
Markers or pens add numbers and designs to your clock. Choose bright colors for clear visibility and a fun look.
Ruler
A ruler helps measure straight lines and equal spaces. It keeps your clock face neat and balanced.
Clock Hands
Cut clock hands from paper or thin cardboard. Make two different lengths for the hour and minute hands.

Credit: www.momsandcrafters.com
Cutting The Clock Face
Cutting the clock face is an important step in making a paper clock without a fastener. The clock face is the round part that shows the time. It needs to be neat and even to work well and look good.
Use a circle to guide your cutting. A perfect circle makes the clock easy to read. You can draw the circle on thick paper or cardboard. This helps the clock last longer and keeps it steady.
Choosing The Right Paper
Select paper that is thick but easy to cut. Cardstock or craft paper works well. Thin paper may tear or bend too much.
Drawing The Circle
Use a compass or a round object to draw the circle. Trace carefully to get a clean outline. Make the circle about 6 to 8 inches wide for clear numbers.
Cutting The Circle
Use sharp scissors or a craft knife for smooth edges. Cut slowly to avoid jagged lines. Take your time to keep the circle perfect.
Marking The Numbers
Marking the numbers on your paper clock is a key step. It helps you tell time easily. You want the numbers to be clear and neat. This part does not need a fastener but needs care and patience.
Choosing The Right Numbers Style
Pick a simple style for the numbers. Big, clear digits work best. Use a pencil first to sketch them lightly. This lets you fix mistakes before finalizing.
Spacing The Numbers Evenly
Divide the clock face into 12 equal parts. Use a ruler or protractor to help. Place each number on its mark. Even spacing makes the clock look balanced.
Writing The Numbers Neatly
Write the numbers slowly and carefully. Use a fine-tip pen or marker. Keep the numbers the same size. Neat writing improves the clock’s look and use.

Credit: www.wikihow.com
Crafting The Clock Hands
Crafting the clock hands is a fun and important step in making a paper clock. The hands show the time and make the clock look real. You can create hands that move freely without using a fastener. This section explains how to cut and shape the hands for your paper clock.
Choosing The Right Paper For Clock Hands
Use thick paper or light cardstock for strong clock hands. Thin paper may bend or tear easily. Pick a color that stands out from the clock face. This helps to read the time clearly. Keep the paper flat and smooth before cutting.
Drawing And Cutting The Clock Hands
Draw two hands on the paper: one short for the hour, one long for the minute. Use a ruler to keep lines straight. Cut carefully along the lines with scissors. Make the ends pointed or rounded, based on your style. Avoid sharp edges to prevent paper tears.
Creating A Slot For Movement
Make a small slot near the base of each hand. The slot lets the hands slide over each other. Use a craft knife or scissors to cut the slot. Keep the slot wide enough to allow smooth movement. Test by sliding one hand over the other gently.
Attaching The Hands Without A Fastener
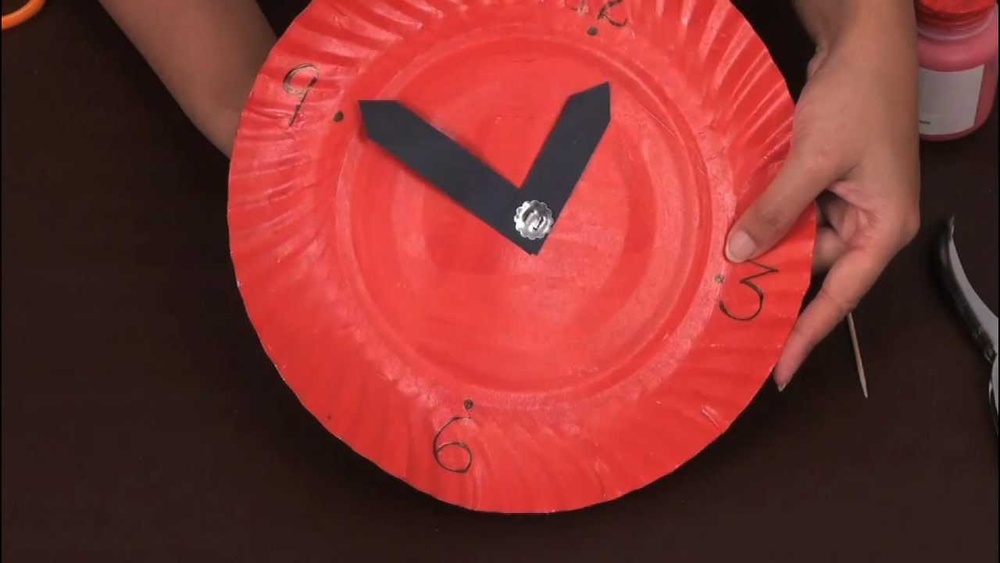
Stack the hour hand on the clock face first. Place the minute hand on top, aligning the slots. Slide the hands together through the slots so they move. Adjust the tightness to avoid slipping or sticking. The hands should turn freely with a light touch.
Attaching Hands Without A Fastener
Attaching the hands of a paper clock without a fastener is simple and fun. It requires only a few materials. This method works well for kids and adults. It keeps the clock hands movable without using sharp tools.
Using common household items, you can create a working clock. The hands will turn smoothly and stay in place. This technique avoids small parts that can get lost or cause harm.
Using Paper Clips To Attach Clock Hands
Take a small paper clip and straighten one end. Push the straight end through the center of the clock face. Then, slide the paper clock hands onto the clip. The clip holds the hands and allows them to move.
Make sure the clip is not too tight. Hands should rotate easily but not fall off. This method is quick and safe for kids.
Threading Clock Hands With String
Cut a short piece of thin string or thread. Pierce the clock face center with a needle or pin. Thread the string through the hole and the clock hands. Tie a small knot under the clock face.
The knot keeps the hands in place. The string acts as a pivot for moving the hands. This method uses materials found in most homes.
Creating A Paper Tab Pivot
Cut a small paper tab from scrap paper. Fold it in half and poke a tiny hole in the center. Insert the tab through the clock face hole. Slide the clock hands onto the tab.
Fold the tab’s ends on the back side of the clock. This holds the hands securely. The tab creates a simple pivot without any metal parts.
Adding Movement To The Hands
Adding movement to the hands of a paper clock without a fastener can be fun and creative. It makes the clock more interactive and realistic. You can try simple ways to let the hands move smoothly. This section explains easy steps to add movement without using traditional fasteners.
Using Paper Strips As Hinges
Cut thin strips of paper to act as flexible hinges. Attach one end to the clock face and the other to the hand. The paper strip bends, allowing the hand to move. Use glue to secure the strips firmly. This method keeps the hands attached and movable.
Creating A Slot Mechanism
Make small slots on the clock face and the hands. Slide the hand into the slot on the face. The hand can pivot in the slot while staying connected. This design lets the hands rotate smoothly without loose parts. Make sure the slots fit well but are not too tight.
Using Tape Loops For Movement
Form tiny loops with tape and attach them between the hands and the clock face. The loops act like springs, giving some flexibility. Hands can move back and forth gently using this method. Choose a tape that sticks well but allows movement.
Decorating Your Paper Clock
Decorating your paper clock makes the project fun and personal. It turns a simple craft into a creative piece. You can use many simple materials to bring your clock to life. Bright colors, patterns, and textures add charm and style.
Choose decorations that match your room or your mood. The goal is to make the clock both useful and beautiful. Let your imagination guide your choices. Here are some easy ways to decorate your paper clock.
Using Colored Markers And Pens
Colored markers and pens are easy tools for decoration. Draw numbers clearly to keep the clock readable. Add small designs like dots or stars around the face. Use bright colors to make the clock stand out. Keep your drawings simple and neat for best results.
Adding Paper Cutouts
Cut out shapes from colored paper to decorate. Circles, triangles, or flowers work well. Glue them around the clock face or on the edges. Layer different colors for a fun look. Paper cutouts add texture and depth to your clock design.
Using Stickers And Washi Tape
Stickers can quickly brighten your paper clock. Choose small stickers that fit the clock face. Washi tape adds color and patterns easily. Create borders or highlight numbers with tape strips. Both stickers and tape are simple to use and remove.
Adding Texture With Ribbons And Buttons
Ribbons and buttons add a tactile feel to your clock. Glue small ribbons around the clock’s edge for a frame. Use buttons as numbers or decorations on the face. These items give a unique look and add dimension. Keep them light so the clock stays flat.
Troubleshooting Common Issues
Troubleshooting common issues helps you build a better paper clock without a fastener. Small problems can stop your clock from working well. Fixing these issues early saves time and frustration.
Below are common problems and simple solutions to keep your paper clock running smoothly.
Loose Or Misaligned Hands
Paper clock hands may slip or not line up properly. Check the center point where hands meet. Press them gently but firmly to keep them steady. Use a small piece of tape behind the hands if needed. This adds extra grip without a fastener.
Hands Do Not Move Smoothly
If the hands get stuck, the clock will not work. Make sure the paper is flat and not bent. Trim any paper edges that block movement. Adjust the hands slightly apart to avoid overlap. Test by turning each hand slowly.
Clock Face Tears Or Warps
Thin paper tears easily during assembly. Use thicker paper or card stock for better strength. Avoid pulling too hard on the clock face. Keep your workspace clean and dry to prevent warping. Press the paper flat under a heavy book before starting.
Numbers Or Marks Are Hard To Read
Clear numbers help tell time quickly. Use bold markers or printed numbers on the clock face. Avoid small or faint writing. Space numbers evenly around the clock. Check visibility under different lighting before finishing.

Credit: komodomath.com
Frequently Asked Questions
How Do You Make A Paper Clock Without A Fastener?
To make a paper clock without a fastener, use paper folding techniques or glue to attach clock hands. Cut out clock parts precisely and secure them with paper tabs or slots for movement.
What Materials Are Needed For A Paper Clock?
You need colored paper, scissors, glue, a pencil, and a ruler. Optional materials include markers for numbers and a paper clip for hands.
Can A Paper Clock Show Accurate Time?
A paper clock without a fastener is mostly for learning and decoration. It won’t keep accurate time like a real clock.
How To Make Clock Hands Move Without A Fastener?
Use paper tabs or slots to create movable hands. Carefully cut and fold parts so hands slide or rotate gently.
Conclusion
Making a paper clock without a fastener is simple and fun. You only need paper, scissors, and glue. This project helps you learn how clocks work. It also improves your cutting and folding skills. You can decorate your clock any way you like.
It makes a great craft for kids and adults. Try making one today and see how creative you can be. A handmade paper clock shows your effort and creativity clearly. Enjoy crafting and telling time with your unique paper clock!