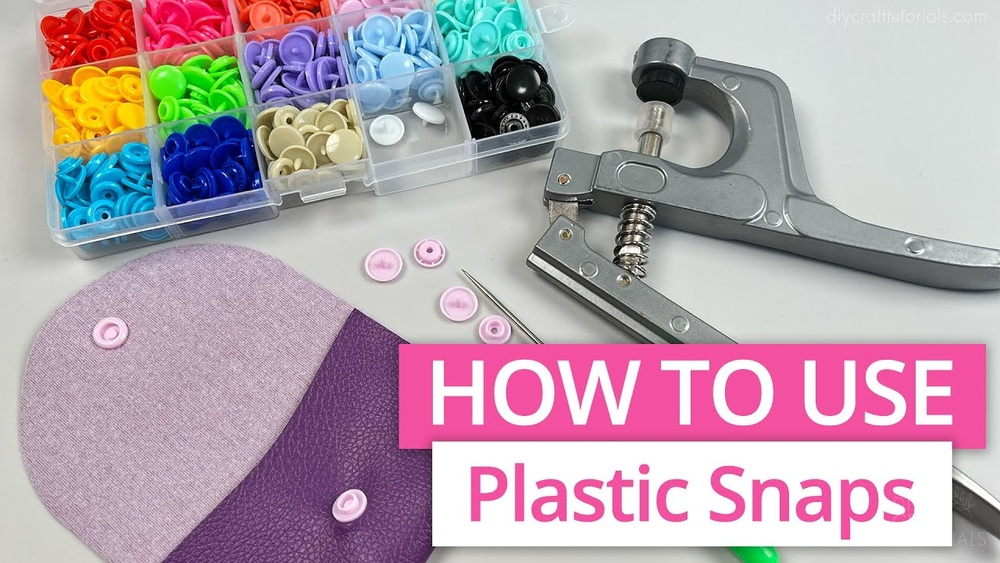
Are you tired of struggling with buttons that pop off or sewing on snaps that never seem to hold? Using a plastic snap fastener tool can make your life so much easier.
Imagine being able to quickly and securely attach snaps to your clothes, bags, or crafts without any hassle. In this guide, you’ll learn exactly how to use a plastic snap fastener tool step-by-step, so you can fix or create items with confidence.
Keep reading, and you’ll discover simple tips that save you time and give your projects a professional finish every time.
Credit: www.youtube.com
Choosing The Right Snap Fastener Tool
Choosing the right snap fastener tool is key for easy and strong snap installation. The right tool saves time and avoids damage to your materials. Understanding your options helps you pick the best fit for your project.
Types Of Snap Fastener Tools
Manual snap fastener tools are simple and easy to use. They work well for small projects and light materials. Handheld plier-style tools offer control and precision. Press machines provide power for heavy-duty use. Each type suits different project needs.
Selecting Suitable Snap Sizes
Snaps come in various sizes. Small snaps fit light fabrics and thin materials. Larger snaps suit thick fabrics and heavier materials. Choose a tool that matches your snap size. This ensures secure attachment and clean results.
Materials Compatible With Plastic Snaps
Plastic snaps work best on soft fabrics like cotton and fleece. They also suit vinyl and leather. Avoid hard or thick materials that can crack snaps. Match your tool and snap type to the material for strong hold.
Preparing Your Workspace
Preparing your workspace is the first step to using a plastic snap fastener tool. A clean, organized area helps you work faster and avoid mistakes. It also keeps your materials safe and easy to find. Follow these simple tips to get your workspace ready.
Organizing Tools And Materials
Gather all tools and materials needed for your project. Place the snap fastener tool, snaps, fabric, and any other items close together. Use small containers or trays to keep tiny parts from getting lost. This setup saves time and reduces stress during work.
Ensuring Proper Lighting
Good lighting is important for precise work. Use a bright lamp or natural light near your workspace. Avoid shadows that can hide small details. Proper lighting helps you see where to place the snaps and ensures accurate installation.
Setting Up A Stable Surface
Choose a flat, sturdy surface to work on. A table or desk works well. Avoid soft or uneven surfaces that can cause mistakes. A stable surface supports the fabric and tool, making the snap fastener easier to use.
Marking Placement For Snaps
Marking placement for snaps is a key step in using a plastic snap fastener tool. It ensures snaps go exactly where you want them. Accurate placement makes your project look neat and professional. Take time to mark carefully before attaching snaps.
Measuring Accurate Positions
Start by measuring the spot for each snap. Use a ruler or tape measure for exact distances. Measure from edges or seams to keep snaps even. Mark small dots with a pencil or fabric marker. This helps avoid mistakes and keeps snaps aligned.
Using Templates Or Guides
Templates or guides simplify marking placement. You can make a paper template with holes for snap positions. Place it on fabric and mark through the holes. Some snap tools come with guides for spacing. These tools save time and improve accuracy.
Double-checking Alignments
Before attaching snaps, check your marks twice. Look closely to see if marks line up on both sides. Fold fabric as it will be after snapping to check fit. Adjust marks if needed to avoid crooked snaps. Taking this step prevents problems later.

Credit: www.thesewingdirectory.co.uk
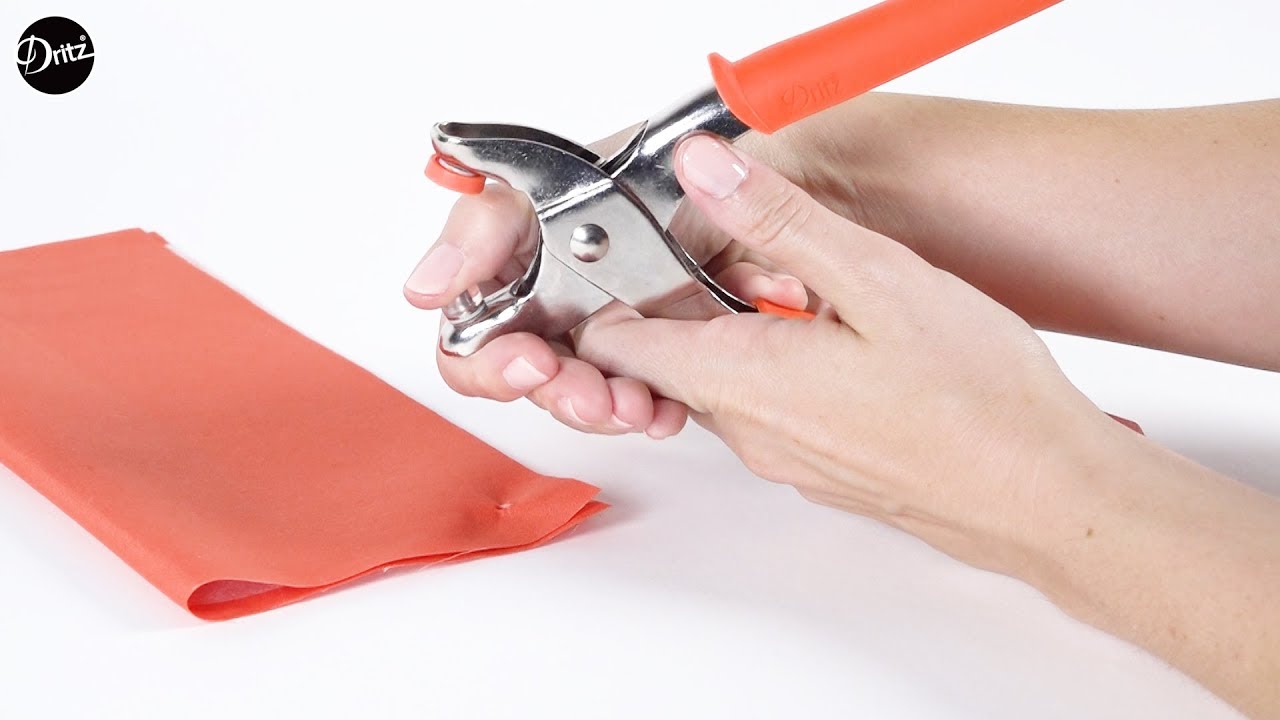
Attaching The Snap Fasteners
Attaching snap fasteners is a simple task once you know the steps. Using a plastic snap fastener tool makes the job neat and quick. This section explains how to place the snaps correctly and use the tool well. Follow these steps to get a strong hold on your fabric or project.
Aligning Snap Components
Start by placing the snap parts carefully. The cap and socket must line up perfectly. Check that the prongs face the right way. The stud and post should also match on the opposite side. Good alignment prevents damage to the snap or tool.
Operating The Snap Fastener Tool
Hold the tool firmly in your hand. Position the snap parts between the tool’s jaws. Make sure the cap sits on the top jaw. The socket or stud goes on the bottom jaw. Press the handles slowly to start fastening.
Applying Correct Pressure
Use steady pressure when squeezing the tool. Too much force can break the snap. Too little may cause it to fall apart. Press until you hear or feel a click. This means the snap is locked in place.
Troubleshooting Common Issues
Troubleshooting common issues with a plastic snap fastener tool can save time and effort. Problems like misaligned snaps, loose attachments, or material damage may occur during use. Understanding how to fix these issues helps achieve neat and strong snaps.
Fixing Misaligned Snaps
Misaligned snaps look uneven and may not close properly. Check the position of both snap parts before pressing. Use a flat surface to hold the fabric steady. Adjust the snap pieces slightly if they are off-center. Press slowly and evenly to avoid shifting.
Dealing With Loose Attachments
Loose snaps can fall off easily. Make sure the tool applies enough pressure to secure the snap. Use the correct size snap for your fabric thickness. Replace worn or damaged snap parts for better hold. Test the snap by gently pulling it after attaching.
Avoiding Material Damage
Material damage reduces fabric strength and looks bad. Use a soft cloth under the fabric to protect it during pressing. Avoid pressing too hard or too long in one spot. Choose snap sizes suitable for your material type. Check the fabric for holes or weak spots before attaching snaps.
Maintaining Your Snap Fastener Tool
Maintaining your plastic snap fastener tool ensures it works well for a long time. Proper care stops damage and keeps the tool ready for your next project. Small actions can make a big difference in the tool’s life and performance.
Cleaning After Use
Wipe the tool with a dry cloth after each use. Remove any dirt, fabric bits, or snap pieces. Avoid water or harsh chemicals; they can cause rust or damage. Clean jaws and moving parts gently to keep smooth action.
Storage Tips
Store the tool in a dry place away from moisture. Use a small box or pouch to protect it from dust. Keep the tool separate from heavy items to avoid bending or breaking. Proper storage stops rust and keeps parts aligned.
Regular Inspections And Repairs
Check your tool often for signs of wear or damage. Look at the jaws and handles for cracks or bends. Tighten any loose screws to keep parts secure. Replace worn parts quickly to avoid bigger problems.

Credit: www.amazon.com
Frequently Asked Questions
What Is A Plastic Snap Fastener Tool Used For?
A plastic snap fastener tool attaches snap buttons to fabric or plastic. It’s ideal for DIY projects and repairs. The tool ensures a secure and neat fastening. It’s simple to use for both beginners and professionals.
How Do I Set Up A Plastic Snap Fastener Tool?
To set up, choose the correct snap size and position it in the tool. Align the fabric or material between the snap parts. Hold the tool firmly and press to secure the snap. Always follow the tool’s manual for best results.
Can I Use A Plastic Snap Fastener Tool On Thick Fabric?
Yes, most plastic snap fastener tools work on thick fabrics. However, test on a scrap piece first to ensure proper fastening. Use firm pressure when pressing the tool. For extremely thick materials, consider a heavy-duty snap fastener tool.
How Do I Maintain My Plastic Snap Fastener Tool?
Clean the tool regularly to remove debris and fabric fibers. Lubricate moving parts with a small amount of oil. Store it in a dry place to prevent rust or damage. Proper maintenance extends the tool’s lifespan and ensures smooth operation.
Conclusion
Using a plastic snap fastener tool is simple and effective. It helps you attach snaps quickly to fabric or other materials. Practice a few times to get comfortable with the tool. Always align the parts carefully for a strong hold.
This tool saves time and effort on your projects. Keep it clean and store it safely after use. With patience, you can improve your skills easily. Snap fasteners add a neat finish to your work. Try different sizes for various needs.
Enjoy making your crafts better and faster.