Have you ever wanted to control one light from two different switches? Imagine turning your room’s light on or off without having to walk across the space.
It sounds simple, but wiring two switches to one light can feel confusing if you’re not sure where to start. Don’t worry—this guide will break it down step-by-step, using clear and easy instructions. By the end, you’ll have the confidence to set up your switches just the way you want.
Ready to make your lighting smarter and more convenient? Let’s dive in!
Tools And Materials Needed
Understanding basic wiring concepts is key to connecting two switches to one light. This knowledge helps ensure safety and functionality. The goal is to control one light from two different places. It sounds simple but requires the right approach and tools.
Before starting, knowing the types of switches and how electrical circuits work is important. This foundation makes the wiring process clear and manageable. Let’s explore these ideas in detail.
Types Of Switches
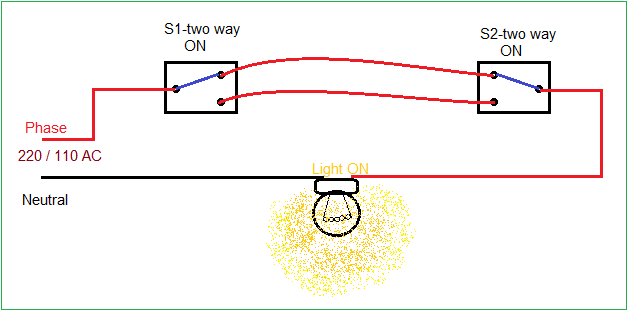
There are several types of switches used in homes. The most common for this task are single-pole and three-way switches. A single-pole switch controls one light from one place. A three-way switch allows control from two different locations.
Three-way switches have three terminals. They help create a path for electricity to flow from either switch. This makes it possible to turn the light on or off from two spots. Understanding this difference is vital for proper wiring.
Understanding Electrical Circuits
Electricity flows through a circuit, a closed loop from power source to light and back. Switches break or complete this loop. When the loop is complete, the light turns on. When broken, the light turns off.
In a two-switch setup, the circuit includes wires called travelers. These wires connect the switches and allow electricity to flow through either switch. Knowing how these wires work helps avoid mistakes and keeps the system safe.
Always remember to turn off power before working on electrical circuits. Safety first. Proper wiring ensures the light works as expected and prevents hazards.

Credit: diy.stackexchange.com
Basic Wiring Concepts
Working with electrical wiring can be risky. Safety must be your top priority when connecting two switches to one light. Taking proper precautions protects you and your home from hazards. Follow these safety tips to ensure a safe and successful project.
Turn Off Power At The Circuit Breaker
Always switch off the power before starting any electrical work. This prevents electric shock and short circuits. Use a voltage tester to confirm no electricity flows to the wires.
Use Proper Tools And Equipment
Select insulated tools designed for electrical work. Avoid using damaged or worn-out tools. Proper equipment reduces the risk of accidents and improves precision.
Understand Your Wiring Layout
Study the wiring plan before you begin. Know which wires connect to each switch and the light. Clear understanding avoids mistakes and unsafe connections.
Wear Protective Gear
Use safety gloves and goggles to protect your hands and eyes. Protective gear guards against sparks and sharp wire ends.
Follow Local Electrical Codes
Adhere to building codes and electrical standards for your area. Compliance ensures your installation is safe and legal. It also helps prevent future problems.
Double-check Connections
Inspect all wire connections carefully before restoring power. Loose or incorrect wiring can cause shorts or fires. Tighten all screws and secure wires properly.
Safety Precautions
Testing the setup is a key step after wiring two switches to one light. It ensures the connections work properly and the light responds as expected. This step helps avoid problems like flickering or no light at all. Testing is simple and quick. Follow these easy steps to confirm your switches control the light correctly.
Turn On Power And Check For Safety
First, restore power to the circuit. Use the main breaker to turn electricity back on. Check that no wires are loose or exposed. If you see any sparks or smell burning, switch off power immediately. Safety is the top priority before testing the switches.
Operate Each Switch Individually
Flip the first switch to the ON position. The light should turn on. Flip it OFF and the light should go off. Repeat this with the second switch. Both switches must control the light independently. This confirms the wiring is correct.
Test Both Switches Together
Turn the first switch ON and leave it there. Flip the second switch ON and OFF several times. The light should respond by turning on or off each time. Then, switch the first switch OFF. The light should still operate with the second switch. This shows the switches work together properly.

Credit: www.realpars.com
Step-by-step Wiring Process
Troubleshooting common issues helps fix problems fast when connecting two switches to one light. Understanding typical errors saves time and effort. Check wiring and switch types carefully. Small mistakes can cause the light not to work properly. Here are common problems and how to solve them.
Check For Loose Connections
Loose wires cause flickering or no light. Turn off power first. Tighten all wire nuts and screws. Ensure wires are properly connected to the right terminals. A secure connection keeps the circuit complete.
Verify Correct Switch Type
Two-way or three-way switches are needed for this setup. Single-pole switches will not work. Confirm both switches are compatible. Using the wrong switch prevents control from both points.
Inspect Wiring Diagram
Follow a trusted wiring diagram. Mistakes in wire placement cause failure. Double-check traveler wires and common terminals. Clear wiring avoids confusion and ensures the light works.
Test Power Supply
Power issues stop the light from turning on. Use a voltage tester to check power at switches. No power means a breaker might be off. Reset breakers or replace blown fuses.
Look For Damaged Components
Old or broken switches may fail. Signs include buzzing or heat. Replace damaged switches with new ones. Faulty parts can block electricity flow.
Testing The Setup
Neat and secure wiring is key to a safe, lasting switch setup. It keeps the connection stable and reduces fire risks. Organized wiring also makes future repairs easier and faster.
Follow simple steps to keep wires tidy and protected. Use the right tools and materials for best results. Clear wiring paths help avoid confusion and mistakes.
Use Color-coded Wires
Choose wires with different colors for each function. For example, black for live, white for neutral, and green for ground. This helps identify wires quickly and avoids mix-ups.
Secure Wires With Cable Clips
Attach wires along walls or inside boxes with clips. This stops wires from hanging loose or getting damaged. Space clips evenly to prevent sagging.
Keep Wires Away From Heat And Water
Avoid running wires near heat sources or damp areas. Heat can melt insulation, and moisture can cause shorts. Use protective conduits if needed.
Strip Wires Carefully
Remove just enough insulation to make a good connection. Too much stripping exposes wires and risks a short circuit. Use a wire stripper for clean cuts.
Use Wire Nuts Or Terminal Blocks
Connect wires with wire nuts or terminal blocks for a secure join. Tight connections stop wires from loosening over time. Check connections before closing boxes.
Label Wires Clearly
Mark wires with labels or tape to show their purpose. This saves time during maintenance or upgrades. Use simple, clear writing for easy reading.
Credit: theorycircuit.com
Frequently Asked Questions
How Do I Wire Two Switches To One Light?
To wire two switches to one light, use a three-way switch setup. Connect the switches using traveler wires. This allows controlling the light from both switches safely and effectively.
Can I Use Regular Switches For Two-switch Light Control?
No, regular switches won’t work for two-switch light control. You need special three-way switches designed for this purpose. These switches allow toggling the light on or off from two locations.
What Tools Are Needed To Connect Two Switches To One Light?
Basic tools include a screwdriver, wire stripper, voltage tester, and electrical tape. These tools help ensure safe wiring and proper connection of switches and light fixtures.
Is It Safe To Connect Two Switches To One Light?
Yes, it is safe if done correctly. Always turn off power before working. Follow electrical codes and use proper switches to avoid hazards.
Conclusion
Connecting two switches to one light is simple with the right steps. Always turn off power before starting any work. Use proper wiring methods to keep everything safe. Test your switches after wiring to ensure they work correctly. This setup gives you control from two places.
It adds convenience to your home lighting. Following clear instructions helps avoid mistakes. Now, you can enjoy easy control over your lights.