Are you thinking about giving your kitchen cabinets a fresh new look? One question that often comes up is whether you should remove the hardware before painting.
It might seem like a small detail, but this choice can make a big difference in how smooth and professional your final result looks. If you want to avoid messy edges, drips, and extra work later on, understanding the best approach will save you time and frustration.
Keep reading to find out why removing hardware before painting could be the key to transforming your kitchen with ease.
Benefits Of Removing Hardware
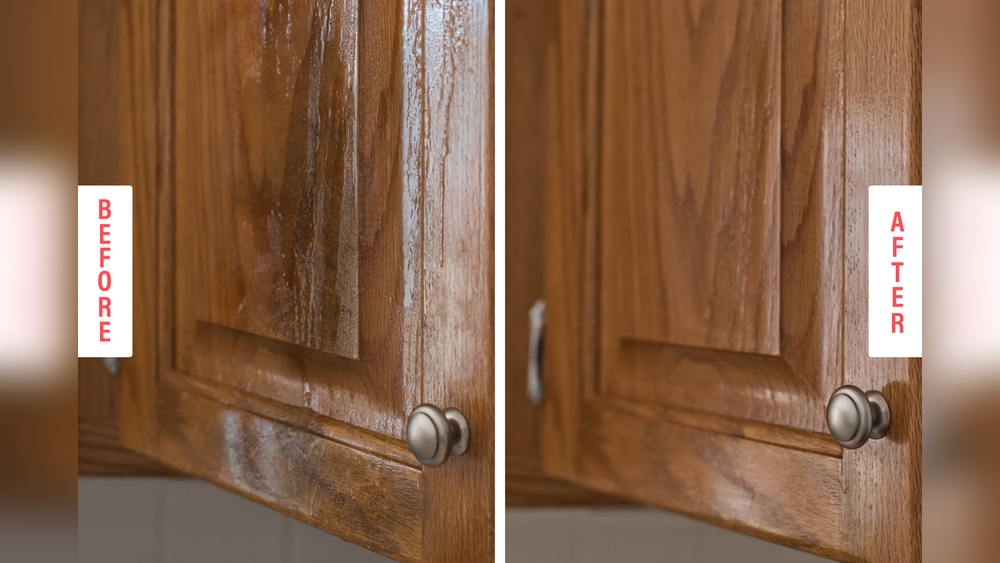
Removing hardware before painting kitchen cabinets offers several benefits. It makes the painting process easier and cleaner. Cabinets look better after painting without hardware in the way. Let’s explore why taking off hardware helps achieve great results.
Ensuring Smooth Paint Application
Hardware can block paint from reaching cabinet surfaces. Removing it allows paint to cover every corner evenly. No missed spots or uneven layers. Paint goes on smoothly without bumps or drips. This leads to a more attractive cabinet finish overall.
Preventing Paint Damage On Hardware
Paint can stick to handles, knobs, or hinges. This ruins their look and function. Removing hardware keeps it clean and free from paint. It also protects metal parts from rust or discoloration. Hardware stays in good shape for longer after painting.
Achieving Professional Finish
Without hardware, painters can work with more precision. Edges and details get painted neatly. Cabinets look custom and professionally done. This small step makes a big difference in the final appearance.
Credit: www.cravingsomecreativity.com
When To Leave Hardware On
Leaving hardware on kitchen cabinets during painting can save time and effort. It works well in certain cases. Understanding when to keep the hardware can help you achieve a neat finish quickly.
Here are some situations where leaving hardware on makes sense.
Quick Touch-ups
For small paint jobs or touch-ups, removing hardware is not always needed. Keeping knobs and handles on avoids extra work. It helps finish the job fast without much mess. Just be careful to cover hardware with painter’s tape.
Using Paintable Hardware
Some hardware is made for painting. These pieces have smooth surfaces that take paint well. Painting over them can give a fresh, uniform look. No need to remove hardware in this case. It saves time and keeps everything in place.
Time And Budget Constraints
Removing hardware takes time and may require tools. If the project is short on time or budget, leave hardware on. This choice reduces labor and cost. Use tape and careful brush strokes to protect hardware while painting.
Tools Needed For Hardware Removal
Removing hardware from kitchen cabinets needs the right tools. Having the proper equipment makes the job faster and safer. It helps avoid damage to the cabinets and hardware. Below are the key tools needed to remove hardware effectively.
Screwdrivers And Drill Options
A basic screwdriver set is essential. Phillips and flathead screwdrivers cover most screws. A cordless drill with screwdriver bits speeds up the process. Use a drill with adjustable torque to avoid stripping screws. Choose hand tools for small or delicate hardware.
Organizing Screws And Parts
Keep screws and parts in small containers or trays. Label containers to remember where each part belongs. Use magnetic trays to prevent losing tiny screws. Sorting parts helps when reattaching hardware later. Organization saves time and reduces frustration.
Protective Gear
Wear safety glasses to protect your eyes from dust and debris. Gloves help avoid splinters and sharp edges. Use a mask if sanding or cleaning near the hardware. Protective gear keeps you safe throughout the removal process.
Step-by-step Hardware Removal Process
Removing hardware from kitchen cabinets before painting is an important step. It helps achieve a smooth, clean finish. This process also protects your hardware from paint damage. Follow these steps carefully to remove handles and knobs safely.
Preparing The Workspace
Clear the area around your cabinets. Lay down a soft cloth or towel on the floor. This prevents scratches on the cabinet doors and hardware. Gather necessary tools like a screwdriver and a small container. Good lighting will help you see screws clearly. Organize your tools for easy access during removal.
Removing Handles And Knobs Safely
Start with one cabinet door or drawer at a time. Use the correct screwdriver to avoid stripping screws. Turn screws slowly and steadily. Hold the handle or knob firmly while unscrewing. Place the hardware gently on your soft cloth to avoid damage. Check for any stuck screws and apply gentle force if needed.
Labeling And Storing Hardware
Use small bags or containers to keep hardware parts together. Label each bag with the cabinet or drawer name. This helps you find the right pieces later. Store all bags in a safe place to avoid losing screws. Keeping hardware organized saves time when reattaching after painting.
Tips For Painting With Hardware Attached
Painting kitchen cabinets with hardware attached can save time and effort. It also keeps the cabinet doors in place and aligned. Careful preparation is key to avoid messy results. Follow these tips to protect your hardware and get a smooth finish.
Using Painter’s Tape
Cover the hardware with painter’s tape to prevent paint stains. Press the tape edges firmly for a tight seal. Replace tape if it peels during painting. Tape helps keep hardware clean and sharp-looking.
Spray Painting Techniques
Spray paint offers even coverage around hardware. Hold the spray can 8 to 12 inches from the surface. Use light, sweeping motions to avoid drips. Multiple thin coats work better than one thick coat.
Avoiding Paint Build-up
Keep hardware free of thick paint layers. Wipe any excess paint off quickly with a cloth. Avoid heavy brushing near edges to prevent clumps. Smooth surfaces ensure hardware works well after painting.

Credit: www.youtube.com
Reattaching Hardware After Painting
Reattaching hardware after painting kitchen cabinets is a crucial step. It brings your cabinets back to life and completes the fresh look. Careful reattachment ensures hardware fits well and looks great.
Taking time to clean, align, and secure hardware will prevent damage and wear. This process helps your cabinets stay functional and stylish for years.
Cleaning Painted Surfaces
Before putting hardware back, clean painted surfaces gently. Use a soft cloth to remove dust and debris. Avoid harsh cleaners that can damage fresh paint. A clean surface helps hardware stick better and look neat. Check for any paint drips or rough spots. Lightly sand these areas for a smooth finish.
Aligning Hardware Correctly
Place hardware carefully to match original holes or markings. Use a ruler or measuring tape for accuracy. Misaligned hardware can cause doors to hang unevenly. Test handles and knobs for easy opening before tightening. Correct alignment improves cabinet function and appearance.
Securing Fasteners Properly
Use the right screws to avoid stripping or breaking. Tighten screws firmly but do not overtighten. Overtightening can crack the paint or damage wood. Check each fastener after installation to ensure stability. Properly secured hardware lasts longer and stays in place.
Common Mistakes To Avoid
Painting kitchen cabinets can refresh your space. Avoiding common mistakes saves time and effort. These errors often cause poor results and extra work. Knowing what to avoid helps the project go smoothly.
Skipping Hardware Removal
Leaving handles and knobs on blocks paint access. Paint builds unevenly around hardware. It causes a messy finish and drips. Removing hardware gives clean edges and smooth coats. It also protects hardware from paint damage.
Ignoring Surface Preparation
Dirty or greasy surfaces stop paint from sticking. Sanding rough spots is necessary to create grip. Skipping cleaning and sanding leads to peeling paint. Proper prep ensures a long-lasting, smooth surface. Take time to wash and sand all cabinet parts.
Using Wrong Paint Types
Not all paints suit kitchen cabinets. Cheap or wrong paint may chip or fade fast. Use paint made for wood and high use areas. Semi-gloss or satin finishes resist stains and clean easily. Choosing the right paint protects your work and looks better.
Credit: www.kilz.com
Frequently Asked Questions
Should I Remove Hardware Before Painting Kitchen Cabinets?
Yes, removing hardware is recommended. It ensures an even paint finish and prevents paint from sticking to handles or hinges. It also makes sanding and cleaning easier, resulting in a professional-looking cabinet makeover.
Can Painting Cabinets With Hardware On Cause Damage?
Painting with hardware on can cause paint buildup on handles and hinges. This leads to a messy appearance and functionality issues. Removing hardware avoids paint chipping and keeps the cabinets looking clean and new.
How Do I Remove Hardware Before Painting Cabinets?
Use a screwdriver to carefully unscrew handles, knobs, and hinges. Keep screws and hardware in a labeled container for easy reinstallation. Removing hardware helps achieve a smooth, flawless paint job.
Is It Harder To Paint Cabinets Without Removing Hardware?
No, painting without hardware is harder. Hardware blocks paint access and creates uneven surfaces. Removing it allows better coverage, cleaner edges, and a more durable finish.
Conclusion
Removing hardware before painting kitchen cabinets makes the job easier and cleaner. Paint covers all surfaces evenly without bumps or missed spots. It also helps avoid damage to knobs and hinges. Reattaching hardware later keeps everything looking neat and professional.
This small step saves time and effort in the long run. So, take a few extra minutes to remove hardware before starting. The results will be smoother, and your kitchen will look fresh and polished. Simple actions lead to better outcomes in any home project.