Have you ever wished you could control your lights from two different spots in the same room? A 3 way dimmer light switch lets you do just that—giving you the power to adjust brightness and convenience with ease.
If you’re ready to upgrade your lighting but don’t know where to start, this guide will walk you through every step. By the end, you’ll have the confidence to connect your 3 way dimmer switch safely and correctly. Keep reading, and you’ll discover simple tips that make this project easier than you think.

Credit: www.do-it-yourself-help.com
Tools And Materials Needed
Before starting to connect a 3 way dimmer light switch, gather all necessary tools and materials. Having the right items ready makes the work smoother and safer.
Make sure to check each tool for good condition. Using proper materials ensures the switch works well and lasts long.
Essential Tools
- Screwdriver set (flathead and Phillips)
- Wire stripper and cutter
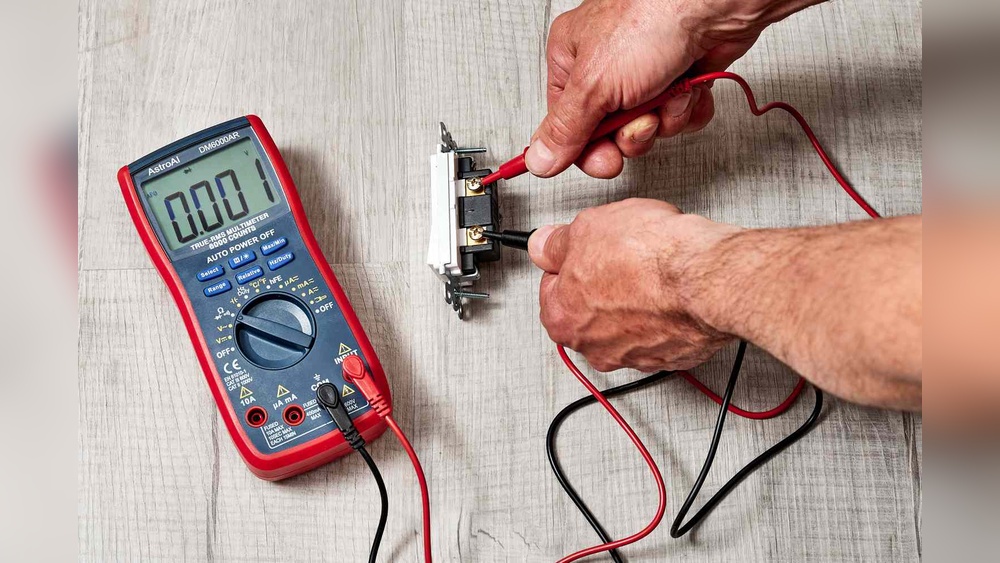
- Voltage tester or multimeter
- Needle-nose pliers
- Electrical tape
- Flashlight or headlamp
Required Materials
- 3 way dimmer switch
- Wire connectors (wire nuts)
- Electrical wires (if new wiring is needed)
- Wall plate for dimmer switch
- Wire labels or markers
Safety Equipment
- Insulated gloves
- Safety glasses
- Non-conductive footwear
Safety Precautions
Identifying your wiring setup is the first step to connect a 3 way dimmer switch correctly. Knowing the wires you have helps avoid mistakes and ensures safety. This part guides you through checking your existing wiring before starting the installation.
Every home may have a different wiring system. Some use a traveler wire; others may have different color codes. Understanding your setup saves time and prevents damage to your switch or wiring.
Gather Basic Tools And Safety Gear
Turn off the power at the breaker panel. Use a voltage tester to confirm no electricity flows. Gather a screwdriver, wire stripper, and electrical tape. Wear gloves and safety glasses for protection.
Remove The Old Switch Cover Plate
Unscrew the cover plate gently. Remove the screws holding the old switch. Pull the switch out carefully without touching wires. Note the wire colors and their positions.
Identify The Common And Traveler Wires
The common wire connects to the power source or light fixture. Traveler wires link the two switches in a 3 way setup. Common wire is often black, travelers can be red or black. Use a tester to label each wire before disconnecting.
Check For Ground Wire
Look for a bare copper or green wire. This is the ground wire for safety. Ensure it is present and in good condition. Grounding is crucial for dimmer switches to work safely.
Draw A Wiring Diagram
Sketch the wiring layout you see. Mark each wire’s color and connection point. This simple diagram helps during installation. Keep it handy for reference to avoid confusion.
Identify Your Wiring Setup
Before starting any electrical work, safety is the first step. Turning off the power prevents electric shocks and accidents. This step protects you and your home.
Always treat electrical wiring with respect. Even if you think the power is off, double-check to be sure. Safety does not allow shortcuts.
Locate Your Circuit Breaker
Find the main electrical panel in your home. It is usually in the basement, garage, or utility room. Open the panel door carefully to see the breakers.
Identify The Correct Breaker
Look for the breaker that controls the light switch circuit. It might be labeled as “lights” or “living room.” If labels are missing, turn off the main breaker to cut all power.
Switch Off The Breaker
Flip the breaker to the OFF position. This stops electricity from flowing to the switch. You should feel a small click when it turns off.
Test The Power
Use a voltage tester or a simple light bulb to check the wires. Make sure there is no electricity before touching anything. Safety first.
Turn Off Power
Always turn off the power at the breaker before starting any wiring work. This step keeps you safe from electric shock. Double-check with a tester to confirm no power is flowing.
Turn Off The Power
Start by switching off the power at the circuit breaker. This step ensures safety. Never work on electrical switches with the power on. Use a voltage tester to confirm no electricity flows to the switch.
Remove The Switch Cover Plate
Unscrew the cover plate over the existing switch. Keep screws in a safe place. The plate may be tight, so use a flathead screwdriver carefully. Removing the plate exposes the switch and wiring.
Unscrew The Existing Switch
Loosen the screws holding the switch to the wall box. Pull the switch gently out from the wall. Avoid pulling hard on the wires. This reveals the wires connected to the switch terminals.
Note Wire Connections
Take a clear photo of the wires and their positions. Label wires with tape if needed. This helps to connect the new dimmer switch correctly. Knowing each wire’s role prevents wiring errors later.
Disconnect The Wires
Use a screwdriver to loosen terminal screws. Carefully detach each wire from the switch. Keep wires separated to avoid accidental contact. This step frees the old switch for removal.
Remove Existing Switches
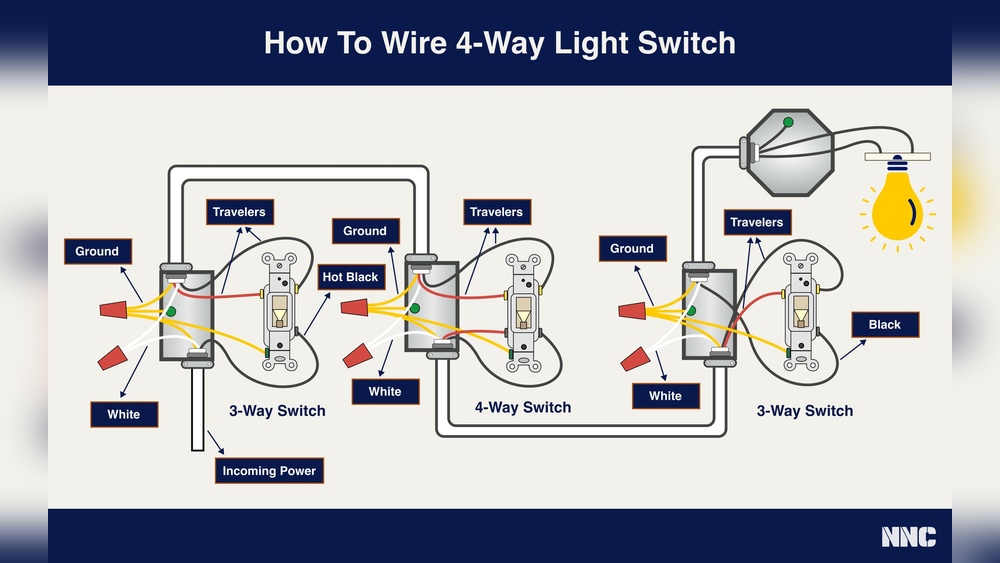
Connecting a 3 way dimmer switch helps control lights from two locations. This setup is common in hallways, stairs, and large rooms. The process involves wiring the common terminal, traveler wires, and the ground wire. Each step is important for safe and proper operation.
Wiring The Common Terminal
The common terminal is usually marked with a different color, often black or dark bronze. This wire carries the main power or load to the switch. Connect the black wire from the power source or the light fixture to the common terminal. Make sure the connection is tight and secure to avoid any loose wiring.
Connecting Traveler Wires
Traveler wires connect the two switches and allow them to control the same light. These wires usually have red and black colors. Attach each traveler wire to the brass or lighter colored terminals on the dimmer switch. Double-check that traveler wires are correctly connected on both switches for smooth dimming.
Ground Wire Connection
The ground wire is usually green or bare copper. It protects against electrical shocks by providing a safe path for electricity. Attach the ground wire to the green screw on the dimmer switch. If the box is metal, connect the ground wire to the box as well to ensure safety.

Credit: diy.stackexchange.com
Connect The 3 Way Dimmer Switch
Connecting a 3 way dimmer switch lets you control lights from two places. Start by turning off power and identifying wires. Follow simple steps to link the dimmer correctly and enjoy adjustable lighting.
Prepare The Wall Box And Turn Off Power
Start by turning off the power at the circuit breaker. This step is crucial for safety. Use a voltage tester to confirm no electricity flows in the wires. Remove the existing switch from the wall box carefully. Check that the box has enough space for the new dimmer switch.
Identify And Connect The Wires
Look for the common wire, usually marked or colored black. Connect this wire to the dimmer switch’s common terminal. Attach the traveler wires to the remaining terminals on the dimmer. These wires often have red or black insulation. Make sure all wire connections are tight and secure.
Mount The Dimmer Switch And Restore Power
Push the wires gently back into the box. Screw the dimmer switch firmly onto the wall box. Attach the switch plate cover to complete the installation. Turn the power back on at the breaker. Test the switch by adjusting the dimmer and toggling the other switch.
Install The Second 3 Way Switch
Testing the dimmer switch is a key step after installation. It ensures your 3-way dimmer works correctly and safely. This step helps find wiring errors and confirms the dimmer controls the light as expected.
Testing is simple. You only need to observe the light’s behavior and check the switch’s response. Proper testing avoids future problems and keeps your home safe.
Turn On The Power Supply
First, restore power to the circuit by switching on the breaker. Without power, the dimmer switch cannot function. Check the breaker panel carefully to avoid any mistakes. Wait a few seconds for the switch to activate fully.
Operate Both Switches
Use both 3-way switches to control the light. Flip each switch on and off. The light should respond smoothly to both switches. The dimmer should adjust brightness without flickering or delay. Test all switch positions to confirm proper wiring.
Adjust The Dimmer Slider Or Knob
Slide or turn the dimmer control slowly. Watch the light change brightness evenly. It should brighten and dim without sudden jumps. If the light flickers or turns off, there may be wiring issues. Repeat the test to be sure of results.
Check For Heat And Noise
Feel the dimmer switch for heat. A slight warmth is normal. Too much heat means a problem. Listen for buzzing or humming sounds. These can indicate wiring or compatibility issues. Turn off power immediately if you detect these signs.
Test With Different Bulbs
Try the dimmer with various bulb types. Use LED, incandescent, or CFL bulbs. Some dimmers do not work well with all bulbs. Testing different bulbs helps find the best match. This ensures smooth dimming and longer bulb life.
Test The Dimmer Switch
Troubleshooting a 3 way dimmer switch can be tricky. Small errors can stop the lights from working. Knowing what to check saves time and frustration.
Below are common problems and easy fixes to try. These tips help ensure your dimmer switch works properly.
Check The Wiring Connections
Loose or wrong wiring is the most common issue. Turn off power first. Remove the switch cover and check all wire connections. Make sure wires are tight and in the right places. Use a voltage tester to confirm no power is present before touching wires.
Test The Dimmer Switch Function
Sometimes the dimmer switch itself is faulty. Swap the dimmer with a regular switch to see if the problem stops. If lights work with a regular switch, replace the dimmer. Use a known working dimmer to test the circuit.
Inspect The Light Bulbs
Wrong bulbs can cause flickering or no light. Use dimmable bulbs as required. Check if bulbs are loose or burned out. Replace non-dimmable bulbs with dimmable ones for best results.
Verify The Power Source
Power issues may cause the switch to fail. Check the circuit breaker and fuse box. Reset any tripped breakers. Make sure power is reaching the switch with a tester. No power means a bigger electrical problem.
Look For Interference From Other Devices
Some electronics can interfere with dimmer switches. Unplug nearby devices and test the switch again. If the flicker stops, move or replace the interfering device. Keep dimmers away from strong electrical signals.
Credit: www.reddit.com
Frequently Asked Questions
What Tools Do I Need For A 3 Way Dimmer Switch?
You need a screwdriver, voltage tester, wire stripper, and electrical tape. A new 3 way dimmer switch and wire connectors are essential. Always turn off power before starting.
How Do I Identify Traveler Wires In A 3 Way Setup?
Traveler wires usually connect the two switches. Use a voltage tester to identify live wires. They often have red or black insulation but check your wiring diagram.
Can I Use Any Dimmer Switch For 3 Way Lights?
No, you need a dimmer specifically designed for 3 way circuits. Standard dimmers won’t work correctly with multiple switch points. Check product specifications before purchase.
What Safety Precautions Should I Follow When Installing?
Turn off power at the breaker box. Use a voltage tester to confirm no current. Wear insulated gloves and follow local electrical codes for safe installation.
Conclusion
Connecting a 3 way dimmer switch can seem tricky at first. Step-by-step wiring makes the task simple and clear. Double-check your connections before turning the power back on. Test the dimmer to ensure it works from both switches. With care and patience, you can control your lights easily.
Enjoy the comfort of adjustable lighting in your home. This skill saves money and adds convenience to daily life. Give it a try—you might surprise yourself!