Have you ever tried to remove a screw anchor from your wall, only to find it stuck tight and frustrating? You’re not alone.
Those little anchors can be tricky, but getting them out doesn’t have to be a headache. Whether you’re fixing a mistake or preparing to repaint, knowing the right way to remove a screw anchor can save you time and prevent damage to your wall.
Keep reading, and you’ll learn simple, effective steps to get that stubborn anchor out quickly and with ease.
Tools Needed
Removing a screw anchor from the wall requires the right tools. Having the proper tools makes the job easier and faster. It also helps prevent damage to your wall. Below are the main tools needed for this task.
Screwdriver
A screwdriver is essential to remove the screw from the anchor. Choose the right type—flathead or Phillips—that matches your screw. This tool helps to loosen and take out the screw smoothly.
Pliers
Pliers come in handy to grip and pull out the anchor. Needle-nose pliers work best for small anchors. Use them carefully to avoid breaking the wall surface.
Utility Knife
A utility knife helps cut around the anchor if it is stuck. This tool can remove excess drywall or loosen the anchor edges. It makes the removal process cleaner and easier.
Drill With Drill Bits
A drill may be needed for stubborn anchors. Use a drill bit slightly smaller than the anchor size. It helps to bore a hole inside the anchor, making it easier to pull out.
Putty Knife
A putty knife helps to clean the hole after anchor removal. Use it to scrape off loose debris or smooth the wall surface. This tool prepares the wall for patching or repainting.
Identify The Anchor Type
Identifying the anchor type is the first step in removing a screw anchor from the wall. Different anchors have different shapes and materials. Each type needs a specific removal method. Knowing your anchor type helps avoid wall damage and saves time.
Plastic Expansion Anchors
Plastic expansion anchors are common in drywall. They are small and usually white or beige. They expand inside the wall when the screw is driven in. These anchors can often be pulled out with pliers after removing the screw.
Toggle Bolts
Toggle bolts have metal wings that open behind the wall. They hold heavy objects tightly. Removing these requires loosening the screw fully. Then, the wings can be pushed through the wall cavity carefully.
Molly Bolts
Molly bolts are metal anchors that expand inside the wall. They create a strong hold for medium-weight items. To remove them, unscrew the bolt and tap the anchor gently to pull it out.
Threaded Drywall Anchors
Threaded drywall anchors screw directly into the wall without pre-drilling. They have wide threads and often plastic. Unscrew the anchor by turning it counterclockwise to remove it safely.
Concrete Anchors
Concrete anchors are made for masonry walls. They are heavy-duty and metal. Removing these anchors may require drilling around them or using special tools to pull them out.
Prepare The Area
Preparing the area is the first step before removing a screw anchor from the wall. It helps protect your wall and makes the process easier. Taking a few simple actions creates a safer and cleaner workspace.
Clear the space around the anchor. Remove any furniture or objects near the wall. This prevents damage and gives you enough room to work comfortably.
Cover the floor and nearby surfaces with a drop cloth or old sheet. It catches dust and debris falling during the removal. This saves you time on cleanup later.
Gather all tools and materials needed. Having everything ready avoids interruptions and keeps you focused. Tools may include a screwdriver, pliers, and a putty knife.
Clear The Surrounding Area
Remove items close to the wall. This avoids accidents and damage. Make sure pets and children stay away.
Protect The Floor And Furniture
Lay down a protective cloth or plastic sheet. It catches dust and small wall pieces. This keeps your space clean and safe.
Gather Necessary Tools
Collect all tools before starting. Common tools include a screwdriver and pliers. Keep them within easy reach to work smoothly.

Credit: www.wikihow.com
Remove The Screw
Removing the screw is the first step to take out a screw anchor from the wall. This step must be done carefully to avoid damage to the wall. The screw holds the anchor in place, so it must come out before the anchor can be removed.
Gather The Right Tools
Use a screwdriver that fits the screw head perfectly. A poor fit can strip the screw, making removal harder. Choose between a flathead or Phillips screwdriver based on the screw type.
Loosen The Screw Slowly
Turn the screwdriver counterclockwise with steady pressure. Do this slowly to prevent the screw from spinning in place. If the screw feels stuck, try applying gentle back-and-forth movements.
Use Pliers For Stubborn Screws
Grip the screw head with pliers if the screwdriver slips. Turn the pliers carefully to avoid breaking the screw. Pliers give extra grip and control during removal.
Clear Away Debris Around The Screw
Remove dust or paint that covers the screw head. Use a small brush or cloth for cleaning. Clear visibility helps the screwdriver fit better and work efficiently.
Extract Plastic Anchors
Removing a screw anchor can leave small holes or damage on your wall. Fixing these spots helps your wall look smooth and clean again. This part explains how to repair wall damage step-by-step.
Filling Holes
Start by cleaning the hole from dust and loose pieces. Use a putty knife to apply wall filler into the hole. Press the filler firmly to fill all gaps. Smooth the surface with the knife so it is flat. Let the filler dry fully before moving to the next step.
Sanding And Painting
Once dry, gently sand the filled area with fine sandpaper. Sand until the surface is even with the wall. Wipe away dust using a dry cloth. Apply paint that matches your wall color. Use a small brush or roller for best results. Allow the paint to dry well before touching the wall.

Credit: theturquoisehome.com
Remove Metal Anchors
Preventing future anchor issues keeps your walls strong and safe. Using the right methods saves time and effort. Small steps make a big difference in wall stability.
Choosing the correct anchor type for the wall is crucial. Different walls need different anchors. Using the wrong anchor can cause damage or failure.
Use The Right Anchor For Your Wall
Match the anchor type to the wall material. Drywall, plaster, and concrete need specific anchors. Check the package instructions before buying.
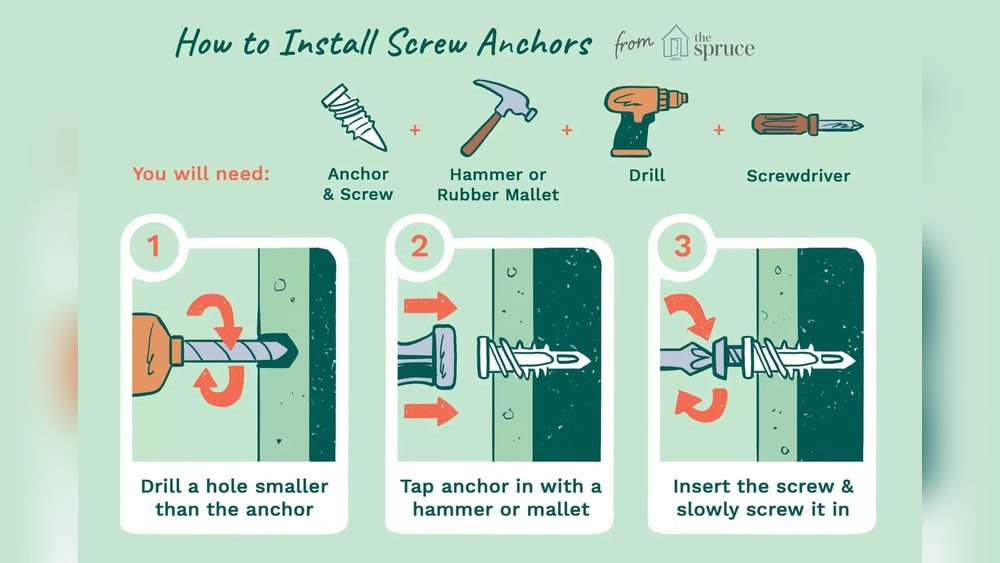
Install Anchors Properly
Follow the instructions carefully during installation. Make sure the hole is the right size. Insert the anchor straight and not at an angle.
Don’t Overload The Anchor
Each anchor has a weight limit. Avoid hanging items heavier than the anchor’s rating. Overloading can cause the anchor to pull out.
Use Quality Anchors
Buy anchors from trusted brands. Cheap anchors may break or fail. Investing in quality ensures better hold and durability.
Regularly Check Anchor Stability
Inspect anchors often, especially in high-use areas. Tighten screws if they become loose. Early detection stops wall damage.

Credit: diy.stackexchange.com
Frequently Asked Questions
How Do You Remove A Screw Anchor From Drywall?
To remove a screw anchor, first unscrew the screw. Use pliers to pull the anchor out gently. If it resists, push it deeper and patch the hole later.
Can I Reuse A Screw Anchor After Removal?
Most plastic anchors lose grip after removal. It is best to replace them with new anchors for secure mounting.
What Tools Do I Need To Extract Screw Anchors?
You need a screwdriver, needle-nose pliers, and possibly a drill. These tools help you unscrew and pull out anchors effectively.
How To Fix Holes After Removing Screw Anchors?
Fill the hole with spackle or wall filler. Let it dry, then sand smooth and repaint for a clean finish.
Conclusion
Removing a screw anchor from the wall can be simple with the right steps. Take your time and use the right tools carefully. Avoid damaging the wall by pulling gently and steadily. Small holes can be fixed with putty and paint later.
Practice patience, and soon the wall will look good as new. Knowing how to remove anchors helps keep your space neat and ready for new projects.