Are you worried about the security of your home or office? Changing the keys to your Kwikset deadbolt might be the simplest and smartest way to take control.
Imagine being able to stop old keys from working without replacing the entire lock. It saves you money and gives you peace of mind. In this guide, you’ll learn exactly how to rekey your Kwikset deadbolt step by step, even if you’ve never done it before.
By the end, you’ll feel confident and secure knowing only your keys can open your door. Keep reading to discover how easy it really is to protect what matters most.
Tools Needed
Rekeying a Kwikset deadbolt requires a few basic tools. These tools help you take apart the lock and change the pins inside. Having the right tools makes the job easier and faster.
Most tools are easy to find. You might already have some at home. Others are cheap and available at hardware stores.
Phillips Head Screwdriver
A Phillips head screwdriver is needed to remove the screws on the deadbolt. It fits the cross-shaped screw heads on most locks. This tool lets you open the lock housing safely.
Kwikset Rekeying Kit
A Kwikset rekeying kit contains special tools and new pins. It includes a plug follower, tweezers, and new pins for the lock. This kit matches the new key you want to use.
Flathead Screwdriver
A small flathead screwdriver helps to pry off parts gently. It can also assist in pushing out the lock cylinder. Use it carefully to avoid damage.
Tweezers
Tweezers are useful for handling small pins inside the lock. They help place pins correctly without dropping them. Precision is key when working with tiny parts.
New Keys
New keys come with the rekeying kit or can be cut separately. You need them to test the new pin setup. Make sure the keys work smoothly after rekeying.
Credit: www.homedepot.com
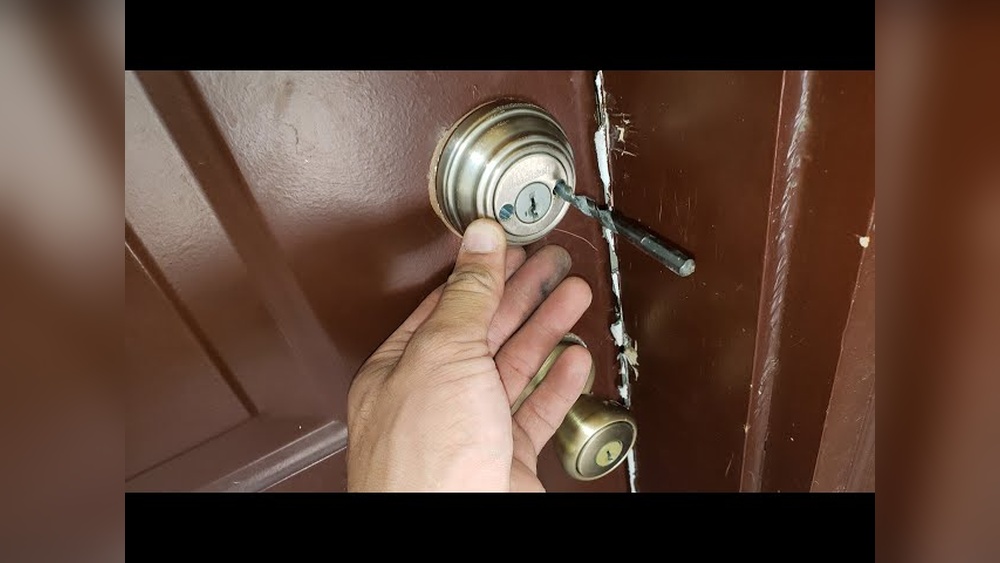
Remove The Deadbolt
Removing the deadbolt is the first step in rekeying a Kwikset lock. This process lets you access the inner parts of the lock. It is important to handle each part carefully to avoid damage.
Unscrew The Lock
Start by locating the screws on the interior side of the deadbolt. Use a screwdriver to remove these screws. Keep the screws safe for reassembly later. Once the screws are out, pull the interior lock piece away from the door. This exposes the deadbolt mechanism inside the door.
Separate The Lock Components
Gently remove the exterior lock cylinder by pulling it out. Sometimes, you may need to wiggle it slightly. After the cylinder is out, separate the deadbolt from the door edge. Check all parts and lay them out in order. This helps you remember where each piece goes during reassembly.
Take Out The Cylinder
Removing the cylinder is the first key step to rekey a Kwikset deadbolt. The cylinder holds the pins and the key mechanism inside the lock. Taking it out lets you change the pins to fit a new key. This step needs care and the right tools to avoid damage.
Gather Your Tools
You need a screwdriver, a new key, and the rekey kit. Most Kwikset kits include a follower tool and new pins. Have a clean workspace to keep small parts safe.
Remove The Deadbolt From The Door
Start by unscrewing the screws on the inside of the door. Pull the deadbolt apart carefully. Keep the screws in a safe place for reassembly later.
Locate The Cylinder Retaining Screw
Look on the side edge of the door. Find the long screw that holds the cylinder in place. Unscrew it fully. This allows the cylinder to slide out.
Slide Out The Cylinder
Insert the key into the lock and turn it slightly. Use the follower tool to push the cylinder out from the back. Do this slowly to keep the pins inside.
Disassemble The Cylinder
Disassembling the cylinder is the first step to rekey a Kwikset deadbolt. It lets you access the pins inside. These pins control which key works with the lock. Taking apart the cylinder carefully is important. You avoid damaging small parts that keep the lock secure.
Remove The Deadbolt From The Door
Start by opening the door. Find the screws on the inside part of the deadbolt. Use a screwdriver to take them out. Pull the deadbolt assembly away from the door. Set it on a flat surface for easy handling.
Unscrew The Cylinder Faceplate
Look at the front of the cylinder. There is a small faceplate held by screws. Remove these screws with a screwdriver. Take off the faceplate gently. This exposes the cylinder housing underneath.
Extract The Cylinder Plug
Insert the original key and turn it slightly. This unlocks the plug inside the cylinder. Use a plug follower tool or a small rod. Push the plug out carefully from the cylinder housing. Keep all pins from falling out.
Keep Track Of Pins And Springs
Inside the plug are tiny pins and springs. Lay them out in order on a clean surface. This helps you remember their positions. Losing or mixing pins can cause problems later.
Replace The Pins
Replacing the pins in a Kwikset deadbolt is a key step in rekeying. Pins control how the key turns inside the lock cylinder. Changing them ensures the lock works only with the new key. This process requires care and patience to avoid mistakes.
Match Pins To New Key
Start by comparing the new key’s cuts to the pin sizes. Each cut on the key matches a specific pin length. Use a pin chart or guide to find the right pins. Arrange the pins in order according to the key’s pattern. This step guarantees the lock aligns perfectly with the new key.
Insert Pins Carefully
Insert the pins one by one into the plug chambers. Make sure each pin sits fully inside without tilting. Use tweezers for better control and precision. Avoid forcing the pins; they must fit smoothly. Proper pin placement prevents lock jamming and ensures smooth turning.

Credit: www.youtube.com
Reassemble The Cylinder
Reassembling the cylinder is a key step after changing the pins inside your Kwikset deadbolt. It puts all parts back together so the lock works smoothly with your new key. Take your time to avoid mistakes that could jam the lock or cause it to fail.
Start by placing the plug back into the cylinder housing carefully. Align the pins inside the plug with the holes in the cylinder. This alignment is crucial for the lock to turn correctly.
Insert The Plug Into The Cylinder Housing
Hold the plug so the keyway faces outward. Slowly slide it into the cylinder housing. Make sure the pins stay in place and do not fall out. Push gently until the plug fits snugly inside.
Replace The Retaining Clip
Find the small retaining clip that holds the plug in the cylinder. Use needle-nose pliers to snap the clip back onto the groove. This clip keeps the plug secure and prevents it from sliding out.
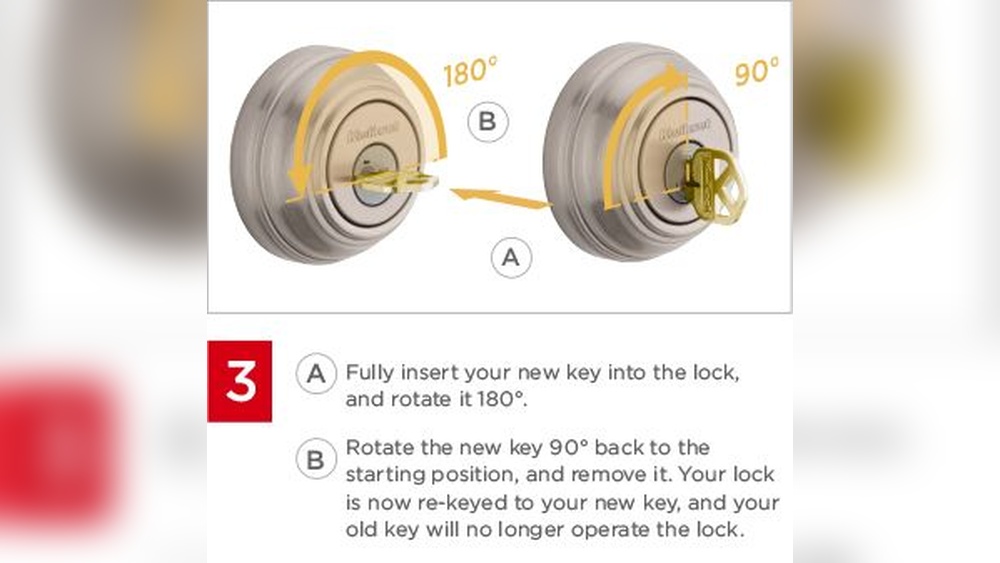
Test The Lock Operation
Insert the new key into the reassembled cylinder. Turn the key slowly to check if the lock rotates smoothly. If it feels stuck, remove the plug and check pin alignment again.
Reinstall The Deadbolt
Reinstalling the Kwikset deadbolt is the final step in the rekeying process. This step ensures your lock works smoothly with the new key. Proper installation keeps your door secure and your lock functioning well.
Follow these simple steps to reinstall the deadbolt correctly. Take your time and check each part carefully. A well-installed deadbolt provides reliable security for your home.
Align The Deadbolt With The Door
Place the deadbolt into the hole on the door edge. Make sure the bolt moves freely when you slide it. The bolt should fit snugly and not stick or jam.
Attach The Exterior And Interior Parts
Put the exterior side of the lock on the outside of the door. Hold the interior part on the inside. Line up the screws with the holes through the door.
Secure The Screws
Insert the screws and tighten them with a screwdriver. Do not overtighten to avoid damaging the lock. Tighten until the lock feels firm and stable.
Test The Lock
Turn the key on the outside to check the bolt moves smoothly. Use the thumb turn on the inside to lock and unlock. Test multiple times to confirm correct installation.

Credit: www.ifixit.com
Test The New Key
Testing the new key after rekeying your Kwikset deadbolt is important. It confirms the lock works smoothly. This step ensures your home stays secure and the key fits perfectly.
Try the new key several times. Insert it gently and turn the lock in both directions. The lock should turn without sticking or resistance.
Check the door lock from outside and inside. The key must work from both sides. This prevents surprises later on.
Test the key under different conditions. Try turning the lock with the door open and closed. This helps catch any alignment issues.
Insert And Turn The New Key
Place the new key into the keyhole carefully. Turn it slowly to the locked and unlocked positions. Feel for smooth movement and no resistance.
Test The Lock From Both Sides
Use the new key on the outside keyhole. Then, test the thumb turn or key on the inside. Make sure both work correctly.
Check Lock Operation With Door Open And Closed
Operate the lock with the door open first. Then close the door and try again. The lock should work without sticking in either case.
Repeat Testing Multiple Times
Test the new key several times in a row. Consistent smooth turning means successful rekeying. Any issues might need adjustment.
Troubleshooting Tips
Troubles can happen while rekeying a Kwikset deadbolt. Simple steps often fix most problems. Being patient helps solve issues faster. Below are common problems and easy solutions.
Check Key Alignment
Keys must line up perfectly with the pins inside the lock. If the key feels stuck or won’t turn, check its position. Gently wiggle the key while turning to find the right angle.
Inspect The Pin Placement
Wrong pin order can stop the lock from working. Make sure each pin matches the new key cuts. Use the guide that came with the rekeying kit to place pins correctly.
Clean The Lock Parts
Dirt or dust inside the lock causes jams. Blow out dust or use a small brush to clean parts. Clean locks work smoother and last longer.
Use The Correct Tools
Using wrong tools can damage lock parts. Always use tools made for Kwikset deadbolts. Proper tools make rekeying easier and safer.
Recheck The Springs
Small springs inside the lock push pins in place. If springs fall out or break, pins won’t move right. Replace or reposition springs before finishing.
Frequently Asked Questions
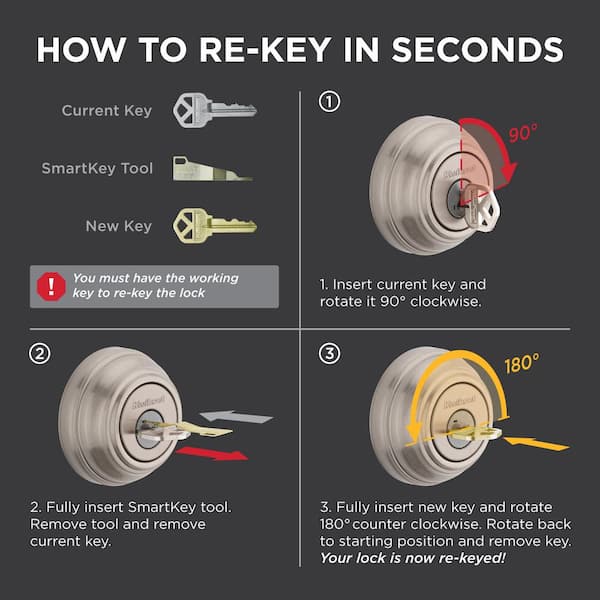
How Do You Rekey A Kwikset Deadbolt Quickly?
To rekey a Kwikset deadbolt quickly, remove the lock cylinder, use a key gauge, change the pins, and reassemble. Follow the instructions carefully to ensure the lock works smoothly with the new key. This process usually takes 15-30 minutes.
What Tools Are Needed To Rekey Kwikset Deadbolts?
You need a key gauge, a plug follower, a screwdriver, tweezers, and new pins. A Kwikset rekeying kit often includes these tools. Having the right tools helps you rekey the deadbolt efficiently and without damaging the lock.
Can I Rekey A Kwikset Deadbolt Without Removing It?
No, you must remove the lock cylinder to rekey a Kwikset deadbolt. Removing the cylinder allows access to the pins inside. Rekeying without removal is not possible and might damage the lock.
How Much Does It Cost To Rekey A Kwikset Deadbolt?
Rekeying a Kwikset deadbolt typically costs between $15 and $40 if done by a locksmith. DIY rekey kits cost around $10 to $20. Cost depends on whether you hire a professional or do it yourself.
Conclusion
Rekeying a Kwikset deadbolt is easier than it seems. With the right tools, anyone can do it at home. It saves money and gives you control over your keys. Just follow each step carefully and take your time. This small project helps keep your home safe.
Try it yourself and enjoy the peace of mind that comes with new keys.