Are you tired of having a useless light switch where you really need an outlet? Changing a light switch to an outlet can open up new possibilities for your space, making it easier to plug in devices exactly where you want.
You might think it’s complicated or risky, but with the right steps, you can do it yourself and save money. Keep reading, and you’ll discover a simple, clear guide that walks you through every part of the process safely and confidently.
By the end, you’ll have the power to transform your room and make your electrical setup work better for you.
Tools And Materials Needed
Changing a light switch to an outlet requires specific tools and materials. Having the right items ready makes the job easier and safer. This section covers what you need before starting.
Essential Tools
- Screwdriver set – flathead and Phillips
- Wire stripper – to remove insulation safely
- Voltage tester – checks if wires are live
- Pliers – for bending and twisting wires
- Utility knife – cuts wires and insulation
- Electrical tape – for securing wire connections
Required Materials
- Electrical outlet – choose the correct type and rating
- Outlet wall plate – matches the outlet style
- Wire nuts – connect wires securely
- Electrical box (if needed) – holds the outlet firmly
- Replacement wires – in case existing wires are damaged
Safety Gear
- Insulated gloves – protect hands from electric shock
- Safety goggles – guard eyes from sparks and debris
- Rubber-soled shoes – reduce risk of grounding
- Flashlight – helps see in dark spaces
Credit: www.oneprojectcloser.com
Preparing For The Project
Preparing for the project is an important step before changing a light switch to an outlet. It helps ensure safety and smooth work. Taking time to prepare lowers risks and makes the process easier. This section explains the first steps to get ready.
Turning Off Power
Safety starts with turning off the power. Find the main circuit breaker or fuse box. Switch off the breaker that controls the room where you work. This cuts electricity to the switch. Avoid working on live wires. Double-check the power is off before proceeding.
Testing For Electricity
Use a voltage tester to check for electricity. Touch the tester to the switch wires. If the tester lights up or beeps, power is still on. Test all wires to be sure. Never trust the breaker alone. Confirming no electricity flows protects you from shocks.
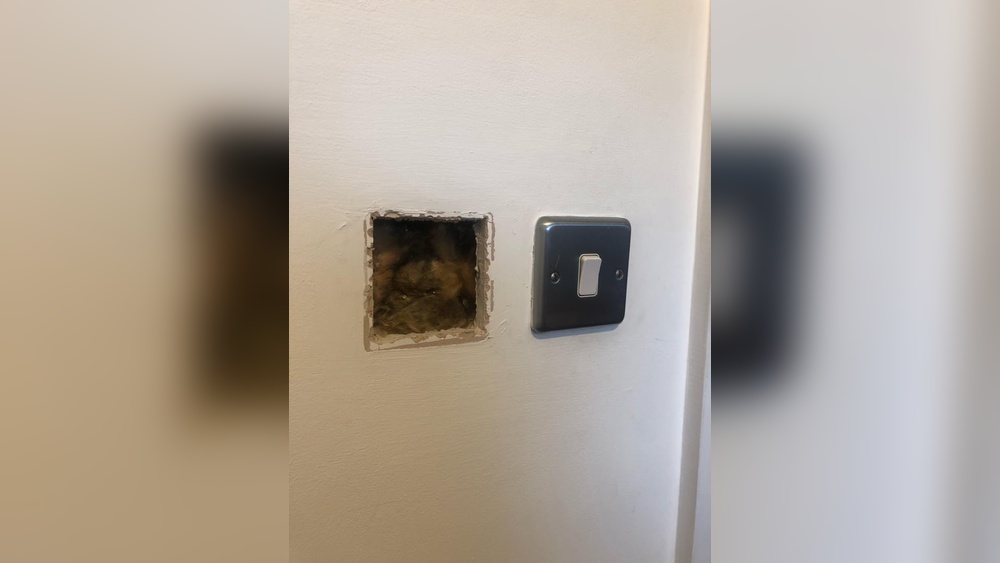
Removing The Switch Cover
Remove the switch cover plate carefully. Use a screwdriver to take out screws. Keep the screws in a safe place. Gently pull the cover away from the wall. Avoid damaging the wall or wires. This step gives access to the switch for the next work.
Identifying Wiring Types
Before changing a light switch to an outlet, know the wiring type. Different wiring setups need different steps. Identifying wiring helps avoid mistakes and keeps you safe. Check the wires carefully. Know what each wire does. This knowledge makes the swap easier and safer.
Single-pole Switch Wiring
A single-pole switch controls one light or device. It has two wires connected to the switch. One wire brings power in. The other wire sends power out to the light. Usually, these wires are black or red. A white wire may be present but not connected to the switch. This setup is simple and common in homes.
Three-way Switch Wiring
Three-way switches control one light from two places. These switches have more wires. You will see two traveler wires plus a common wire. Traveler wires are often red and black. The common wire is usually black or dark colored. This wiring is more complex than single-pole. Identifying the common wire is key before making changes.
Ground Wire Importance
Ground wires keep you safe from electric shocks. They are usually green or bare copper. Every switch and outlet should connect to a ground wire. This wire directs extra electricity safely into the ground. Always check for a ground wire before swapping switches. Missing ground connection can cause safety problems.

Credit: www.youtube.com
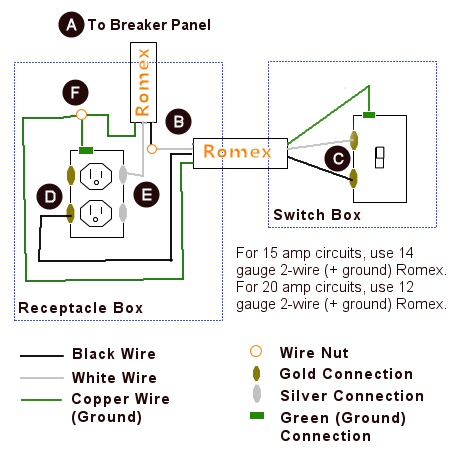
Wiring The Outlet
Wiring the outlet is a key step in changing a light switch to an outlet. It requires careful connection of wires to ensure safety and proper function. Follow each step closely to avoid mistakes. Use tools like a screwdriver and wire stripper for best results.
Connecting Hot And Neutral Wires
Identify the hot wire; it is usually black or red. Connect it to the brass-colored screw on the outlet. The neutral wire is typically white. Attach it to the silver-colored screw. Make sure wires are secure and no strands are loose. Tighten screws firmly to hold wires in place.
Attaching The Ground Wire
The ground wire is either green or bare copper. Connect it to the green grounding screw on the outlet. This wire helps prevent electrical shocks. Ensure it wraps around the screw in a clockwise direction. Tighten the screw to keep the ground wire secure.
Securing The Outlet
Carefully push the wired outlet back into the electrical box. Avoid pinching or loosening any wires. Use screws to fasten the outlet to the box. The outlet should sit flush with the wall. Attach the cover plate to complete the installation.
Finishing Touches
Finishing touches are key to a neat, safe electrical update. After wiring the outlet, the final steps ensure everything works well and looks good. These steps also help protect your new outlet and prevent accidents. Follow this guide carefully to complete your project with confidence.
Installing Outlet Cover Plate
First, place the cover plate over the outlet. Align it carefully with the screw holes. Use a screwdriver to tighten the screws gently. Do not overtighten, or you may crack the plate. The cover plate keeps the wiring safe and gives a clean look.
Restoring Power
Go to your circuit breaker panel. Switch the power back on to the outlet’s circuit. Ensure the breaker clicks into the ON position. Restoring power activates the new outlet. Be cautious and avoid touching wires while doing this step.
Testing The Outlet
Use a plug-in tester or a small appliance. Insert it into the new outlet to check power. Confirm the device turns on or the tester shows correct wiring. If the outlet does not work, switch off power and recheck connections. Testing guarantees your work is safe and functional.

Credit: bratcherelectric.com
Common Mistakes To Avoid
Changing a light switch to an outlet may seem simple. Mistakes can cause problems or even danger. Avoid common errors to keep your project safe and effective. Pay close attention to wiring, safety, and outlet limits. These steps help you avoid costly or risky issues.
Incorrect Wiring Connections
Connecting wires incorrectly can stop the outlet from working. It may cause sparks or short circuits. Match wires by color and function carefully. Use a voltage tester to check wires before touching. Follow the wiring diagram for your outlet type. Double-check all connections before closing the box.
Ignoring Safety Precautions
Safety is crucial when working with electricity. Always turn off power at the breaker panel. Use insulated tools to avoid shocks. Wear gloves and safety glasses for protection. Never work on live wires. Test the power with a tester to be sure it is off. Skipping safety steps can cause injury or worse.
Overloading The Outlet
Outlets have limits on how much power they handle. Plugging too many devices can overload and cause fires. Know the outlet’s amp rating before use. Avoid connecting high-power appliances to the new outlet. Use circuit breakers and fuses to protect your wiring. Keep the total load within safe limits for your home.
When To Call A Professional
Changing a light switch to an outlet can seem simple. Yet, some tasks need expert help. Knowing when to call a professional ensures safety and proper work. Electricity is dangerous without the right skills. Mistakes can cause shocks or fires. Here are signs you should hire a pro.
Complex Wiring Or Old Electrical Systems
Old homes may have outdated wiring. Complex wiring can confuse even skilled DIYers. Professionals understand different wiring types and rules. They ensure the outlet works safely without damage.
No Knowledge Of Electrical Codes
Electrical codes vary by area. A pro knows local rules and standards. This prevents issues during home inspections. Proper code adherence keeps your home safe and legal.
Uncertainty About Power Shutoff
Turning off power before work is crucial. Not knowing how to do this is risky. Professionals can safely disconnect power. They avoid electrical shocks or accidents.
Need For Ground Fault Circuit Interrupter (gfci) Outlet
Bathrooms and kitchens need GFCI outlets. Installing them requires special skills. A pro installs GFCI correctly to protect from shocks. This is important near water sources.
Signs Of Electrical Problems
Buzzing sounds, sparks, or burning smells mean trouble. These signs show wiring issues or overloads. A professional can diagnose and fix these safely.
Frequently Asked Questions
How Do I Safely Change A Light Switch To An Outlet?
First, turn off the power at the breaker. Confirm with a voltage tester. Remove the switch, disconnect wires, and connect them to the outlet terminals. Ensure grounding is correct. Finally, secure the outlet and restore power.
What Tools Are Needed To Convert A Switch To An Outlet?
You need a screwdriver, voltage tester, wire stripper, outlet, wire nuts, and electrical tape. These tools help ensure a safe and proper installation.
Can I Replace A Single-pole Switch With A Standard Outlet?
Yes, you can replace a single-pole switch with a standard outlet by properly wiring the hot, neutral, and ground wires to the outlet terminals.
Is It Necessary To Check Local Electrical Codes For This Change?
Yes, always check local electrical codes before modifying electrical fixtures. Compliance ensures safety and prevents legal issues.
Conclusion
Changing a light switch to an outlet can save space and add convenience. Always turn off the power before starting any work. Follow safety steps carefully to avoid accidents. Using the right tools makes the job easier and faster. If unsure, ask a professional for help.
With patience and care, you can complete this task successfully. This simple change can improve your room’s functionality. Give it a try and enjoy the benefits of an extra outlet.