Are you struggling to connect your drainage outlet to your retaining wall properly? Getting this right is crucial to prevent water damage and keep your outdoor space safe and sturdy.
In this guide, you’ll discover simple, step-by-step instructions that make the process clear and easy. By following these tips, you’ll save time, avoid costly mistakes, and protect your property from drainage problems. Keep reading to learn exactly how to hook up your drainage outlet to your retaining wall like a pro.

Credit: dallcon.com.au
Choosing The Right Materials
Choosing the right materials is key for hooking up a drainage outlet to a retaining wall. Proper materials ensure durability, safety, and effective water flow. Using wrong materials can cause leaks and damage. The right choices make the installation easier and last longer.
Types Of Drainage Outlets
Drainage outlets come in various types. Common ones include pipe outlets, weep holes, and grate outlets. Pipe outlets carry water through pipes to a safe area. Weep holes let water seep out slowly behind the wall. Grate outlets cover openings to stop debris from entering. Pick a type that suits your wall and water flow needs.
Selecting Retaining Wall Materials
Retaining walls use materials like concrete blocks, natural stone, or timber. Concrete blocks are strong and easy to shape. Natural stone gives a classic look but needs careful fitting. Timber is cheaper but less durable and may rot over time. Choose materials that match your landscape and hold back soil well. Also, consider how the drainage outlet fits with the wall material.
Tools Needed For Installation
Simple tools help install the drainage outlet properly. You will need a drill to make holes for pipes or weep holes. A saw cuts materials to size. A level checks if the wall and outlet are straight. Measuring tape ensures correct outlet placement. Use gloves and safety glasses for protection. Having the right tools saves time and prevents errors.

Credit: www.youtube.com
Preparing The Site
Preparing the site is the first step to hook up a drainage outlet retaining wall. It sets the stage for a strong and effective installation. Proper preparation helps avoid future problems like water pooling or wall damage. Focus on clearing the area, measuring and marking, and ensuring the right slope.
Clearing The Area
Start by removing all debris, plants, and loose soil near the wall. Clear space allows easy access and a clean working surface. Remove roots and rocks that might block drainage or weaken the wall’s base. Keep the area tidy to work safely and efficiently.
Measuring And Marking
Measure the space for the drainage outlet carefully. Use a tape measure to mark exact points on the wall and ground. Mark where the outlet will connect to the drainage system. Clear markings guide precise cuts and reduce mistakes during installation.
Ensuring Proper Slope
Check the slope of the ground where water will flow. The slope should lead water away from the wall and foundation. A gentle slope helps prevent water buildup and soil erosion. Use a level tool to confirm the correct angle before installing the outlet.
Installing The Drainage Outlet
Installing the drainage outlet is a key step in building a retaining wall that lasts. It helps water flow away from the wall, preventing damage and erosion. This section guides you through the main parts of installing the outlet properly.
Positioning The Outlet
Start by choosing the right spot for the outlet. It should be near the base of the wall where water collects. Make sure the outlet is level and faces away from the wall. This allows water to escape easily. Mark the position clearly before cutting or digging.
Securing The Outlet In Place
Place the outlet into the hole or slot you made. Use concrete or strong mortar around the edges to hold it firmly. Check that it does not move or wobble. Let the material dry completely. A secure outlet stays fixed even under water pressure.
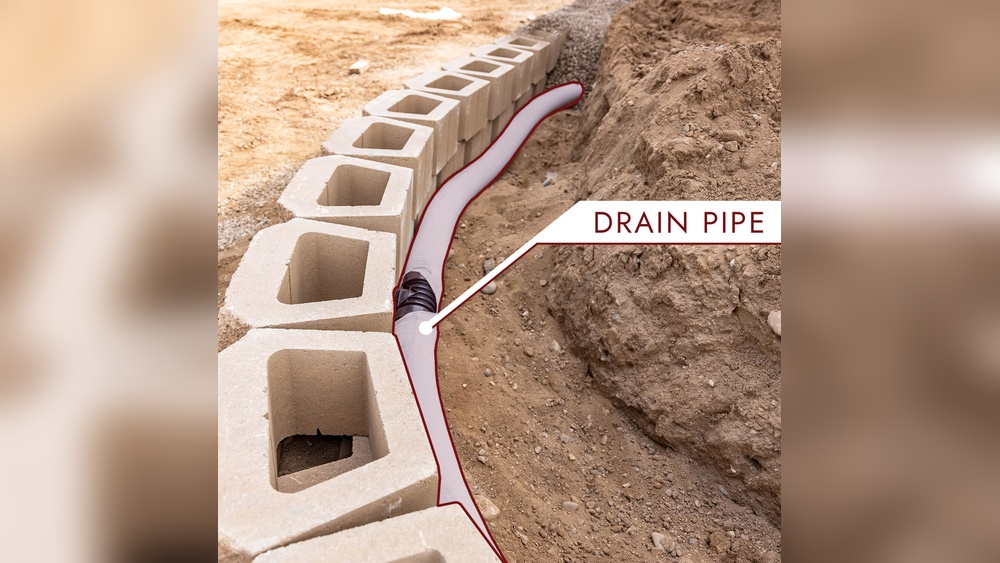
Connecting Drain Pipes
Attach the drain pipes to the outlet tightly. Use pipe glue or sealant for a watertight fit. The pipes should lead water away from the wall and foundation. Keep the pipes sloped downward to help water flow. Check all connections for leaks before finishing.
Building The Retaining Wall
Building a retaining wall is a key step in managing soil and water flow. A strong wall holds back earth and prevents erosion. Proper construction ensures long-lasting performance. Follow clear steps to build a solid retaining wall with a drainage outlet.
Laying The Foundation
Start by digging a trench below ground level. The trench should be wide and deep enough for a stable base. Fill it with gravel or crushed stone. Compact the material well to create a firm foundation. This base supports the weight of the wall and stops shifting.
Stacking Wall Materials
Choose durable materials such as concrete blocks, bricks, or stones. Lay the first row carefully on the foundation. Use a level to keep the row straight and even. Stack each layer with staggered joints for strength. Apply construction adhesive or mortar as needed. Keep the wall height within safe limits.
Incorporating Drainage Features
Drainage prevents water pressure behind the wall. Place a perforated pipe at the base, behind the wall. Surround the pipe with gravel for better water flow. Cover the gravel with landscape fabric to stop soil clogging. Add drainage holes or weep holes in the wall. Proper drainage protects the wall from damage.
Sealing And Finishing Touches
Sealing and finishing touches are key to a strong drainage outlet on your retaining wall. These steps protect the structure from water damage. They also help keep the wall stable and durable. Proper sealing stops leaks and prevents soil erosion. Finishing touches give the project a neat, professional look.
Applying Sealants
Choose a sealant made for outdoor use and water resistance. Apply it evenly along the joint where the outlet meets the wall. Use a brush or caulking gun for smooth coverage. Let the sealant dry fully before moving on. This step stops water from seeping behind the wall.
Adding Backfill And Compacting
Backfill the area around the drainage outlet with gravel or soil. Add it in small layers for better control. Compact each layer firmly using a tamper or shovel end. Well-compacted backfill supports the wall and improves water flow. Avoid leaving gaps that water can wash away.
Testing Drainage Functionality
Pour water near the outlet to check for leaks. Watch how water flows through the drainage system. The water should move away quickly and not pool. Fix any leaks by applying more sealant or adjusting backfill. Testing ensures your drainage works well under real conditions.
Maintenance Tips
Maintaining a drainage outlet retaining wall is key to its long life. Proper care stops problems early. Follow these simple tips to keep your wall working well and looking good.
Regular Inspection
Check the wall often for cracks or loose stones. Look for signs of water pooling or erosion. Early spotting of issues helps prevent big repairs later. Set a schedule to inspect the wall every few months.
Clearing Debris
Remove leaves, dirt, and other debris from the drainage outlet. Blocked outlets cause water to build up behind the wall. Use a small brush or hose to clear away dirt. Keep the area clean to ensure smooth water flow.
Repairing Damages
Fix cracks and loose parts quickly to avoid bigger damage. Use mortar or concrete to seal small cracks. Replace broken stones or bricks as soon as possible. Timely repairs keep the wall strong and safe.

Credit: elitefoundationrepairs.com
Frequently Asked Questions
What Materials Are Needed For Drainage Outlet Retaining Walls?
You need gravel, perforated pipes, geotextile fabric, concrete blocks, and sealant. These materials ensure proper drainage and wall stability.
How Do I Connect Drainage Pipes To Retaining Walls?
Use perforated pipes behind the wall base. Connect pipes to drainage outlets with watertight fittings to prevent leaks and soil erosion.
Why Is Proper Drainage Important For Retaining Walls?
Proper drainage prevents water buildup, reducing pressure on the wall. This avoids cracks and wall failure, extending its lifespan.
Can I Install Drainage Outlets Myself?
Yes, with basic tools and knowledge. Follow guidelines for pipe placement and sealing to ensure effective drainage and wall safety.
Conclusion
Properly hooking up a drainage outlet retaining wall keeps water flow smooth. It helps avoid water damage and soil erosion near your wall. Using the right tools and following clear steps makes the job easier. Check connections often to ensure they stay tight and leak-free.
A well-installed drainage system protects both your wall and landscape. Take your time and work carefully for the best results. This simple effort saves money and trouble later. Good drainage means a stronger, longer-lasting retaining wall.