Have you ever wished you could control one light from two different switches? Maybe you want to turn on a hallway light from both ends, or control a room’s main light without getting up.
Connecting two light switches to one light might sound tricky, but with the right steps, you can do it yourself. In this guide, you’ll discover simple and clear instructions that make this project easy, even if you’re not an expert.
Keep reading, and you’ll soon have full control over your lighting with just a flip of a switch—no electrician needed.
Tools And Materials Needed
Before starting to connect two light switches to one light, gather all tools and materials. Having everything ready makes the work easier and safer. This section lists the essential items needed for this electrical project.
Basic Tools
You will need a screwdriver set with flathead and Phillips tips. A wire stripper is important to remove insulation from wires. A voltage tester helps check if wires carry electricity. Needle-nose pliers assist in bending and holding wires.
Electrical Materials
Use two single-pole light switches designed for household wiring. Get electrical wire with the right gauge, usually 14 or 12 gauge. Wire nuts or connectors secure wire joints safely. Electrical tape provides extra insulation and protection.
Safety Gear
Wear insulated gloves to avoid electric shock. Safety goggles protect eyes from sparks or debris. Use a sturdy ladder if switches are high on the wall. Turn off power at the circuit breaker before starting work.
Types Of Light Switches
Understanding the types of light switches helps to connect two switches to one light. Different switches have different wiring and uses. Choosing the right switch makes the connection easier and safer.
Single-pole Switch
A single-pole switch controls one light or set of lights from one location. It has two terminals and a simple on/off function. This switch is common in most homes for basic lighting control.
Single-pole switches are easy to install and understand. They cannot control a light from two places. This limits their use in rooms with multiple entrances or large spaces.
Three-way Switch
A three-way switch allows control of one light from two different locations. It has three terminals: one common and two travelers. This setup lets you turn the light on or off from either switch.
Three-way switches are perfect for hallways or large rooms. They require special wiring between the two switches. Learning the wiring method is key to a successful connection.
Safety Precautions
Working with electrical wiring can be risky without proper safety measures. Taking safety precautions protects you and your home from electrical hazards. Before starting any wiring project, prioritize safety.
Turn Off The Power
Switch off the main power supply at the circuit breaker. Confirm the power is off by testing the switch with a voltage tester. Never work on live wires to avoid electric shock.
Use Proper Tools
Use insulated tools designed for electrical work. Avoid using damaged or worn-out equipment. Proper tools reduce the risk of accidents and make the job easier.
Wear Safety Gear
Wear rubber-soled shoes and insulated gloves. Safety glasses protect your eyes from sparks and debris. Dress appropriately to minimize risk during wiring.
Follow Wiring Codes
Check local electrical codes before starting the project. Use the correct wire type and size for your installation. Following codes ensures safe and legal wiring.
Double-check Connections
Verify all wire connections are tight and secure. Loose connections can cause shorts or fires. Take your time to ensure every wire is correctly attached.

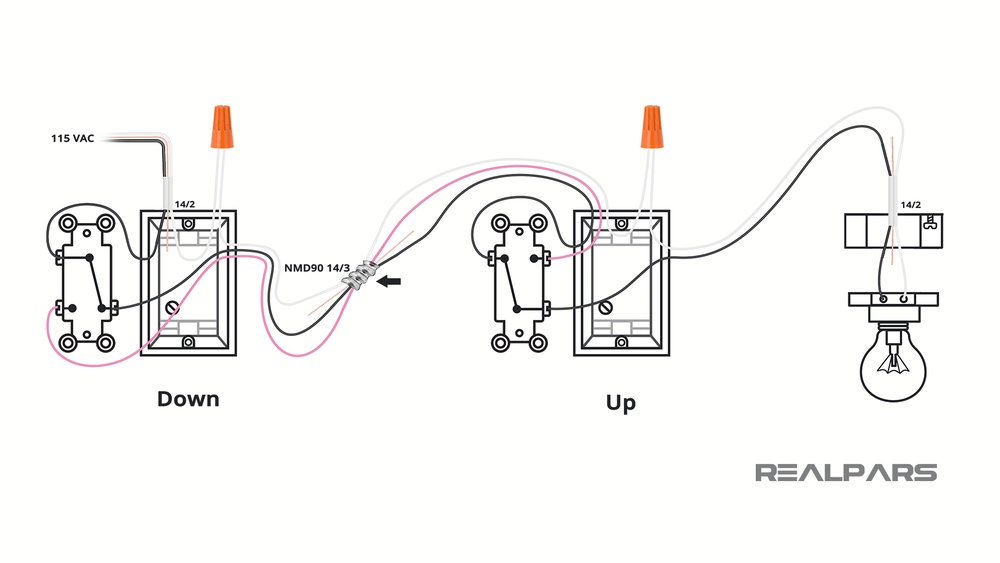
Credit: www.realpars.com
Wiring Basics
Wiring basics are important to connect two light switches to one light safely. Understanding simple wiring helps avoid mistakes. It makes the process clear and straightforward. Learning these basics prepares you for the steps ahead.
Start by knowing how circuits work in homes. Then, identify the wires correctly. This knowledge ensures proper connections and safe use of your switches.
Understanding Circuit Wiring
Electric circuits carry current from the power source to the light. Switches control this flow by opening or closing the circuit. In a two-switch setup, the circuit splits to allow control from both places.
The power comes into the first switch and travels to the second switch. From there, it goes to the light fixture. This setup is called a “three-way switch” circuit.
Each switch has three terminals. One is for the power input, and two are for traveler wires. These traveler wires connect the two switches and share current.
Identifying Wires
Wires come in different colors for easy identification. Black or red wires usually carry power. White wires are neutral and complete the circuit. Green or bare wires are for grounding.
Traveler wires between switches are often red or black. Use a tester to check which wire carries power. Label wires before disconnecting old switches. This step helps prevent confusion later.
Correct wire identification keeps you safe. It also ensures the switches work correctly with the light.
Step-by-step Wiring Process
Connecting two light switches to control one light is a common electrical task. It allows you to operate the same light from different locations. Follow this step-by-step wiring process carefully. Safety is the top priority. Each step guides you through the wiring with clear instructions.
Turn Off Power
Before starting, switch off the power at the main circuit breaker. Use a voltage tester to check the wires. Confirm the power is off to avoid electric shock. Safety cannot be ignored in electrical work.
Prepare The Switch Boxes
Remove the old switches and clear the boxes. Check that wires are long enough to work with. Strip about half an inch of insulation from each wire end. Organize the wires for easy access and connection.
Connect The First Switch
Identify the common terminal on the switch. Attach the power (hot) wire to this terminal. Connect the traveler wires to the other two terminals. Tighten the screws firmly for a solid connection. Make sure no wires touch each other.
Connect The Second Switch
Repeat the same steps for the second switch. Attach the traveler wires to the traveler terminals. Connect the wire going to the light fixture to the common terminal. Double-check all connections before moving on.
Wire The Light Fixture
Connect the light fixture’s hot wire to the switch wire. Join the neutral wires together with a wire nut. Attach the ground wires to the grounding screws. Secure all connections inside the boxes. Restore power and test the switches to ensure they work properly.
Credit: www.reddit.com
Testing The Connection
Testing the connection is a vital step after wiring two switches to one light. It ensures the setup works safely and correctly. This process confirms both switches control the light without issues. Careful testing helps avoid future electrical problems and hazards.
Turn Off The Power
Start by turning off the power at the circuit breaker. This step protects you from electric shock. Never test wiring with the power on. Safety must always come first.
Use A Voltage Tester
Check the wires using a voltage tester. It tells you if electricity flows through the circuit. Test all wires connected to the switches and light fixture. The tester confirms correct wiring before powering up.
Restore Power And Test Switches
Turn the power back on at the breaker. Flip each switch to see if the light turns on and off. Both switches should work independently. Test multiple times to ensure reliable operation.
Check For Flickering Or Delays
Observe the light closely for flickering or delays. These signs may indicate loose wiring or poor connections. Tighten any loose screws or wires if needed. A steady light means a solid connection.
Turn Off Power Before Final Adjustments
Switch off the power again before fixing any issues. Never handle live wires. Make all adjustments safely and carefully. Then, repeat the testing steps to confirm the fix.
Common Issues And Fixes
Connecting two light switches to one light can be tricky. Some common problems may stop the light from working properly. Knowing these issues helps fix them quickly. This saves time and makes your home safer.
Incorrect Wiring Connections
One common problem is wrong wiring. Switches need proper wires connected to the right terminals. Wrong connections cause the light to stay off or flicker. Always check which wire goes where before starting. Use a tester to find live and neutral wires.
Loose Or Damaged Wires
Loose wires can break the connection. This causes the light to turn on and off randomly. Damaged wires also cause sparks or no light. Tighten all wire screws and replace any broken wires. Safety first—turn off power before checking wires.
Faulty Switches
Switches wear out over time. A broken switch stops the light from working. Test each switch by turning it on and off. Replace any switch that feels loose or does not click properly. Use switches designed for two-way control.
Incorrect Switch Type
Using the wrong switch type is common. Standard single-pole switches do not work for two switches. Use two-way or three-way switches for this setup. Check the packaging or label before buying switches.
No Power To The Circuit
Sometimes, the power supply is the problem. A tripped breaker or blown fuse cuts power to the light. Check your electrical panel for any tripped switches. Reset the breaker or replace the fuse if needed.

Credit: diy.stackexchange.com
Frequently Asked Questions
How Do Two Switches Control One Light?
Two switches can control one light using a three-way switch setup. This allows either switch to turn the light on or off independently.
What Tools Are Needed For Wiring Two Switches?
You need a screwdriver, wire stripper, voltage tester, electrical tape, and 3-wire cable to connect two switches to one light safely.
Can I Use Regular Switches For Two-switch Control?
No, you must use three-way switches designed for two-switch control of one light fixture.
Is It Safe To Connect Two Switches To One Light?
Yes, if you follow proper wiring guidelines and local electrical codes, the setup is safe and reliable.
Conclusion
Connecting two switches to one light can save time and effort. Follow the steps carefully to ensure safety and proper function. Use the right tools and check your wiring twice. This setup gives you control from different places in a room.
It also adds convenience to your daily life. Always turn off power before starting any electrical work. If unsure, ask a professional for help. Now you know how to connect two switches to one light easily. Give it a try and enjoy the convenience!