If you’re planning to install a deadbolt lock, one of the trickiest parts is drilling the perfect hole. Get it wrong, and you could damage your door or end up with a lock that doesn’t fit properly.
But don’t worry—this guide will walk you through every step, making the process simple and stress-free. By the time you finish reading, you’ll have the confidence to drill your deadbolt hole like a pro, saving time and avoiding costly mistakes.
Ready to secure your home with ease? Let’s dive in.

Credit: www.youtube.com
Tools And Materials Needed
Drilling a hole for a deadbolt requires the right tools and materials. Having everything ready makes the job faster and easier. It also helps to get a clean, precise hole for your lock.
Below are the key tools and materials needed to drill a deadbolt hole properly. Understanding these will prepare you for the task ahead.
Essential Drilling Tools
You need a power drill with a variable speed setting. A drill helps you create the hole quickly and accurately. Use a hole saw bit sized for your deadbolt, usually 2 1/8 inches. A spade bit or an auger bit can help with the latch hole. A tape measure and pencil are useful to mark the exact spot. A chisel can clean the edges for a perfect fit. A screwdriver is handy to install the lock later.
Types Of Deadbolts
Know your deadbolt type before drilling. Single-cylinder deadbolts use a key on the outside and a thumb turn inside. Double-cylinder deadbolts require a key on both sides. Some deadbolts need larger holes or extra drilling for the lock mechanism. Measure your deadbolt’s dimensions to match your drill bits. This step avoids mistakes and ensures a good fit.
Safety Gear
Safety is important when drilling. Wear safety glasses to protect your eyes from wood chips. Use ear protection to reduce noise from the drill. Gloves protect your hands from sharp tools and splinters. Work in a well-lit area to see clearly. Keep your workspace clean to avoid accidents. These simple safety steps keep you safe and focused.
Choosing The Right Location
Choosing the right location for your deadbolt hole is important. It affects the lock’s strength and how easy it is to use. A well-placed deadbolt can improve your door’s security and give you peace of mind. Take time to find the best spot before drilling.
Ideal Height For Deadbolt
The standard height for a deadbolt is about 6 to 12 inches above the door handle. This height keeps the lock easy to reach for most people. It also gives enough space between the deadbolt and the handle to avoid weakening the door. Mark this height clearly before starting.
Marking The Door
Mark the spot on the door where you want to drill the hole. Use a pencil and a ruler to make a precise mark. Check both sides of the door to ensure the hole will be straight. Double-check the mark before drilling to avoid mistakes.
Checking Door Thickness
Measure your door’s thickness before drilling. Most deadbolts fit doors that are 1 3/8 to 1 3/4 inches thick. If your door is thinner or thicker, you may need a special lock or extra parts. Knowing the thickness helps you choose the right deadbolt and tools.
Preparing The Door
Preparing the door is the first step to install a deadbolt correctly. Careful preparation helps to avoid mistakes and keeps the door strong. It involves measuring, marking, and setting up the door for drilling.
Measuring And Marking
Start by measuring the right height for the deadbolt. Usually, it is about 6 to 12 inches above the door handle. Use a tape measure and pencil to mark the spot clearly. Double-check the measurements to ensure accuracy. Mark the center point on the door edge and face. This helps guide your drill and keeps the hole straight.
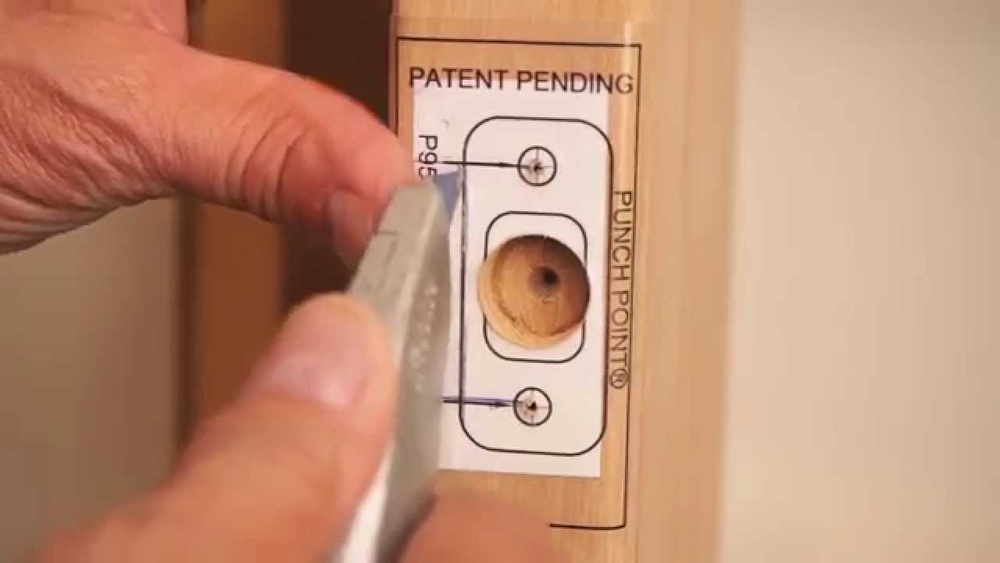
Using A Template
Most deadbolt kits come with a paper or cardboard template. Place the template on the door, aligning it with your marks. Tape it firmly to prevent slipping. The template shows where to drill the holes for the lock and latch. Follow the guide carefully to avoid drilling in the wrong place. This step saves time and reduces errors.
Setting Up For Drilling
Prepare your tools and workspace before drilling. Use a drill with the correct bit size for the deadbolt hole. Secure the door to stop it from moving while drilling. Wear safety glasses to protect your eyes from wood chips. Check that your drill is set to the right speed. Ready your drill and start with a small pilot hole. This helps to keep the drill steady and precise.

Credit: www.familyhandyman.com
Drilling The Face Bore
Drilling the face bore is a key step in installing a deadbolt. This hole allows the lock to fit securely into the door. Accuracy and care during this step ensure the lock works well and looks neat.
Start by preparing the door surface. Mark the exact spot for the hole. Use the right tools to get a clean, smooth bore. Avoid rushing to prevent mistakes that can damage the door.
Selecting The Drill Bit
Choose a drill bit that matches the deadbolt size. Most deadbolts need a 2 1/8 inch hole saw bit. Use a sharp bit to cut cleanly through the wood. Dull bits cause rough edges and extra effort.
Check the bit’s quality. High-speed steel or carbide bits last longer. They also make the drilling easier and faster.
Drilling Straight And Clean
Hold the drill perpendicular to the door surface. This keeps the hole straight. A tilted hole can stop the deadbolt from fitting properly.
Start drilling slowly to create a guide hole. Increase speed once the bit is steady. Keep the drill steady and apply even pressure.
Stop drilling once the bit passes through the door. Clean the hole edges with sandpaper for a smooth finish.
Avoiding Splintering
Splintering ruins the door’s look and weakens the wood. Place masking tape over the drilling spot. This holds wood fibers in place during drilling.
Drill from both sides of the door if possible. Drill halfway through one side, then finish from the other side. This method reduces splintering on both faces.
Use slow speed when the bit nears the exit side. This helps keep the wood intact and clean.
Drilling The Edge Bore
Drilling the edge bore is a key step when installing a deadbolt. This hole fits the latch and allows the lock to work smoothly. Accuracy here ensures the deadbolt fits tight and secure.
Focus on precision. Take time to align and drill carefully. A clean edge bore prevents problems later during installation.
Aligning The Drill
Place the drill bit exactly where the latch will go. Use a pencil mark on the door edge as a guide. Hold the drill straight and steady. Avoid tilting the drill to keep the hole even and centered.
Creating The Latch Hole
Start drilling slowly to avoid splintering the wood. Drill through the door edge to the marked depth. Use a hole saw or spade bit sized for the latch. Stop once you reach the right depth for the latch to fit.
Smoothing The Edges
Remove rough wood around the hole with sandpaper. Smooth edges help the latch slide in easily. Check for splinters or uneven spots. Clean edges improve the lock’s performance and durability.

Credit: www.reddit.com
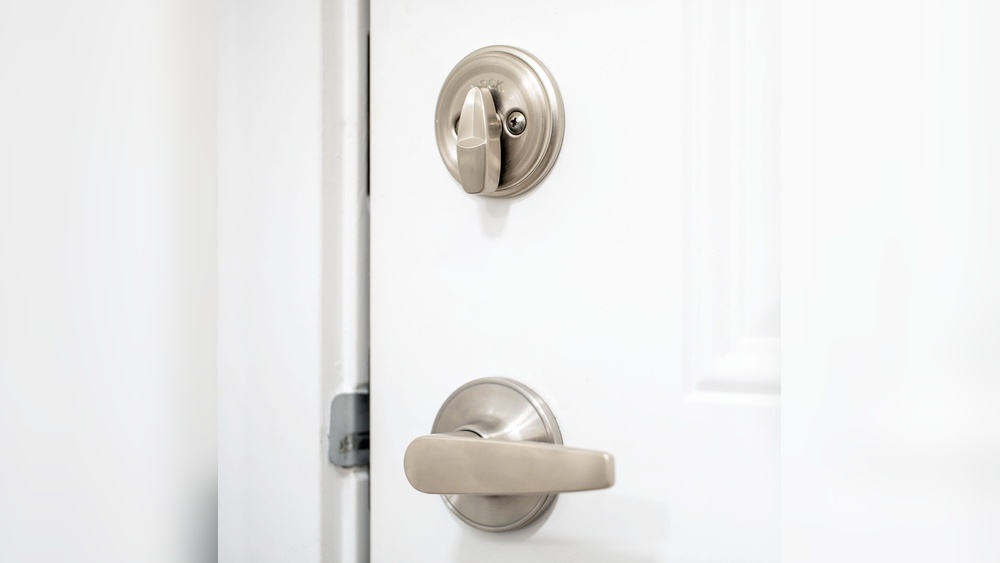
Installing The Deadbolt
Installing the deadbolt is an important step after drilling the hole. It ensures your door locks securely and works smoothly. Follow these simple steps to fit the parts correctly. Pay close attention to details for a proper fit and strong lock.
Fitting The Latch And Bolt
Start by inserting the latch into the hole on the edge of the door. Make sure the bolt faces the right way to lock the door. Push the latch in until it fits flush with the door edge. Check that the latch moves freely when you press it.
Attaching The Faceplate
Place the faceplate over the latch on the door edge. Align it so the screw holes match the drilled holes. Use screws to fasten the faceplate tightly. This keeps the latch secure and prevents it from moving.
Securing The Lock Mechanism
Insert the exterior and interior lock pieces into the big hole on the door. Connect the two parts through the latch mechanism. Use screws to attach the lock firmly on both sides. Test the lock by turning the thumb turn or key to ensure it works well.
Testing And Adjustments
After drilling the deadbolt hole, testing and adjusting the lock is crucial. This step ensures the lock works smoothly and fits properly. Small issues can cause big problems later. Taking time to test and make changes saves effort.
Checking Lock Functionality
Insert the deadbolt into the hole carefully. Turn the key or thumb turn to check movement. The bolt should slide in and out without sticking. Test locking and unlocking several times. Make sure the lock feels secure and smooth. Check both sides of the door for ease of use.
Adjusting Alignment
Look at the bolt and strike plate on the door frame. They must line up perfectly. If the bolt hits the plate, adjust the strike plate position. Loosen screws and move it slightly up, down, or sideways. Tighten screws and test the lock again. Repeat until the bolt moves freely.
Troubleshooting Common Issues
If the deadbolt sticks, check for wood splinters or debris. Clean the hole with sandpaper or a small file. If the lock is hard to turn, oil the mechanism lightly. Use graphite powder or a silicone spray. Avoid heavy oil that attracts dust. If the lock does not fit, re-check hole size and depth. Enlarge carefully with the drill if needed.
Tips For A Professional Finish
Achieving a professional finish after drilling a deadbolt hole makes your door look neat and strong. Small details help the lock fit well and last longer. Follow simple steps to improve the appearance and function of your door.
Using Wood Filler
Fill any rough edges or gaps around the hole with wood filler. Choose a filler that matches your door’s color. Apply it smoothly with a putty knife. Let it dry completely before sanding. Sand the area gently to make it flat and even. This step hides mistakes and protects the wood from moisture.
Painting Or Staining
After sanding, paint or stain the filled area to match the rest of the door. Use a small brush for careful application. This seals the wood and keeps it safe from damage. Choose paint or stain that suits your door’s material. Let the finish dry well before installing the lock.
Maintaining The Lock
Keep the deadbolt working smoothly by cleaning it regularly. Use a soft cloth to wipe dust and dirt. Apply a little lubricant to the keyhole and moving parts. Check screws and tighten if needed. Proper care extends the life of your lock and keeps your home secure.
Frequently Asked Questions
How Do You Measure For A Deadbolt Hole?
Measure 6 to 7 inches from the door edge for the deadbolt. Mark the center height for the lock hole. Use a template if available. Accurate measurement ensures proper alignment and functionality of the deadbolt.
What Drill Bit Size Is Needed For Deadbolts?
Typically, use a 2 1/8-inch hole saw for the main hole. For the latch hole on the edge, use a 1-inch spade bit. These sizes fit most standard deadbolt locks perfectly.
How Deep Should The Deadbolt Hole Be Drilled?
Drill the main hole through the entire door thickness. For the latch hole, drill to at least 1 inch deep. Proper depth ensures the deadbolt fits securely without sticking.
Can I Drill A Deadbolt Hole Without A Template?
Yes, but it requires precise measuring and marking. Use a ruler and pencil to mark the correct points. Templates simplify the process and reduce mistakes.
Conclusion
Drilling a deadbolt hole takes care and the right tools. Follow each step slowly and carefully. Measure twice to avoid mistakes. Keep your drill steady and take breaks if needed. Safety matters—always wear goggles and gloves. With patience, your door will be ready for a secure deadbolt.
This simple skill adds safety to your home. Practice makes the process easier next time. Now, you can confidently prepare your door for a new lock.