Have you ever wished you could add a light to your existing switch without rewiring your entire home? It might seem tricky, but you can do it yourself with the right steps.
Imagine walking into a room and easily finding the switch in the dark or giving your space a modern touch—all by simply adding a light to your switch. In this guide, you’ll learn exactly how to make this upgrade quickly and safely.
Keep reading, and you’ll discover simple tips that save you time, money, and hassle.

Credit: diy.stackexchange.com
Assess Your Current Switch Setup
Adding a light to an existing switch starts with understanding your current setup. This step is crucial to avoid mistakes and ensure the new light works properly. Take time to study the switch and wiring before starting any work.
Knowing what type of switch you have and how it is wired saves time and trouble. It also helps you pick the right tools and materials for the job.
Check Switch Type And Wiring
Look at the switch to find out its type. Common types include single-pole, three-way, and dimmer switches. Each type controls lights differently.
Turn off power at the breaker before removing the switch cover. Check the wires connected to the switch. Note their colors and positions. Take a photo for reference. This helps when adding a light.
Identify Power Source
Find the power source for the switch. It could come from the breaker box or another junction box. Knowing where power enters helps plan wiring for the new light.
Use a voltage tester to confirm power is off before touching wires. Test wires to see which carry power and which go to the light fixture.
Ensure Safety Precautions
Safety is key when working with electricity. Always turn off power at the main breaker. Use a voltage tester to double-check no electricity flows to the switch.
Wear insulated gloves and use tools with insulated handles. Keep the workspace dry and free of clutter. Follow local electrical codes and guidelines.
Choose The Right Light Fixture
Choosing the right light fixture is key when adding light to an existing switch. The fixture must fit the space and work well with your current wiring. Pick a fixture that matches your room’s style. This choice affects how your room feels and functions.
Consider Fixture Compatibility
Check if the fixture fits the switch and wiring type. Some fixtures need special wiring or dimmer switches. Measure the space to avoid a fixture that is too big or small. Ensure the fixture’s base matches your ceiling or wall mount.
Select Appropriate Bulb Type
Choose bulbs that fit the fixture’s sockets. LED bulbs use less energy and last longer. Some fixtures need specific bulbs, like halogen or CFL. Pick bulbs with the right brightness for the room’s use.
Plan For Energy Efficiency
Energy-saving fixtures reduce electricity bills. Look for fixtures rated for low energy use. LED fixtures are a smart choice for efficiency. Think about using timers or motion sensors to save more power.
Gather Necessary Tools And Materials
Before adding light to an existing switch, gather the right tools and materials. This step helps the work go smoothly and safely. Having everything ready saves time and avoids mistakes. Below are the key items you need for this project.
Essential Electrical Tools
Start with basic electrical tools. A screwdriver set is necessary for removing switch covers and securing wires. Wire strippers help remove insulation cleanly. A voltage tester ensures the power is off before work begins. Needle-nose pliers aid in bending and placing wires. Electrical tape secures wire connections safely.
Required Wiring Components
You will need new wiring components to add light to the switch. Use copper electrical wire that matches your home’s system. A light fixture or LED bulb is needed to provide illumination. Wire nuts connect wires securely and safely. Also, consider a light switch with a built-in indicator light for easy control.
Safety Gear Checklist
Safety gear protects you during electrical work. Use insulated gloves to prevent shocks. Safety goggles shield your eyes from dust and debris. Wear closed-toe shoes to protect your feet. A flashlight can help if the power is off and lighting is poor. Always work in a well-lit, dry area.
Turn Off Power And Test
Turning off the power before working on an existing switch is very important. It keeps you safe from electric shocks. Testing the switch ensures no electricity flows through the wires. This step prevents accidents and damage. Follow these simple steps to turn off power and test safely.
Locate Circuit Breaker
Find the circuit breaker box in your home. It is usually in the basement, garage, or utility room. Open the box carefully. Look for the switch that controls the power to the room with your switch. Flip the breaker to the off position. This stops electricity from reaching the switch.
Use Voltage Tester
Use a voltage tester to check if the power is off. A non-contact tester works best for safety. Hold the tester near the wires or switch terminals. If the tester lights up or beeps, power is still on. If not, it means no electricity is flowing. This tool confirms your safety before touching wires.
Confirm Power Is Off
Double-check the power is off by flipping the light switch. The connected light or device should not turn on. Test the voltage tester again on the wires. Make sure it shows no power. Only start working on the switch once you are sure power is off. Safety first. Always.
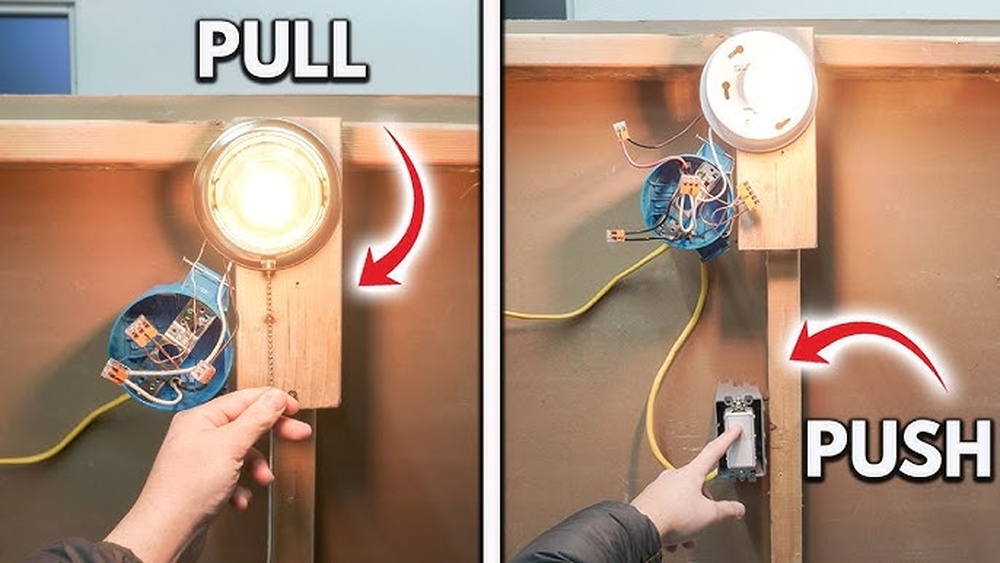
Connect New Light To Existing Switch
Connecting a new light to an existing switch is a common electrical task. It lets you control additional lighting from the same switch. This process requires careful work with wires and safety precautions. Follow clear steps to ensure a safe and effective connection.
Remove Switch Cover And Access Wiring
Start by turning off power at the breaker box. Use a screwdriver to remove the switch cover plate. Carefully pull the switch out from the wall box. This exposes the wiring behind the switch. Keep the wires in place and note their positions.
Identify Wiring Connections
Look for the black (hot), white (neutral), and ground wires. The black wire usually connects to the switch terminals. White wires may be bundled together in the box. The ground wire is often green or bare copper. Verify each wire to avoid mistakes.
Attach Wires To Light Fixture
Run a new cable from the switch box to the light fixture location. Connect the black wire from the switch to the black wire of the new light. Join the white neutral wire from the power source to the white wire of the fixture. Connect the ground wire to the fixture’s ground screw or wire.
Secure Connections With Wire Nuts
Twist wire ends together firmly before placing wire nuts. Use wire nuts that fit the wire size. Make sure no bare wire shows outside the nut. Tug gently to test if connections are tight. Push wires back into the box carefully.

Credit: www.do-it-yourself-help.com
Install And Mount The Light Fixture
Installing and mounting the light fixture is a key step in adding light to an existing switch. This step ensures the light source is stable and works properly. Proper installation keeps the fixture safe and looks good in your room.
Follow clear steps to position, secure, and prepare the fixture. This helps avoid common mistakes and ensures your light works well for a long time.
Position Fixture On Wall Or Ceiling
Choose the exact spot on the wall or ceiling for your fixture. Make sure it aligns with the switch you want to control. Use a pencil to mark the mounting holes. Check for any wires or pipes behind the surface before drilling. Proper positioning helps the light spread evenly in the room.
Fasten Fixture Securely
Use screws and anchors to fasten the fixture to the wall or ceiling. Tighten the screws firmly but do not over-tighten to avoid damage. The fixture must not wobble or feel loose. A securely mounted fixture is safe and lasts longer. Double-check the fixture after fastening to confirm stability.
Attach Bulb And Cover
Insert the correct bulb type and wattage into the fixture socket. Avoid bulbs that exceed the fixture’s recommended wattage. After placing the bulb, attach the cover or shade. The cover protects the bulb and softens the light. Ensure the cover fits well and stays in place. This step completes the look and function of your new light.
Restore Power And Test Light
Restoring power and testing the new light is the final step. It ensures your work is safe and the light works correctly. This step checks the connection and confirms everything is ready.
Switch On Circuit Breaker
Locate the circuit breaker panel in your home. Find the switch that controls the power to your light. Flip the switch to the ON position. This restores electricity to the switch and the light.
Be careful and make sure your hands are dry. Do not touch any wires or metal parts. Turning on the breaker safely provides power to your new light.
Test Light Operation
Go to the switch where you added the light. Flip the switch to turn the light on. The light should glow immediately if connected correctly.
Flip the switch off and on a few times. This confirms the switch works properly. If the light does not turn on, double-check your wiring.
Troubleshoot Common Issues
If the light does not turn on, check the circuit breaker again. Sometimes it trips and needs resetting. Make sure the bulb is screwed in tightly and is not burnt out.
Inspect all wire connections for loose or wrong connections. Use a voltage tester to check if power reaches the switch. Correct any mistakes before testing again.
Safety Tips And Best Practices
Adding light to an existing switch can improve your home’s lighting and convenience. Safety is very important during this process. Following the right safety tips and best practices helps prevent accidents and damage. This section covers key safety points to keep your project safe and effective.
Avoid Overloading Circuits
Do not connect too many lights or devices to one circuit. Overloading causes breakers to trip or wires to overheat. Check your circuit’s capacity before adding new lights. Spread loads across different circuits for safety and balance. Use a circuit tester to ensure the circuit can handle the extra load.
Use Proper Wire Gauges
Use wires that match the current and length needed. Thin wires can overheat and cause fire risks. For most home lighting, 14-gauge wire is standard. Thicker wire is needed for higher power or longer runs. Always check local electrical codes for wire requirements.
Consult A Professional When Needed
Some wiring tasks require expert knowledge. If unsure about wiring or safety, call a licensed electrician. Professionals ensure the work meets safety codes and functions correctly. They can also help with permits and inspections. Hiring a pro avoids risks and saves time in the long run.

Credit: www.finehomebuilding.com
Frequently Asked Questions
How Do I Add A Light To An Existing Switch?
Turn off power, connect the light fixture wires to the switch, and secure connections. Use a neutral wire if available. Test the setup before finishing.
Can I Add A Light Without Rewiring The Switch?
Yes, by using smart bulbs or wireless switches, you can add light without rewiring. These options are easy and safe for non-electricians.
What Tools Are Needed To Add Light To A Switch?
You need a screwdriver, wire stripper, voltage tester, electrical tape, wire nuts, and a light fixture. Always use insulated tools for safety.
Is It Safe To Add A Light To An Existing Switch?
Yes, if you turn off power and follow wiring codes carefully. Use a voltage tester to ensure safety and avoid electrical shocks.
Conclusion
Adding light to an existing switch can brighten your space easily. Follow clear steps and stay safe while working with electricity. Use the right tools and check connections twice. Small changes make a big difference in your home. Enjoy better lighting and more comfort every day.
Keep learning and improving your DIY skills. Simple updates can improve how your home feels and works. Start with one switch and see the results yourself.