Are you ready to learn how to hook up a wall outlet safely and easily? Whether you’re upgrading your home or fixing a loose socket, knowing the right steps can save you time, money, and frustration.
Imagine having the confidence to handle this task yourself, without needing to call an electrician every time. In this guide, you’ll find clear, simple instructions that anyone can follow. Stick with me, and by the end, you’ll have the skills to get your outlets working perfectly—and safely.
Let’s dive in!
Tools And Materials Needed
Before hooking up a wall outlet, gather the right tools and materials. This step ensures safety and smooth work. Having everything ready saves time and avoids mistakes.
Essential Tools
- Screwdriver (flathead and Phillips)
- Wire stripper
- Voltage tester
- Needle-nose pliers
- Electrical tape
- Wire cutters
- Flashlight or work light
Required Materials
- Wall outlet (receptacle)
- Electrical box
- Electrical wires (usually 12 or 14 gauge)
- Wire nuts
- Outlet cover plate
- Wire connectors
- Grounding wire (if needed)
Preparing For Installation
Preparing to hook up a wall outlet is an important step. It ensures safety and a smooth installation process. Taking time to prepare prevents accidents and mistakes. Follow these key steps before you start working on the outlet.
Turn Off Power
Safety comes first. Always turn off power at the circuit breaker. This stops electricity from flowing to the outlet. Use a voltage tester to check the outlet wires. Confirm no power is present before touching anything.
Working with live wires can cause shocks or fires. Turning off power protects you and your home. Never skip this step, even for quick fixes.
Check Wiring Compatibility
Not all wires and outlets match. Check the type of wiring in your wall. Look for copper or aluminum wires. Make sure the outlet you buy supports these wires.
Look at the wire colors too. Usually, black or red is hot, white is neutral, and green or bare is ground. Match these wires correctly to the outlet terminals. Wrong connections can cause damage or hazards.
Read the outlet instructions carefully. Confirm the voltage and amperage fit your home’s system. This step helps the outlet work properly and last longer.
Removing Old Outlet
Removing an old outlet is the first step in installing a new one. It requires care and attention to avoid any electrical accidents. You must turn off the power from the circuit breaker before starting. This step ensures your safety throughout the process.
After switching off the power, gather the right tools, such as a screwdriver and a voltage tester. Confirm no electricity flows to the outlet. This check prevents shocks and keeps the work safe. Now, you are ready to remove the outlet cover and disconnect wires.
Unscrew Outlet Cover
Use a screwdriver to remove the screws holding the outlet cover. Place the screws in a safe spot to avoid losing them. Gently pull the cover away from the wall. This exposes the outlet and wiring behind it. Take care not to damage the wall or wires.
Disconnect Wires Safely
Before touching wires, test them with a voltage tester again. Confirm no power is present. Then, loosen the screws holding the wires on the outlet. Carefully detach each wire one at a time. Keep track of wire positions to help with the new outlet. Avoid pulling or bending wires too hard. Safely move the old outlet away from the wall box.
:max_bytes(150000):strip_icc()/how-to-wire-an-outlet-1152325-hero-f184ed9c5eca4db490656bf5f32e438f.jpg)
Credit: www.thespruce.com
Wiring The New Outlet
Wiring the new outlet is a key step in setting up a wall outlet safely. It needs care and attention to avoid electrical hazards. This section explains how to connect the wires properly. Simple steps make the job easier and safer.
Identify Wire Types
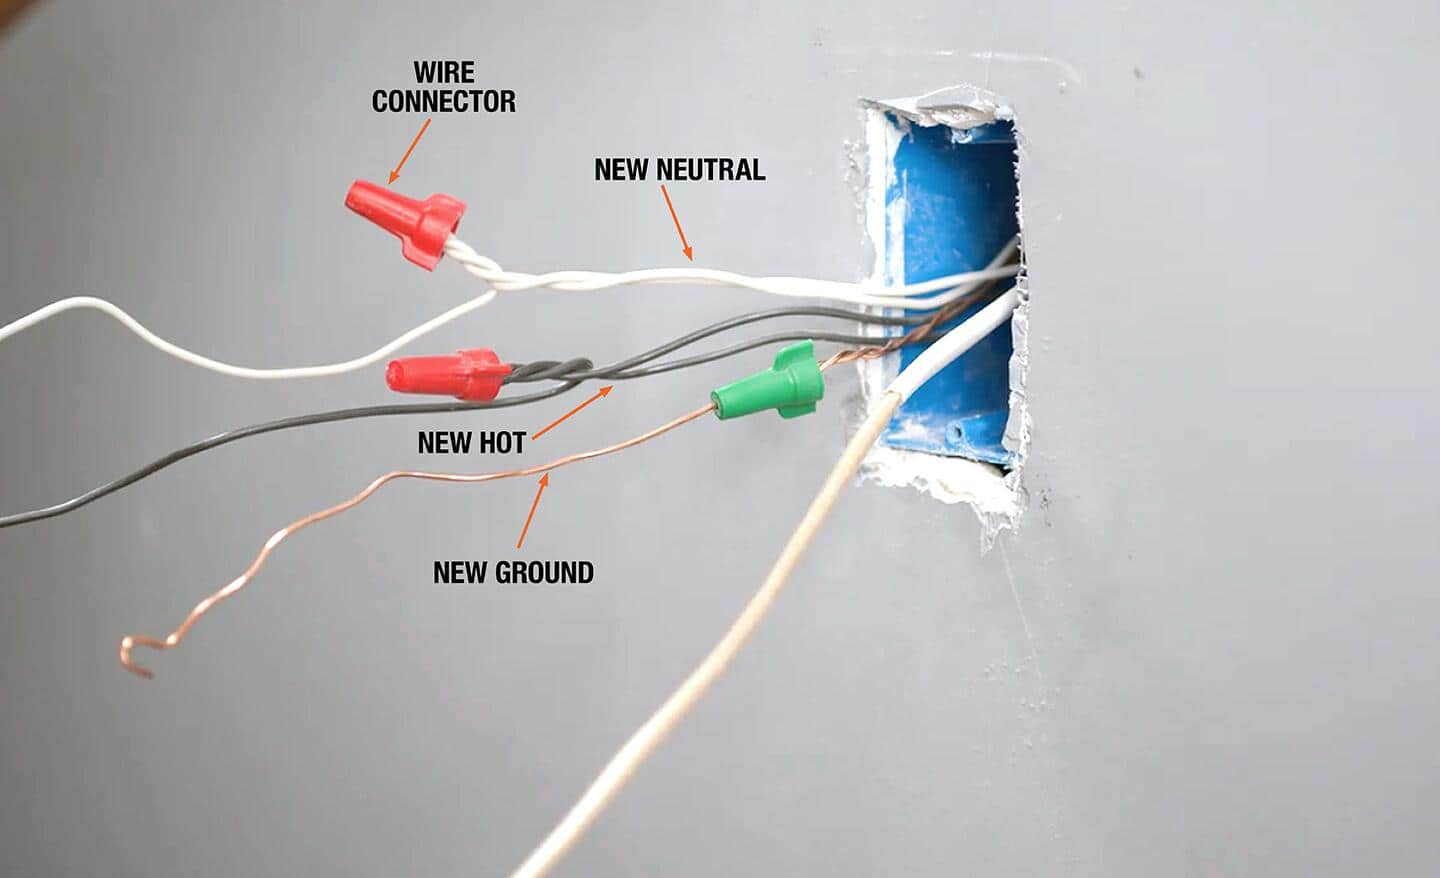
Start by identifying the wires inside the wall box. You usually find three types: hot, neutral, and ground. The hot wire is often black or red. The neutral wire is white. The ground wire is green or bare copper. Each wire has a specific role in the circuit. Knowing the wire types helps connect the outlet correctly.
Connect Wires Correctly
Connect the hot wire to the brass screw on the outlet. Attach the neutral wire to the silver screw. The ground wire goes to the green screw or grounding point. Tighten all screws firmly to ensure a good connection. Loose connections can cause sparks or power loss. Double-check the wires before closing the outlet box.
Securing The Outlet
Securing the outlet is an important step in wiring a wall outlet. It keeps the outlet in place and protects the wires. A well-secured outlet reduces the chance of electric shocks and damage. This step also ensures the outlet looks neat on the wall.
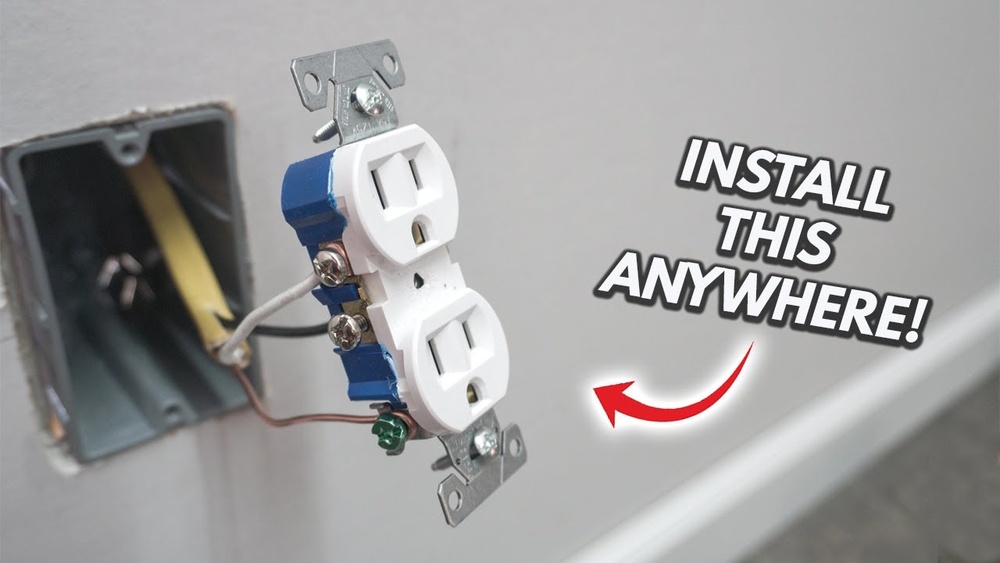
Attach Outlet To Box
Start by pushing the outlet gently into the electrical box. Align the screw holes on the outlet with the holes on the box. Use a screwdriver to tighten the screws. Do not overtighten; it may crack the outlet. The outlet should feel steady and not move.
Replace Outlet Cover
After securing the outlet, place the cover plate over it. Line up the cover plate screw hole with the outlet. Insert the screw and tighten it carefully. The cover protects the wiring and gives a clean finish. Check that the cover fits well and is flush against the wall.

Credit: www.youtube.com
Testing The Installation
Testing the installation of your new wall outlet is crucial for safety and function. It ensures the wiring is correct and power flows as expected. Taking the time to test prevents future problems and hazards.
Restore Power
Start by turning the power back on at the circuit breaker. Make sure the correct breaker is switched to the “on” position. Check that no other breakers tripped during your work. Restoring power allows you to test the outlet under normal conditions.
Use Outlet Tester
Use a simple outlet tester to check your work. Plug the tester into the outlet. Look for indicator lights that show wiring status. The lights tell you if the outlet is wired correctly or if there are issues. Common problems include reversed wires or no ground connection. Fix any problems before using the outlet normally.
Safety Tips And Precautions
Working with electrical outlets needs care and attention. Safety comes first to prevent shocks and fires. Follow key tips and take precautions before starting your project. Simple steps can protect you and your home.
Avoid Common Mistakes
Turn off power at the circuit breaker before touching wires. Use a voltage tester to confirm no current flows. Connect wires to the correct terminals: black to brass, white to silver, and green or bare copper to ground. Tighten screws firmly, but do not over-tighten and damage the wires. Never force wires into the outlet box or reuse damaged parts. Keep wires neat and avoid crowding inside the box. Use proper tools and wear insulated gloves for extra safety.
When To Call A Professional
Call an electrician if you feel unsure or uncomfortable. Complex wiring, old circuits, or damaged walls need expert care. Problems like sparks, burning smells, or frequent breaker trips require immediate help. Professionals have the tools and experience to fix issues safely. Avoid risks by trusting experts for major electrical work.
Credit: www.homedepot.com
Frequently Asked Questions
How Do I Safely Hook Up A Wall Outlet?
Turn off the power at the circuit breaker before starting. Use a voltage tester to confirm no current. Connect the wires to the outlet terminals correctly: black (hot) to brass, white (neutral) to silver, and green or bare (ground) to green screw.
What Tools Are Needed To Hook Up A Wall Outlet?
You will need a screwdriver, wire stripper, voltage tester, and needle-nose pliers. These tools help remove insulation, check power, and tighten connections safely during installation.
Can I Replace A Wall Outlet Without An Electrician?
Yes, if you understand basic electrical safety and wiring. Always cut power at the breaker and test before working. If unsure, consult a professional to avoid hazards or code violations.
How Do I Identify Hot, Neutral, And Ground Wires?
Hot wires are usually black or red. Neutral wires are white. Ground wires are green or bare copper. Proper identification ensures safe and correct outlet wiring.
Conclusion
Hooking up a wall outlet is simpler than it seems. Follow each step carefully for safety. Always turn off power before starting any work. Use the right tools and check your connections twice. This helps avoid shocks and electrical problems.
Taking time ensures your outlet works well and lasts longer. You can handle this task with confidence and care. Stay safe and enjoy your properly hooked-up outlet.


