Are you planning to add a new wall to an old concrete slab but aren’t sure how to anchor it securely? Getting this right is crucial to ensure your wall stays strong and safe for years to come.
You’ll discover simple, step-by-step methods to anchor your new wall to an old slab without hassle or guesswork. Whether you’re a DIY enthusiast or just want to understand the process better, you’ll find clear tips that save time, money, and frustration.
Keep reading to learn how to make your new wall stand firm on your old slab with confidence.

Credit: www.contractortalk.com
Choosing The Right Anchor
Choosing the right anchor is key for attaching a new wall to an old slab. The anchor must fit the slab type and support the wall’s weight. Picking the wrong anchor can cause damage or weak connections. Understanding anchor types, materials, and load needs helps find the best fit.
Types Of Anchors
Anchors come in many styles. Expansion anchors spread inside the hole and grip tight. Sleeve anchors work well for medium loads. Wedge anchors hold strong in solid concrete. Chemical anchors use glue to fix in place. Each type suits different slab conditions and wall needs.
Material Compatibility
Check the slab and wall materials before choosing anchors. Some anchors work better with concrete, others with brick or stone. Metal anchors resist rust in damp places. Match the anchor material to avoid corrosion and damage. Correct pairing extends the anchor’s life and strength.
Load Requirements
Know how much weight the wall will place on the anchor. Light walls need smaller anchors. Heavy walls need strong, heavy-duty anchors. Consider both vertical and horizontal forces. Proper load rating keeps the wall stable and safe over time.
Preparing The Old Slab Surface
Preparing the old slab surface is a key step before anchoring a new wall. It ensures strong bonding and long-lasting support. The surface must be clean, stable, and rough enough to hold the new material well. Skipping preparation can cause weak attachment or future cracks.
Cleaning And Inspection
Start by removing dirt, dust, and loose particles from the slab. Use a broom, brush, or pressure washer for thorough cleaning. Check the slab carefully for any signs of damage or wear. Look for cracks, chips, or areas with loose concrete. Good cleaning and inspection reveal the slab’s true condition.
Repairing Cracks And Damage
Small cracks and damaged spots weaken the slab’s strength. Fill cracks with epoxy or suitable concrete filler. Larger damaged areas may need patching with fresh concrete mix. Allow repairs to dry completely before proceeding. Fixing these problems prevents future wall damage.
Surface Roughening Techniques
A rough surface helps the new wall stick better. Use a grinder or chisel to create a textured finish. Avoid making the surface too smooth or glossy. Roughening increases mechanical grip between old slab and new wall. This simple step improves the wall’s stability and durability.
Drilling And Hole Preparation
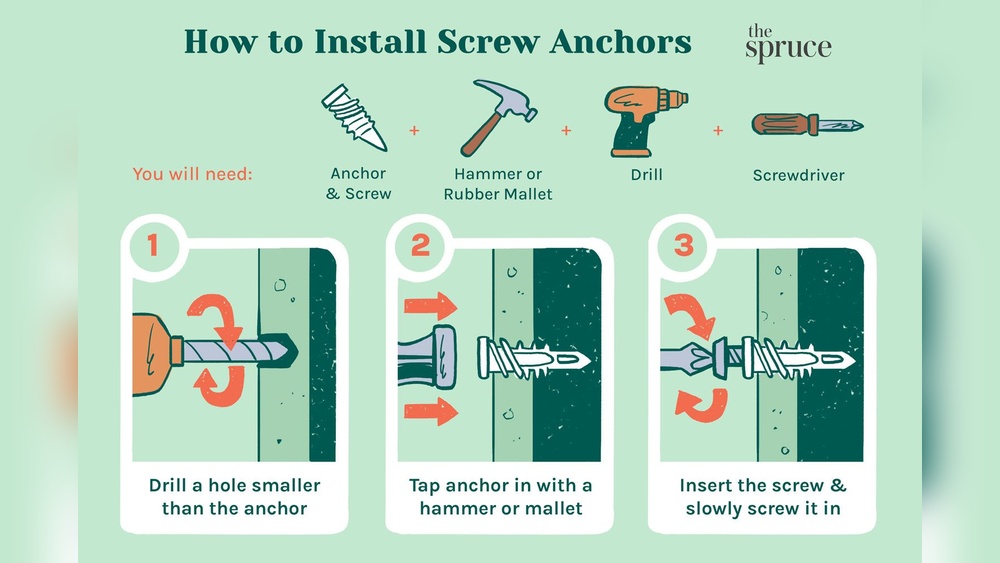
Drilling and hole preparation are key steps in anchoring a new wall to an old slab. These steps ensure the anchor holds firmly and lasts long. Proper drilling creates the right space for anchors and prevents damage to the slab. It also helps in placing the anchors accurately for strong support.
Selecting Drill Bits
Choose drill bits made for concrete or masonry. Carbide-tipped bits work best on old slabs. Match the bit size to the anchor’s diameter. Using the wrong bit can cause weak holes or cracks. Always check the bit condition before drilling. Worn bits reduce drilling efficiency and accuracy.
Proper Drilling Depth And Diameter
Drill holes deeper than the anchor length. This allows space for dust and full anchor embedment. The hole diameter must match the anchor size closely. Too wide holes cause loose anchors. Too narrow holes make insertion difficult or crack the slab. Use a depth stop or tape on the drill bit to keep depth consistent.
Dust Removal Methods
Remove dust after drilling for better anchor grip. Use a wire brush to clean hole sides. Blow compressed air into the hole to clear dust. A vacuum cleaner works well too. Clean holes improve anchor adhesion and reduce slip risk. Repeat cleaning if dust remains inside the hole.
Credit: www.ancon.co.uk
Installing The Anchor
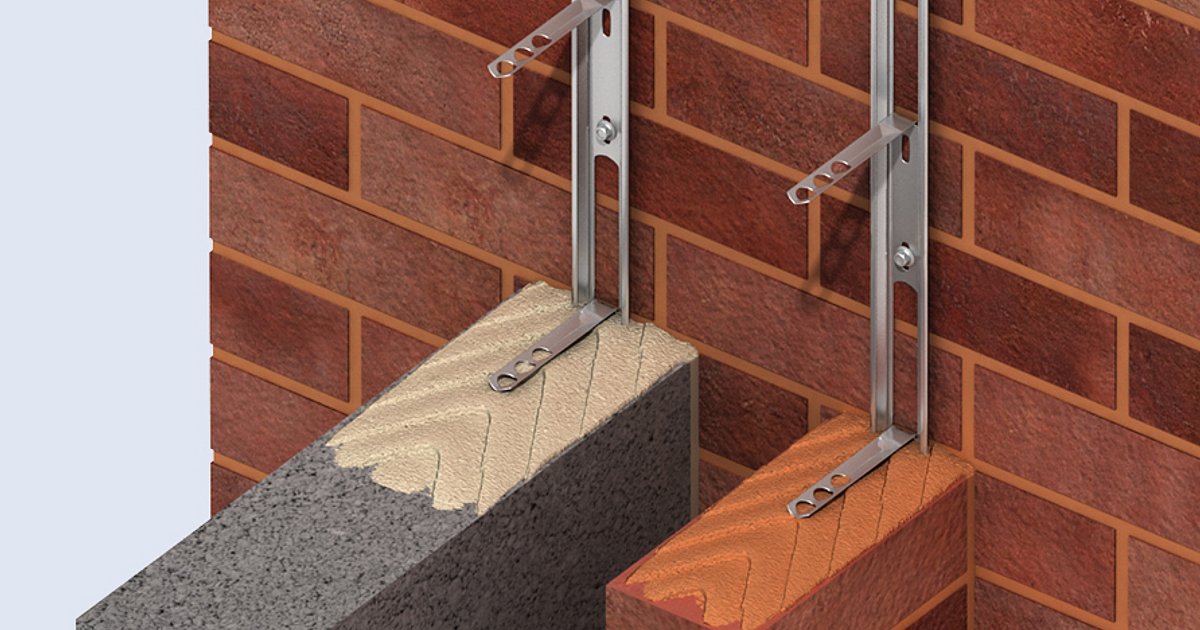
Installing the anchor is a crucial step when attaching a new wall to an old slab. Proper installation ensures the wall stays firm and safe. This process requires careful handling and attention to detail. Follow these simple steps to secure the anchor correctly.
Anchor Placement Tips
Choose the right spots for your anchors. Place them evenly along the wall line. Avoid weak or cracked areas in the slab. Mark positions clearly before drilling. Use a level to keep anchors straight. Proper placement improves the wall’s strength and stability.
Using Epoxy And Adhesives
Epoxy creates a strong bond between the anchor and slab. Clean the drilled holes thoroughly before applying epoxy. Insert the anchor into the hole filled with epoxy. Allow the adhesive to cure fully before adding weight. This step prevents anchors from loosening over time.
Ensuring Correct Alignment
Align anchors carefully with the new wall’s frame. Use a spirit level to check vertical and horizontal placement. Incorrect alignment can cause wall cracks or movement. Adjust anchors as needed before the epoxy hardens. Proper alignment keeps the wall straight and secure.
Curing And Setting Time
Curing and setting time are crucial when anchoring a new wall to an old slab. Proper curing ensures the adhesive or mortar gains the strength needed. Setting time determines when you can apply load or continue construction. Ignoring these times can cause weak bonds and future cracks. Understanding these factors helps secure a strong, lasting connection between surfaces.
Recommended Curing Periods
Most adhesives need at least 24 to 72 hours to cure fully. Concrete-based mortars may require 7 days or more. Follow the product instructions for exact times. Avoid moving or stressing the anchored area during curing. Proper curing allows the material to harden and bond well with the slab.
Environmental Factors
Temperature and humidity affect curing speed. Cold temperatures slow down the process. High heat can dry materials too quickly, causing cracks. Moisture levels also impact curing. Keep the area shaded and moist if needed. Adjust curing time depending on weather conditions to ensure good bonding.
Testing Anchor Strength
Test the anchor’s strength before applying heavy loads. Pull tests measure how well the anchor holds. Use simple tools or hire professionals for testing. Testing ensures the bond is strong and safe. Wait for the recommended curing time before testing the anchor strength.
Common Mistakes To Avoid
Anchoring a new wall to an old slab requires care and attention. Mistakes can lead to weak support or damage. Avoiding common errors helps ensure a strong, lasting bond. Focus on the right tools, surface, and methods.
Incorrect Anchor Selection
Choosing the wrong anchor weakens the connection. Not all anchors suit old slabs. Some anchors may not hold well in aged concrete. Use anchors designed for old or cracked slabs. Check load capacity and material compatibility.
Poor Surface Preparation
Dirty or rough surfaces reduce anchor strength. Dust, oil, and debris stop anchors from gripping. Clean the slab thoroughly before anchoring. Remove loose particles and dry the surface. A smooth, clean base ensures better adhesion.
Improper Installation Techniques
Wrong drilling or fixing can cause failure. Drill holes too big or too small. Do not skip measuring depth or alignment. Insert anchors firmly but avoid over-tightening. Follow manufacturer instructions carefully for best results.
Maintenance And Inspection
Maintaining and inspecting anchors between new walls and old slabs is vital. It ensures safety and long-lasting stability. Regular attention helps spot problems early. This prevents costly repairs and structural damage.
Regular Checks For Stability
Check anchors at least twice a year. Look for any movement or looseness. Test the wall’s firmness by gentle pushing. Listen for unusual sounds like creaks or cracks. Tighten bolts and screws if they feel loose. Keep the area around the anchors clean and dry.
Signs Of Anchor Failure
Watch for cracks near the anchor points. Notice rust or corrosion on metal parts. See if the wall tilts or shifts slightly. Look for gaps between the wall and slab. Water stains or damp spots can also be warning signs. Act quickly when any of these appear.
Repair And Replacement Options
Small cracks need filling with proper sealant. Rusty anchors require cleaning or replacing. Use corrosion-resistant anchors for replacements. For loose anchors, tighten or install new fasteners. In severe cases, call a professional for help. Regular repair keeps the wall safe and secure.

Credit: www.researchgate.net
Frequently Asked Questions
How Do You Anchor A New Wall To An Old Slab?
To anchor a new wall to an old slab, drill holes in the slab and insert steel dowels or rebar. Use epoxy or grout to fix them firmly. Attach the wall frame securely to these anchors for stability and strength.
What Materials Are Best For Anchoring New Walls?
Steel dowels, rebar, epoxy, and grout are ideal materials. They provide strong bonding between the new wall and old slab. Using corrosion-resistant steel ensures durability and long-lasting support for the anchored wall.
Can I Anchor A New Wall Without Drilling The Slab?
Drilling is the most reliable method to anchor new walls. Without drilling, walls may lack proper support and stability. Alternative methods like adhesive anchors exist but are less effective on old concrete slabs.
How Deep Should Holes Be For Anchoring New Walls?
Holes should be at least 4 to 6 inches deep in the slab. This depth ensures strong anchorage and prevents the wall from shifting. Always follow manufacturer guidelines for the specific anchors used.
Conclusion
Anchoring a new wall to an old slab requires careful steps. Start by cleaning the slab and marking anchor points clearly. Use the right anchors and drill holes precisely for a strong hold. Tighten anchors steadily to avoid damage. Check stability often during the process.
This method keeps your wall safe and lasting longer. Simple tools and patience make a big difference. Follow these tips, and your wall will stay secure for years. Trust the process and take your time. Success comes with careful work and good materials.