Are you ready to make your home more secure but unsure how to start? Drilling a strike hole for a deadbolt might sound tricky, but with the right steps, you can do it yourself—and save time and money.
In this guide, you’ll learn exactly how to drill the perfect strike hole, so your deadbolt fits snugly and works smoothly. Keep reading, and by the end, you’ll have the confidence to upgrade your door’s security like a pro.
Tools And Materials Needed
Drilling a strike hole for a deadbolt requires specific tools and materials. Having the right equipment makes the job easier and more accurate. This section covers what you need before starting your project.
Choosing The Right Drill Bits
Select drill bits designed for wood or metal, depending on your door type. A hole saw bit is ideal for the large hole needed for the deadbolt. For the smaller holes, use a spade or twist bit. Sharp bits reduce the chance of splintering and make cleaner holes. Check the size of the bits to match the deadbolt specifications.
Additional Equipment
A power drill is essential for drilling the holes quickly and evenly. A tape measure helps mark the exact spot for the strike hole. Use a pencil to mark drill points clearly on the door. A level ensures your hole aligns perfectly. Safety glasses protect your eyes from dust and debris. A clamp can hold the door steady during drilling for better control.

Credit: www.reddit.com
Measuring And Marking The Door
Measuring and marking the door is the first step to drill the strike hole for a deadbolt. Accurate measurements ensure the deadbolt fits perfectly. Mistakes here can cause misalignment and security issues.
Take your time to measure carefully. Use the right tools like a tape measure and pencil. Marking the door precisely helps guide your drill for clean and straight holes.
Locating The Deadbolt Position
Start by deciding the height of the deadbolt. Usually, it is 6 to 12 inches above the door handle. Measure from the floor to this height and mark it clearly. Check the door edge for the latch position. Make sure the deadbolt aligns with the door frame strike plate.
Marking Drill Points Accurately
Use a template or the deadbolt itself to mark drill points. Mark the center of the hole on the door face for the lock cylinder. On the door edge, mark the hole for the latch bolt. Double-check all marks for alignment. Accurate marking prevents mistakes and saves time during drilling.
Preparing The Door Surface
Preparing the door surface is a key step before drilling a strike hole for a deadbolt. It ensures the hole is precise and the door stays strong. Proper preparation prevents damage and helps the deadbolt fit well. Take your time with this step for a clean, professional result.
Removing Obstructions
Start by clearing anything that blocks the drilling area. Remove old hardware like locks or handles near the drill spot. Check for dirt, paint, or debris on the door surface. Clean the area with a cloth to get a smooth surface. This makes drilling easier and more accurate. Removing obstructions also stops damage to your tools.
Protecting The Door Finish
Protect the door finish before drilling to avoid scratches and marks. Use painter’s tape around the drill spot. This tape keeps the wood or paint safe. Press the tape firmly so it sticks well. The tape also helps guide the drill bit. Protecting the finish keeps your door looking new after installation.
Drilling The Main Hole
Drilling the main hole is a key step when installing a deadbolt strike plate. This hole allows the bolt to fit securely into the door frame. Doing this right ensures your lock works smoothly and keeps your door strong.
Precision matters here. The hole must be the right size and depth. Too shallow, and the bolt won’t fit. Too deep, and the door frame weakens. Using the right tools and techniques helps make a clean, perfect hole.
Setting The Drill Depth
Start by marking the exact depth for the hole. Use a tape measure or the deadbolt instructions for this. Most deadbolt holes need to be about 1 inch deep.
Set a drill stop or wrap tape around the drill bit. This acts as a guide to prevent drilling too far. Check the depth before drilling to avoid mistakes.
Maintaining Drill Stability
Hold the drill steady at a right angle to the door frame. This keeps the hole straight and clean. Use both hands for better control.
Start drilling slowly to avoid slipping. Increase speed once the bit grips the wood. Keep steady pressure but do not force the drill.
Creating The Edge Mortise
Creating the edge mortise is an important step when installing a deadbolt. This part holds the strike plate that keeps the door securely locked. A well-made mortise ensures the strike plate fits flush with the door edge. It also prevents the door from sticking or catching on the lock.
Taking time to create a clean, precise mortise makes your deadbolt installation stronger and more reliable. Small mistakes can cause problems later. Follow these simple steps to get a neat edge mortise for your deadbolt strike plate.
Marking The Edge For The Strike Plate
Start by placing the strike plate on the door edge. Use a pencil to trace the outline carefully. Double-check the position to match the deadbolt latch. Make sure the marks are clear and easy to see.
Measure the depth of the strike plate. Mark this depth on the door edge with a pencil. These marks guide your chiseling and drilling. Correct markings prevent damage and ensure a tight fit.
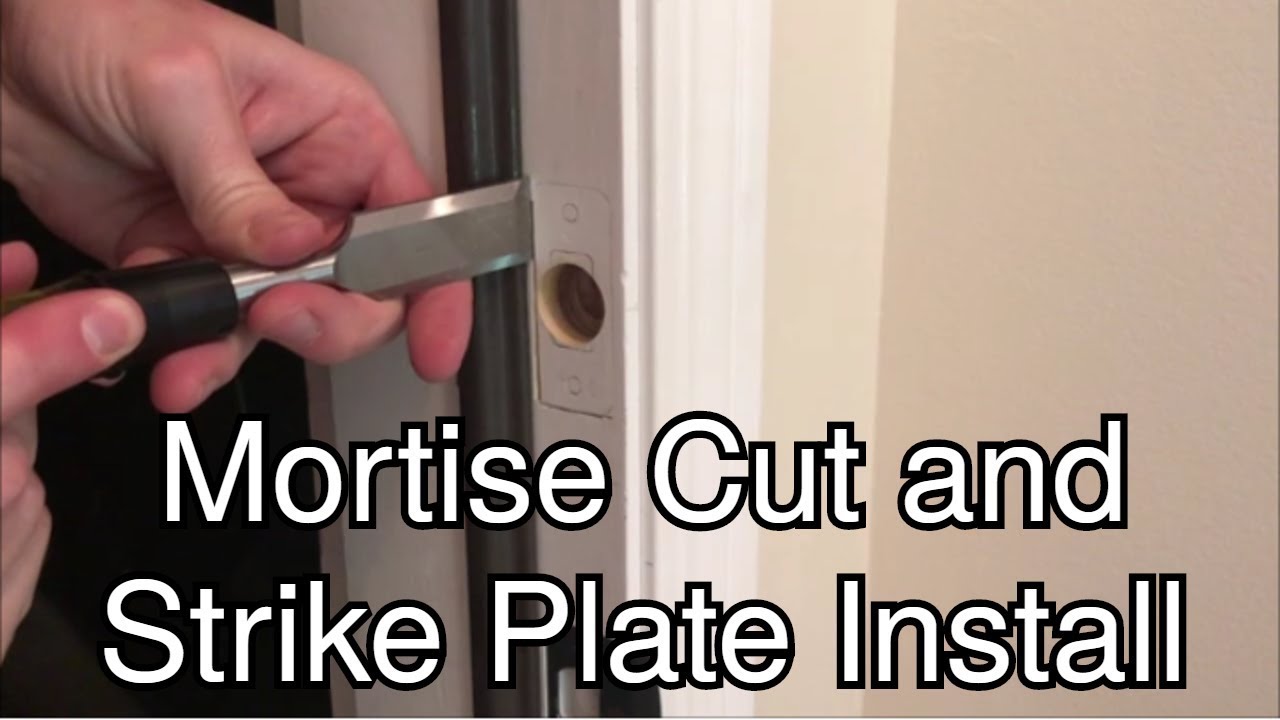
Chiseling Techniques For Clean Cuts
Use a sharp chisel for the best results. Position the chisel on your pencil marks. Tap gently with a hammer to remove thin wood layers. Work slowly to avoid splitting the wood.
Clear small wood chips regularly. Check the depth often with the strike plate. Stop chiseling once the mortise matches the strike plate depth. Smooth edges improve the final fit and appearance.

Credit: www.youtube.com
Fitting The Strike Plate
Fitting the strike plate is an important step after drilling the strike hole for a deadbolt. The strike plate helps the deadbolt latch securely into the door frame. Installing it properly ensures your door locks tightly and safely.
Careful alignment and secure attachment keep the strike plate in place. This prevents the deadbolt from sticking or failing to lock. Follow these steps for a strong and effective fit.
Aligning The Plate Correctly
Place the strike plate over the hole in the door frame. Make sure the plate fits flush against the wood. The hole in the plate should line up exactly with the drilled strike hole.
Check the deadbolt’s position by closing the door slowly. The bolt should slide smoothly into the strike hole. Adjust the plate as needed to avoid any gaps or misalignment.
Securing The Plate With Screws
Use the screws that come with your strike plate. Insert them into the screw holes on the plate. Tighten the screws firmly to hold the plate in place.
Do not overtighten, or you might strip the screw holes. The plate must stay flat and secure for the deadbolt to work properly. Test the lock after installation to confirm a tight fit.
Testing And Adjustments
After drilling the strike hole for your deadbolt, testing and adjustments are crucial. This step ensures the deadbolt fits perfectly and works smoothly. Careful checks can prevent problems later.
Testing the operation helps confirm the lock functions as it should. Small changes might be needed to improve the fit or movement. Patience here saves frustration later.
Checking Deadbolt Operation
Start by inserting the deadbolt into the drilled hole. Turn the key or thumb turn to see if it moves freely. The bolt should slide in and out without resistance. Check if the bolt fully extends into the strike plate. Make sure the door closes easily without forcing the lock. Listen for any unusual sounds like grinding or sticking. These signs show where adjustments may be needed.
Making Necessary Modifications
If the bolt sticks or does not align, mark the problem areas. Use a file or sandpaper to smooth rough edges inside the hole. Enlarge the hole slightly if the bolt cannot fit fully. Adjust the strike plate position by loosening screws and moving it gently. Tighten screws only after the bolt moves smoothly. Test the lock again after each change. Repeat until the deadbolt operates without problems.
Credit: www.youtube.com
Frequently Asked Questions
How Do You Mark The Strike Hole Position For A Deadbolt?
Measure the deadbolt’s faceplate and transfer its dimensions to the door frame. Use a pencil to mark the exact center for drilling. Accurate marking ensures the strike hole aligns perfectly with the deadbolt latch for smooth locking.
What Drill Bit Size Is Needed For A Deadbolt Strike Hole?
Use a drill bit that matches the strike plate’s hole diameter, commonly 1 inch to 1 1/8 inch. Selecting the correct size prevents loose fitting and maintains door security. Always double-check the deadbolt specifications before drilling.
How Deep Should I Drill The Strike Hole For A Deadbolt?
Drill the strike hole to the depth of the strike plate plus the door frame’s thickness. Typically, this is around 1 inch. Proper depth ensures the deadbolt latch fits fully and securely inside the frame.
Can I Drill A Deadbolt Strike Hole Without A Drill Guide?
Yes, but using a drill guide improves accuracy and prevents misalignment. Without it, measure carefully and drill slowly to maintain control. A guide helps create a clean, straight hole essential for proper deadbolt function.
Conclusion
Drilling a strike hole for a deadbolt is simple with the right steps. Measure carefully and mark the spot clearly. Use the correct drill bit size for a perfect fit. Take your time to avoid mistakes and ensure safety. A properly drilled strike hole helps your door lock securely.
Practice patience, and your door will work smoothly. Keep tools ready and follow the guide step by step. This small task improves your home’s security easily and quickly.