
Have you ever faced the frustration of a stuck deadbolt on your door? Whether you’re moving into a new home, replacing old hardware, or simply need to fix a jammed lock, knowing how to get a deadbolt off your door can save you time and stress.
In this guide, you’ll discover simple, step-by-step methods to remove that deadbolt quickly and safely—even if you don’t have much experience with tools. Keep reading, because once you learn these easy tips, you’ll feel confident tackling deadbolt issues on your own.
Tools Needed
Removing a deadbolt from a door requires the right tools. Having these tools ready makes the task simpler and faster. Each tool serves a specific purpose in the removal process. Using the correct tools also helps avoid damage to the door or lock.
Phillips Head Screwdriver
A Phillips head screwdriver is essential for removing screws from the deadbolt. Most deadbolts use Phillips screws to hold the lock in place. This screwdriver fits the screw heads perfectly to prevent stripping.
Flathead Screwdriver
A flathead screwdriver helps pry off the faceplate or trim around the deadbolt. It can also assist in releasing clips or stubborn parts. This tool is useful for gently lifting components without damage.
Allen Wrench Set
Some deadbolts have small hex screws that require an Allen wrench. Having a set with various sizes ensures you find the right fit. This tool helps remove screws hidden behind covers or trims.
Pliers
Pliers provide a strong grip to hold or twist parts during removal. They work well for turning stubborn screws or pulling out broken pieces. Needle-nose pliers are especially helpful in tight spaces.
Utility Knife
A utility knife can cut through paint or caulk sealing the deadbolt. It makes it easier to remove trim or faceplates without damage. This tool is also handy for cleaning edges after removal.

Credit: www.reddit.com
Identify Deadbolt Type
Removing a deadbolt starts with knowing its type. Different deadbolts have unique designs. This affects how you take them off. Recognizing your deadbolt helps choose the right tools and steps. It saves time and prevents damage to your door.
Deadbolts come in several common types. Each has a distinct look and mechanism. Focus on the exterior and interior parts to identify yours. Check the shape, lock style, and how it attaches to the door.
Single Cylinder Deadbolt
This deadbolt has a key slot outside. Inside, it uses a thumb turn to lock or unlock. It’s common in homes and easy to spot. The thumb turn lets you lock without a key inside.
Double Cylinder Deadbolt
Both sides have key slots. No thumb turn inside. It adds security but needs a key to lock or unlock from either side. This type often appears on doors with glass near the lock.
Keyless Or Electronic Deadbolt
No traditional key slot here. It uses a keypad or fingerprint scanner. Some models have a small manual key slot for emergencies. These deadbolts require different removal methods than standard types.
Vertical Deadbolt
The bolt moves up and down, not side to side. It locks by sliding the bolt vertically into the door frame. This style is less common but important to recognize before removal.
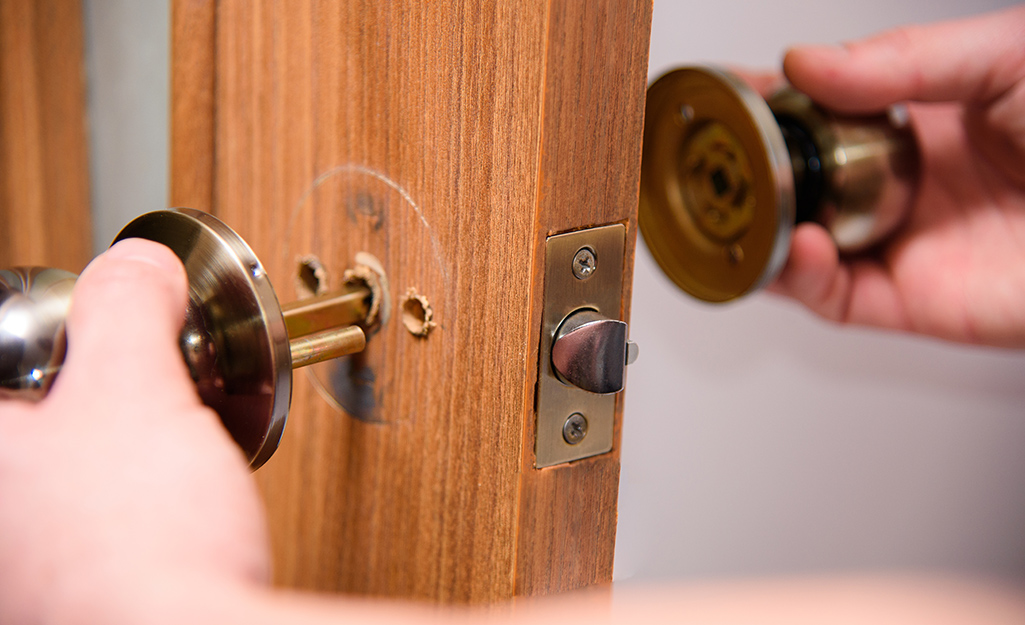
Remove Door Handle Or Knob
Removing the door handle or knob is the first step to take off a deadbolt. This step makes the lock easier to reach and handle. The process is simple but needs care to avoid damage to the door.
Most door handles or knobs attach with screws. These screws hold the two sides of the handle together. Removing them allows you to pull the handle off the door.
Locate The Screws On The Door Handle Or Knob
Look closely at the handle or knob. Screws often sit on the inside part of the door. Some handles hide screws under a small cover plate. Check for a tiny slot or a removable piece.
Use The Right Screwdriver
Find a screwdriver that fits the screws well. A mismatched screwdriver can strip the screws. Most door handles use a Phillips or flathead screwdriver.
Unscrew The Door Handle Or Knob Carefully
Turn the screwdriver slowly to remove the screws. Keep the screws safe for reinstallation. Once loose, pull both sides of the handle or knob apart gently.
Remove The Handle Or Knob From The Door
After unscrewing, the handle should slide off. If it feels stuck, wiggle it lightly. Avoid using force to prevent damage.
Unscrew Deadbolt Faceplate
Removing the deadbolt faceplate is an important first step to take off the deadbolt from a door. The faceplate holds the deadbolt in place on the door’s edge. Unscrewing it allows you to access the lock mechanism inside. This step is simple but requires care to avoid damage to the door.
Use a screwdriver that fits the screws well. This prevents stripping the screw heads. Keep the screws safe for later use. They will be needed when reinstalling the deadbolt or replacing it. Take your time to loosen each screw fully before removing the faceplate.
Gather The Right Tools
Find a screwdriver that matches the screws on your deadbolt faceplate. Most faceplates use a Phillips head screwdriver. Check the size to make sure it fits snugly. A proper fit helps remove screws easily without damage.
Locate The Screws On The Faceplate
Look along the edge of the door where the deadbolt is installed. The faceplate will have two or more screws holding it. Identify all screws before starting. This helps avoid missing any hidden screws.
Carefully Unscrew The Faceplate
Insert the screwdriver into each screw head. Turn counterclockwise to loosen. Apply gentle, steady pressure. Do not force the screws. Remove each screw completely and set it aside. Slowly pull the faceplate away from the door once all screws are out.
Extract Deadbolt Mechanism
Extracting the deadbolt mechanism is a key step in removing a deadbolt from a door. It involves taking out the internal parts that lock and unlock the door. This process requires care to avoid damage to the door or lock.
Start by understanding the deadbolt structure. Knowing how parts fit together helps in safe removal. Follow the steps carefully to remove the mechanism smoothly.
Remove The Interior Thumb Turn
Locate the thumb turn on the inside of the door. It is the part you twist to lock or unlock. Look for screws holding it in place. Use a screwdriver to remove these screws. Pull the thumb turn away from the door gently. Set it aside safely.
Unscrew The Deadbolt Faceplate
Find the faceplate on the edge of the door. It covers the deadbolt mechanism. Remove the screws with a screwdriver. Take off the faceplate carefully. This exposes the deadbolt latch inside the door.
Extract The Deadbolt Latch
Push the latch back into the door. Use pliers if needed for a firm grip. Pull the latch out from the door edge. It should come out smoothly. Keep the latch and screws together for later use or disposal.
Credit: www.homedepot.com
Use Lock Picking Techniques
Removing a deadbolt without a key can be tricky. Lock picking techniques offer a way to open the lock quietly and safely. These methods require patience and a few basic tools. You can try different approaches depending on your skill and the lock type.
Raking Method
The raking method uses a rake tool to move pins inside the lock. Insert the rake into the keyway and slide it back and forth. This action tries to push all pins to the shear line quickly. It works faster than picking each pin one by one.
Apply slight tension with a tension wrench while raking. This tension helps set the pins in place. Keep raking until the lock clicks open. The raking method suits beginners and simple locks.
Single Pin Picking
Single pin picking is more precise than raking. Use a pick tool to lift each pin individually. Feel for pins that bind and raise them to the shear line. This method takes longer but offers more control.
Apply steady tension with the wrench. Lift one pin at a time until all pins are set. The lock will turn open smoothly. Single pin picking works well on complex or high-security deadbolts.
Apply Bump Key Method
The bump key method is a practical way to remove a deadbolt from a door. It uses a special key called a bump key. This key fits into the lock and helps move the pins inside quickly. This action allows the lock to open without the original key.
This method requires some care and patience. It works best on standard pin-tumbler locks. Many deadbolts use this type of lock. Bump keys can be found online or made by filing down a key.
Prepare The Bump Key
Start with a key that fits the lock. The bump key should have all pins cut to the lowest depth. Use a file or grinder to make the cuts. Make sure the key is smooth and clean.
Insert The Bump Key
Put the bump key fully into the keyhole. Hold it firmly but do not turn it yet. Keep the key straight to avoid damage.
Apply A Bump And Turn
Lightly tap the end of the bump key. Use a small hammer or screwdriver handle. At the same time, turn the key slowly. The pins inside will jump, letting the lock open.
Remove The Deadbolt
Once the lock opens, use a screwdriver to remove screws. Take off the deadbolt from the door. Store the parts safely for later use.

Credit: www.youtube.com
Use Drill To Remove Deadbolt
Using a drill to remove a deadbolt can be a quick and effective method. It works well when the key is lost or the lock is stuck. This process requires some care to avoid damaging the door. Follow the steps carefully for the best results.
Gather The Right Tools
Start by collecting the tools you need. A power drill with a metal drill bit is essential. A screwdriver and safety glasses will help with the removal and protect your eyes. Make sure the drill bit matches the size of the screws on the deadbolt.
Drill Through The Deadbolt Cylinder
Place the drill bit on the center of the deadbolt cylinder. Apply steady pressure and drill slowly. The goal is to break the pins inside the lock. This will stop the deadbolt from turning and allow you to remove it.
Remove The Deadbolt After Drilling
Once the cylinder is drilled out, use a screwdriver to remove the screws. Pull the deadbolt parts away from the door. The lock should come off easily. Clean the area before installing a new lock.
Replace Or Repair Deadbolt
Deciding to replace or repair a deadbolt depends on its condition. Some deadbolts only need minor fixes. Others require complete replacement to work properly and keep you safe.
Knowing how to choose between repair and replacement saves time and money. It also ensures your door remains secure.
Signs A Deadbolt Needs Repair
Check if the deadbolt sticks or jams. This often means dirt or worn parts inside. Tighten any loose screws. Lubricate the lock with graphite spray. These steps can restore smooth action.
Also, test the key. If it turns hard or gets stuck, the cylinder may need cleaning or minor repair.
When To Replace The Deadbolt
Replace the deadbolt if it is rusty or broken. Cracked or bent parts mean the lock cannot secure the door. Old locks without modern security features are better swapped out.
Choose a new deadbolt that fits your door’s size and style. This improves both safety and appearance.
How To Remove The Old Deadbolt
First, unscrew the interior and exterior plates. Keep screws safe to reuse or replace. Pull the deadbolt mechanism out gently. If stuck, wiggle it slightly to loosen.
Clean the door edge before installing a new lock. This prevents dirt from causing problems later.
Installing A New Deadbolt
Align the new deadbolt with the door holes. Insert the bolt and screw the plates firmly. Test the lock by turning the key and thumb turn.
Make sure the bolt slides smoothly into the door frame. Adjust strike plates if needed for proper fit.
Prevent Future Lockouts
Preventing future lockouts saves time and stress. Small steps can help avoid locked-out moments. Planning ahead keeps your day smooth and worry-free.
Spare Keys
Keep spare keys in safe places. Give a copy to a trusted neighbor or friend. Hide one in a secure outdoor spot, like a lockbox. Avoid obvious spots like under mats or pots. Check your spares regularly to ensure they work.
Smart Lock Options
Smart locks offer keyless entry with codes or apps. You can set temporary codes for visitors. Some models allow remote unlocking from your phone. Many have battery alerts to avoid surprises. Choose a smart lock that fits your door and budget.
Frequently Asked Questions
How Do I Remove A Deadbolt From A Door?
To remove a deadbolt, first unscrew the interior and exterior plates. Then, carefully pull out the deadbolt mechanism from the edge of the door. Keep screws and parts organized for reinstallation or replacement.
What Tools Are Needed To Take Off A Deadbolt?
You typically need a Phillips screwdriver, flathead screwdriver, and sometimes an Allen wrench. These help remove screws and pry the deadbolt parts gently without damaging the door.
Can I Remove A Deadbolt Without A Key?
Yes, if you can access the screws on the inside, you can unscrew and remove the deadbolt. If locked on both sides, professional help may be required to avoid damage.
How Long Does It Take To Remove A Deadbolt Lock?
Removing a deadbolt usually takes 10 to 20 minutes, depending on your experience. Having the right tools ready speeds up the process significantly.
Conclusion
Removing a deadbolt from a door is easier than it seems. Follow the steps carefully and take your time. Use the right tools to avoid damage. Stay safe and work slowly. With patience, you can remove the deadbolt yourself. This simple task saves money and effort.
Keep these tips in mind for future repairs. Practice makes perfect, so don’t rush. Now, you are ready to handle deadbolt removal with confidence.


