Are you tired of crooked pictures or holes in the wrong spots on your walls? Hanging pictures might seem simple, but getting them perfectly straight and secure takes a bit of know-how.
With the right technique using marking hooks, you can transform your walls quickly and confidently. In this guide, you’ll discover easy steps to hang your pictures like a pro, avoid common mistakes, and make your space look polished and inviting.
Ready to turn your blank walls into a stunning display? Let’s get started!
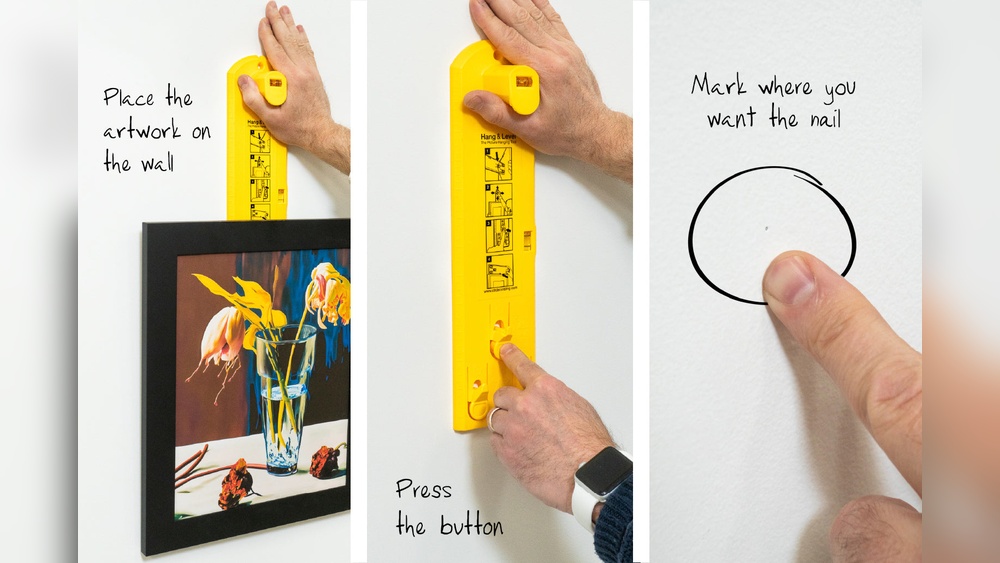
Credit: www.homedepot.com
Choosing The Right Hooks
Choosing the right hooks is important for hanging pictures safely and neatly. The right hooks hold your pictures firmly on the wall. They prevent damage to both your wall and your artwork. Picking hooks that fit your picture’s size and weight makes the process easier and more secure.
Types Of Picture Hooks
There are several types of picture hooks. Basic metal hooks are common and easy to use. Sawtooth hangers attach to the back of frames and rest on nails or hooks. Wire hangers offer flexibility for larger frames. Adhesive hooks stick to walls and avoid holes but suit lighter pictures only.
Weight Capacity Considerations
Each hook has a weight limit. Choose hooks that can hold your picture’s weight. Too weak hooks may fall and damage your picture or wall. Check the hook’s label for weight capacity. Use multiple hooks for heavy or large frames to spread the weight evenly.
Material And Finish Options
Hooks come in different materials like steel, brass, or plastic. Steel hooks are strong and durable. Brass hooks resist rust and look nice. Plastic hooks work well for light pictures but may break easily. Match the hook’s finish to your wall or frame for a clean look.

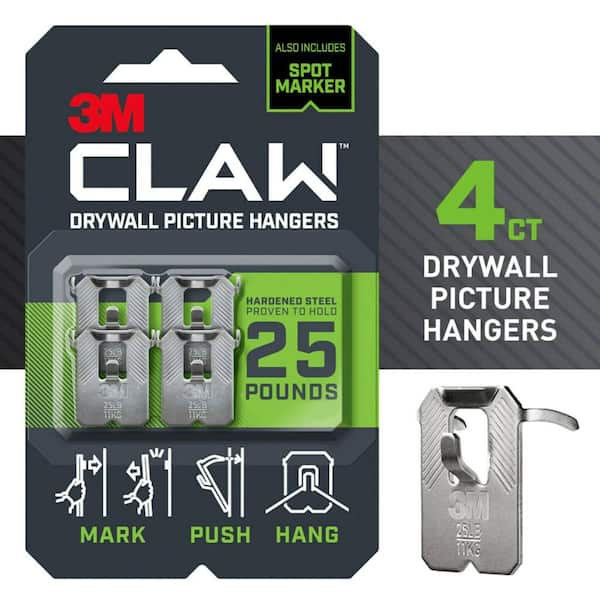
Credit: www.amazon.com
Gathering Essential Tools
Hanging pictures on a wall needs proper tools. These tools help you place hooks right and keep pictures straight. Gathering essential tools saves time and avoids mistakes. Ready tools make the task easy and quick.
Measuring Tools
Measuring tools ensure your pictures hang evenly. A tape measure or ruler works well. Use them to check distances between hooks. A level helps keep pictures straight. Without measuring, pictures may look crooked or uneven.
Marking Tools
Marking tools show where to place hooks. A pencil is perfect for light marks on the wall. Mark spots carefully to avoid holes in the wrong places. Painter’s tape can also help mark spots without damage. Clear marks guide you during installation.
Installation Tools
Installation tools help fix hooks to the wall firmly. A hammer or drill is needed for nails or screws. Wall anchors provide extra support on drywall. Hooks come in different types; choose one that fits your wall. Proper tools keep pictures secure and safe from falling.
Preparing The Wall
Preparing the wall is the first step to hang pictures neatly and safely. A clean, well-marked wall helps hooks hold better. It also prevents damage and keeps your pictures straight. Follow these simple steps to get ready.
Cleaning The Surface
Start by wiping the wall with a dry cloth. Remove dust and dirt gently. Use a mild cleaner if the wall is greasy or sticky. Let the wall dry completely before marking or hanging anything. A clean surface ensures hooks stick well and stay firm.
Identifying Studs And Drywall
Studs are the wooden supports behind walls. Hooks placed in studs hold more weight. Use a stud finder to locate these supports. If you do not have one, tap the wall and listen for a solid sound. Mark stud locations lightly with a pencil. Drywall alone may not support heavy frames.
Deciding On Hook Placement
Measure the picture width and height first. Decide where on the wall the picture will look best. Mark the top center of the frame’s spot on the wall. Use a level to keep markings straight. Place hooks at the correct height to avoid crooked pictures. Accurate marks make hanging easier and safer.
Marking The Hook Positions
Marking the hook positions is an important step in hanging pictures. It ensures your picture will hang straight and at the right height. Taking time here saves effort later. Precise marking makes the whole process smoother and the result better. Follow these simple steps to mark the spots perfectly.
Measuring Height And Alignment
Start by deciding how high you want the picture. Measure from the floor to the desired height. Usually, eye level works best. Next, check the width of the picture. Find the center point of the wall space. Mark the center lightly with a pencil. This helps to keep the picture balanced on the wall.
Using A Level For Precision
A level tool keeps your marks straight. Place it on the wall at the height mark. Adjust the level until the bubble is centered. Draw a small horizontal line along the level. This line shows where the hooks will go. Using a level avoids crooked pictures and gives a neat look.
Marking With Pencils Or Tape
Use a pencil to mark the exact spots for the hooks. Mark lightly so you can erase later. Alternatively, use painter’s tape to mark the spots. Tape is easy to remove and won’t damage paint. Make sure your marks match the hook size and picture weight. Accurate marks make hanging easier and safer.
Installing The Hooks
Installing hooks properly is key to hanging pictures securely. You need steady hooks to hold the weight of your frames. This step requires care and simple tools. Follow these tips to install hooks safely and correctly.
Hammering Hooks Safely
Hold the hook against the wall at the spot marked. Use a small hammer for better control. Tap the hook gently to avoid bending or breaking it. Keep your fingers away from the hammer’s path. Stop hammering when the hook is flush with the wall.
Using Anchors For Extra Support
Heavy frames need anchors to keep hooks steady. Drill a small hole first, matching the anchor size. Push the anchor into the hole until it fits tight. Insert the hook screw into the anchor and turn slowly. Anchors prevent hooks from pulling out of the wall.
Double Checking Stability
After installing, gently pull the hook to test strength. Check if it feels loose or wobbly. Adjust or reinstall if the hook shifts easily. A stable hook ensures your picture stays safe and straight. Take a moment to confirm before hanging your art.
Hanging The Pictures
Hanging pictures on a wall needs care and patience. It ensures your art or photos look great and stay safe. This step focuses on how to place pictures properly after marking hooks. Follow these simple tips to hang your pictures securely and beautifully.
Attaching Wire Or Hanging Hardware
Check the back of your picture frame. Attach wire or hooks firmly for support. Use D-rings or sawtooth hangers if no wire exists. Make sure hardware is strong enough for the picture’s weight. Tighten screws and test the stability before hanging.
Adjusting For Balance
Lift the picture and hang it on the marked hook. Step back and see if it looks level. Shift the wire or hardware slightly to balance the picture. Use a small level tool for accuracy. Adjust until the picture hangs straight and feels secure.
Final Alignment Check
Look at the picture from different angles. Check if it matches surrounding frames or wall features. Make sure the picture is not tilted or crooked. Lightly press the bottom edges to keep it flush with the wall. Confirm the picture stays steady before finishing.
Tips For A Perfect Display
Hanging pictures on a wall can change the whole look of a room. The right display shows your style and makes your space feel warm. Follow simple tips to create a neat and eye-catching picture wall. These ideas help you place your photos and art perfectly every time.
Creating A Gallery Wall
Start with a theme or color scheme for your gallery wall. Use frames of similar styles or colors for a clean look. Lay your pictures on the floor first to plan the layout. Keep the biggest piece in the center or at eye level. Balance small and large frames around it. Use marking hooks to hang each piece precisely where you want it. This way, your gallery wall looks organized and stylish.
Spacing Between Frames
Keep space between frames consistent. Usually, 2 to 4 inches works well for most walls. Equal spacing makes the display easy to see and pleasant to the eye. Avoid crowding pictures too close or leaving large gaps. Use a ruler or tape measure to mark spots on the wall. Marking hooks help you hang pictures exactly at these spots. Proper spacing gives your display a neat and balanced feel.
Lighting And Placement Ideas
Light highlights your pictures and brings them to life. Place your pictures where natural light falls softly. Avoid direct sunlight to prevent fading. Use wall lights or spotlights to focus on key pieces. Hang pictures at eye level for the best view. Consider the room’s function when choosing placement. For example, hang family photos in living rooms and art in hallways. Good lighting and placement make your pictures stand out beautifully.
Troubleshooting Common Issues
Hanging pictures on a wall can sometimes bring small problems. These issues can stop your picture from looking perfect or even cause damage. Knowing how to fix these problems helps you get the best result every time. Below are common troubles and easy ways to solve them.
Hooks Pulling Out
Hooks pulling out is a common problem. It happens when the hook does not hold well in the wall. Use a hook that fits your wall type. For drywall, use anchors or special hooks made for it. Check the weight of the picture before hanging. Heavy pictures need stronger hooks or nails. Press the hook firmly into the wall to avoid movement.
Uneven Hanging
Uneven hanging makes your picture look tilted or crooked. Use a level tool to check the alignment. Mark the spots on the wall before putting the hooks. Measure the distance between hooks carefully. Use two hooks for large or heavy pictures to keep balance. Adjust the picture slightly until it looks straight.
Wall Damage Prevention
Preventing wall damage saves you time and money. Use the right hooks and nails for your wall type. Avoid big nails in thin drywall. Use adhesive hooks for light pictures to avoid holes. Do not overload hooks beyond their limit. Fill small holes with wall putty after removing hooks. Paint over the putty to hide marks.

Credit: www.amazon.com
Frequently Asked Questions
How Do I Mark Hooks For Hanging Pictures?
To mark hooks, use a pencil to lightly mark the wall where the hooks will go. Measure carefully for even placement. Use a level to keep marks straight and aligned.
What Tools Do I Need To Hang Pictures With Hooks?
You need a pencil, measuring tape, level, hammer, and appropriate hooks or nails. Optionally, use wall anchors for heavier frames.
How High Should I Hang Pictures On A Wall?
Hang pictures at eye level, typically 57 to 60 inches from the floor. Adjust height based on furniture and wall space.
Can I Hang Pictures On Drywall Without Studs?
Yes, use drywall anchors or special hooks designed for drywall. These provide extra support and prevent damage.
Conclusion
Hanging pictures with marking hooks is simple and effective. Take your time to measure and mark the spots carefully. Use the right hooks for your wall type. This helps keep your pictures steady and safe. Enjoy decorating your space with your favorite images.
Small steps make a big difference in your home’s look. Try it yourself and see how easy it can be.