Installing a deadbolt lock can give your home the extra layer of security you need, but drilling the perfect hole for it can feel tricky. If you’re worried about making mistakes or damaging your door, you’re not alone.
The good news is, with the right steps and tools, you can drill a clean, precise hole that fits your deadbolt perfectly. In this guide, you’ll learn exactly how to drill a hole for your deadbolt lock—no guesswork, no stress.
Keep reading, and by the end, you’ll have the confidence to protect your home like a pro.
Tools And Materials Needed
To drill a hole for a deadbolt lock, you need the right tools and materials. These help you work safely and get good results. Using proper equipment saves time and avoids damage to your door. Prepare everything before starting the job.
Choosing The Right Drill
Pick a drill that is easy to handle. A cordless drill works well for most doors. Check the drill’s power. It should be strong enough to go through wood or metal. A drill with variable speed control gives better precision.
Selecting Drill Bits
Use drill bits made for the door material. A spade bit or hole saw works best for wood doors. For metal doors, use a high-speed steel bit. Choose the correct size bit to match the deadbolt lock’s dimensions. This ensures a perfect fit.
Additional Supplies
Gather extra tools for a smooth process. A tape measure helps mark the drill spots. Use a pencil or marker for clear lines. A drill guide or template keeps holes straight. Safety glasses protect your eyes from dust and debris.

Credit: www.familyhandyman.com
Choosing The Lock Location
Choosing the right location for your deadbolt lock is important. It helps keep your door secure and makes the lock easy to use. The lock should be placed where it fits well and works smoothly. Two main steps help you pick the spot: measuring your door’s thickness and marking the hole positions. These steps ensure the lock fits tightly and functions properly.
Measuring Door Thickness
Start by measuring how thick your door is. Use a tape measure for this. Measure from one side of the door to the other. Deadbolt locks come in different sizes, so knowing your door’s thickness helps you pick the right lock. Most doors are between 1 3/8 inches to 1 3/4 inches thick. If your door is thinner or thicker, find a lock that fits. This step prevents problems when installing the lock later.
Marking Hole Positions
After measuring, mark where you will drill the holes. The main hole goes through the door’s face. It is usually 2 1/8 inches in diameter. Mark this spot at the correct height, usually about 6 to 12 inches above your door handle. Next, mark the edge of the door for the latch hole. This hole is smaller, about 1 inch wide. Use a pencil and a template if the lock came with one. Accurate marks help you drill clean holes and install the lock easily.
Preparing The Door
Preparing the door is a key step before drilling a hole for a deadbolt lock. It helps ensure a clean, accurate cut and protects the door from damage. Proper preparation also makes the installation easier and safer.
Clearing The Work Area
Start by removing any objects near the door. Clear furniture, rugs, and decorations. This gives you space to work freely. It also keeps items safe from dust or debris. A clean area helps you focus on the job.
Protecting The Door Surface
Cover the door surface with painter’s tape around the drilling spot. The tape prevents splintering and scratches. Use a pencil to mark the hole location on the tape. This keeps the marks visible and neat. Tape also helps guide the drill bit straight.
Drilling The Face Hole
Drilling the face hole is a key step when installing a deadbolt lock. This hole lets the lock fit securely on your door. Accuracy here helps the lock work smoothly and look neat. Use the right tools and follow the steps carefully. This ensures your door stays strong and safe.
Setting Drill Speed
Choose a slow drill speed to start. Slow speed gives more control and reduces mistakes. High speed can cause the drill to slip or the wood to split. Adjust your drill to a medium setting if the door material is hard. Always test the speed on a scrap piece first.
Drilling Straight And Clean
Hold the drill straight to the door surface. A tilted drill makes a crooked hole. Keep steady hands and apply even pressure. Let the drill do the work without pushing too hard. Clean the hole by pulling the drill out slowly. This prevents rough edges and chips.
Drilling The Edge Hole
Drilling the edge hole is a key step in installing a deadbolt lock. This hole allows the latch to fit securely into the door’s edge. Precision is important to ensure the lock works smoothly and fits well. Taking time to drill the hole correctly will help the deadbolt function properly and keep your door secure.
Aligning The Drill
First, mark the point on the door edge where the latch will go. Use a pencil to make a clear mark. Hold the drill straight and line the bit with this mark. Check that the drill is perpendicular to the door edge. This helps create a clean, even hole. A crooked hole can cause the latch to stick or not fit.
Creating The Latch Space
Start drilling slowly into the door edge at the marked point. Drill only deep enough for the latch to fit fully inside. Stop and check the depth often. Use a chisel to clean the edges if needed. Make sure the space is smooth and even. This space must be exact for the latch to sit flush with the door edge.
Installing The Deadbolt
Installing the deadbolt is the next step after drilling the holes. It ensures your door locks securely. This process needs care and precision. Follow these instructions to fit the latch and mount the lock cylinder correctly.
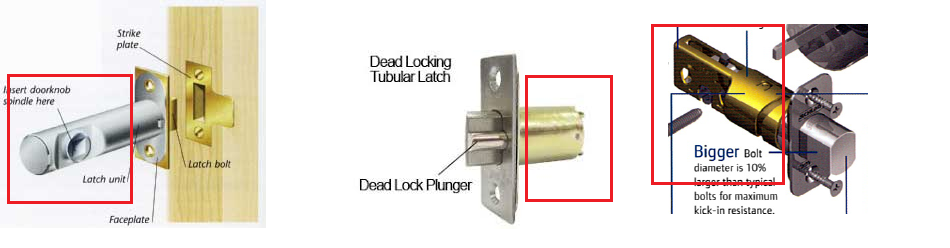
Fitting The Latch
Start by inserting the latch into the hole on the edge of the door. The latch bolt should face the door frame. Use a screwdriver to fasten the screws tightly. Make sure the latch sits flush with the door edge. Check if the latch moves smoothly when you push it.
Mounting The Lock Cylinder
Place the exterior part of the lock with the keyhole on the outside of the door. Align the spindle through the latch mechanism. On the inside, position the interior lock piece. Secure both parts with the provided screws. Test the lock by turning the key or thumb turn. It should operate without sticking or jamming.
Testing Lock Functionality
Testing lock functionality is a key step after drilling the hole for your deadbolt lock. It ensures the lock works properly and secures your door. Take your time to check every part carefully. This prevents problems later, like jamming or failure to lock.
Checking Bolt Movement
Start by turning the key or thumb turn to move the bolt. The bolt should slide out smoothly without sticking. Push the bolt back in to check retraction. If the bolt moves freely, it fits well in the hole you drilled. If it sticks or feels tight, adjust the hole or clean any debris inside.
Ensuring Smooth Operation
Test the lock several times to make sure it works every time. The key should turn easily without extra force. The bolt should extend and retract smoothly. Listen for any unusual sounds like grinding or scraping. These signs mean the lock parts may not align perfectly. Fix any rough spots by sanding or adjusting the lock placement. A smooth operation means your deadbolt will keep your door secure and easy to use.
Credit: diy.stackexchange.com
Tips For Clean And Safe Drilling
Drilling a hole for a deadbolt lock needs care and precision. Clean and safe drilling helps the lock fit well and keeps the door strong. Follow these tips to make the process easier and safer.
Avoiding Splintering
Splintering ruins the look of the door. Use painter’s tape over the spot to stop wood from chipping. Drill slowly at the start to let the bit cut smoothly. Keep the drill bit sharp and clean for a neat hole. Back the drill out now and then to clear wood dust.
Maintaining Drill Control
Hold the drill steady with both hands. Keep the drill straight to avoid uneven holes. Start drilling at a low speed for better control. Apply firm but gentle pressure; don’t force the drill. Take breaks if you feel the drill slipping or overheating.

Credit: www.youtube.com
Frequently Asked Questions
How Do You Measure For A Deadbolt Lock Hole?
Measure 6 to 7 inches from the door edge for the center of the hole. Mark the spot for accuracy before drilling. Use the lock’s template if provided to ensure proper alignment and fit.
What Drill Bit Size Is Needed For Deadbolts?
Typically, use a 2 1/8 inch hole saw for the main bore hole. For the latch hole on the door edge, a 1-inch spade bit is common. Check your lock instructions for exact sizes.
Can I Drill A Deadbolt Hole Without Damaging The Door?
Yes, use the correct drill bits and work slowly. Mark holes clearly and drill perpendicular to the door surface. Protect the door with tape to prevent splintering around the holes.
How Deep Should I Drill The Latch Hole?
Drill the latch hole about 1 inch deep into the door edge. Ensure the latch fits flush with the door surface. Verify depth with the latch size before final installation.
Conclusion
Drilling a hole for a deadbolt lock takes patience and care. Measure twice, drill once. Use the right tools and follow steps carefully. This helps ensure the lock fits well and works safely. Take your time to avoid mistakes or damage.
With practice, the task becomes easier and more confident. Enjoy the security a deadbolt lock provides for your home.