Hanging pictures can instantly brighten up your space and make it feel like home. But if you’ve ever tried to hang something heavy or on drywall, you know it’s not always easy.
That’s where wall anchors come in. Using the right wall anchors can keep your pictures secure and prevent damage to your walls. You’ll learn simple, step-by-step tips to use wall anchors like a pro. By the end, you’ll feel confident hanging your favorite photos and artwork safely and perfectly every time.
Keep reading to unlock the secret to hassle-free picture hanging!
Credit: thediyplaybook.com
Choosing The Right Wall Anchors
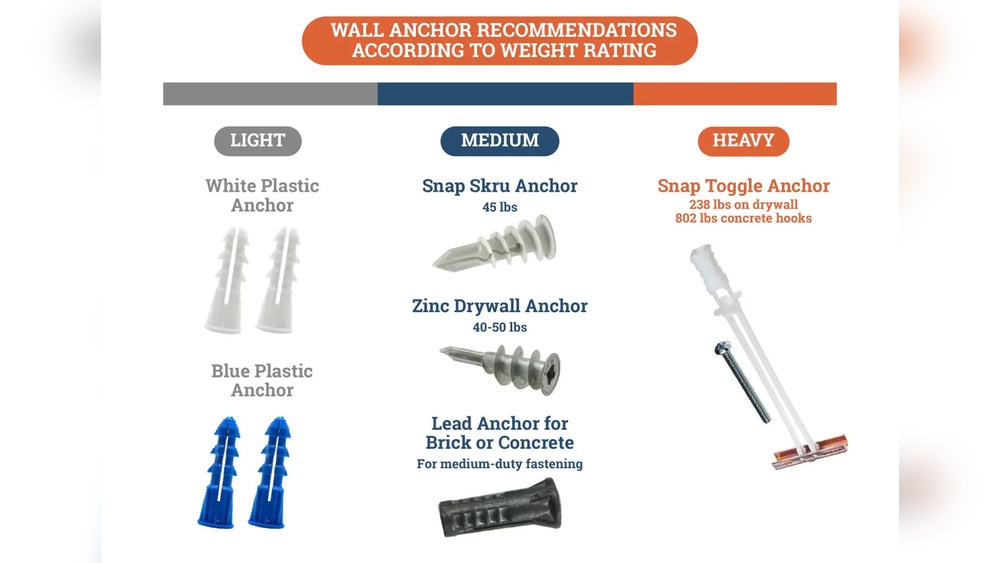
Choosing the right wall anchors is essential for hanging pictures safely. The anchors must fit the wall type and support the picture’s weight. Using the wrong anchor can cause damage or make the picture fall. Understanding the types of anchors and their uses helps you pick the best option.
Types Of Wall Anchors
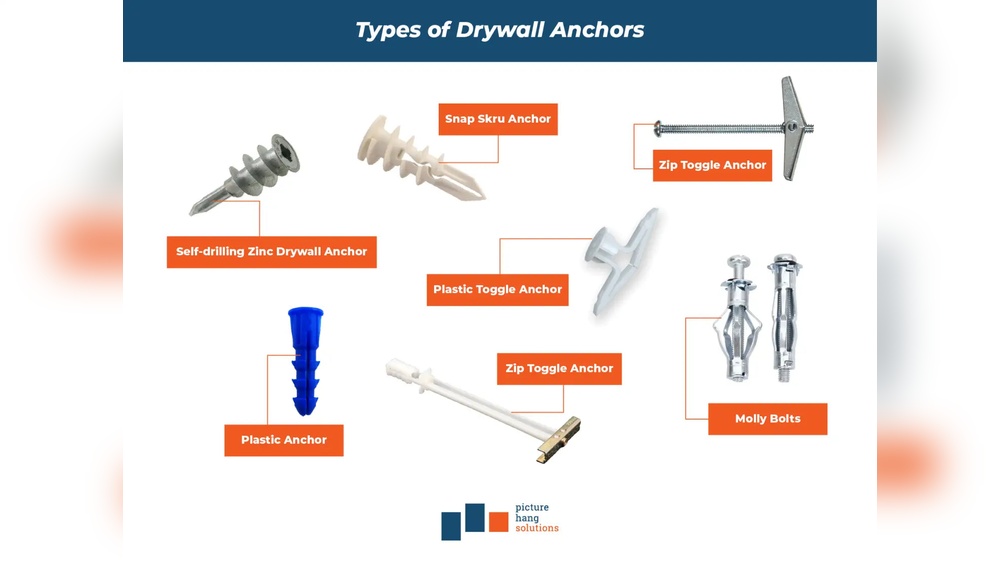
Wall anchors come in several types. Plastic expansion anchors work well in drywall and light loads. Toggle bolts have wings that open inside the wall for strong support. Molly bolts expand inside hollow walls for medium-heavy items. Self-drilling anchors screw directly into drywall without a pilot hole.
Matching Anchors To Wall Material
Different walls need different anchors. Drywall requires plastic anchors or toggle bolts. Plaster walls benefit from molly bolts or toggle anchors. Concrete or brick walls need masonry anchors or screws with plugs. Matching anchors to wall type ensures a secure hold and prevents damage.
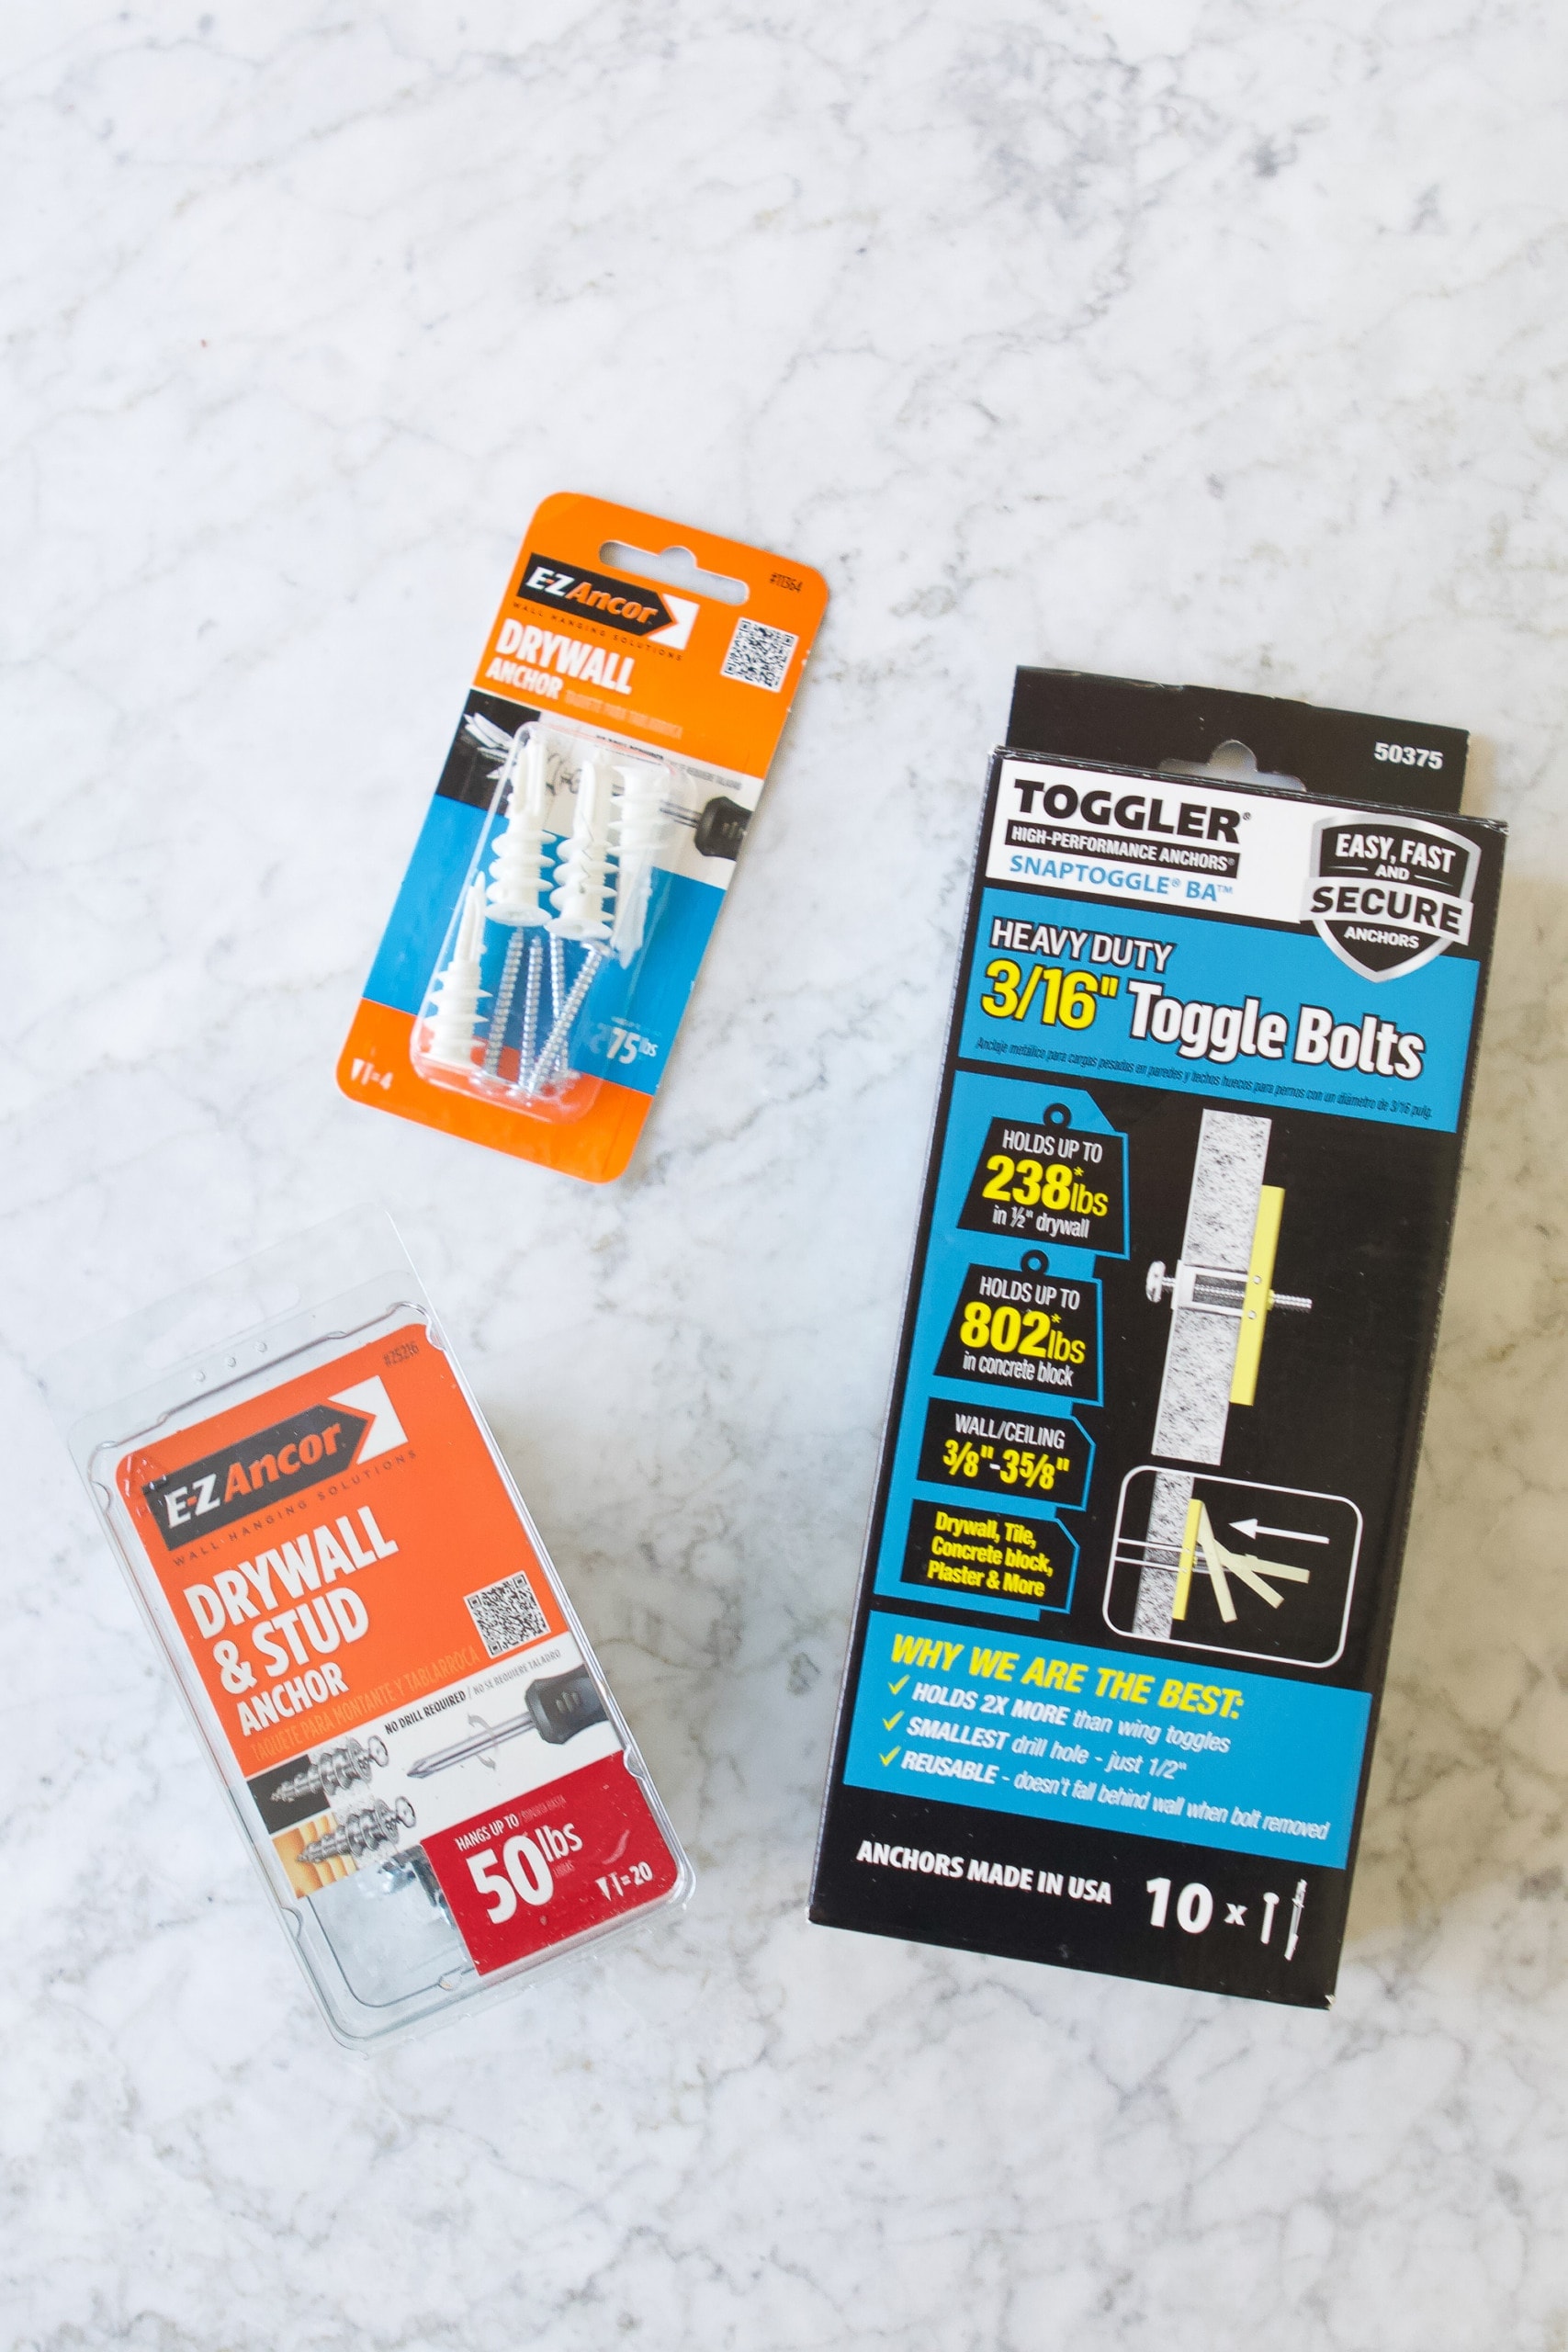
Weight Capacity Considerations
Every anchor has a weight limit. Check the packaging for maximum weight. Choose an anchor that supports more than the picture’s weight. Heavy frames need stronger anchors like toggle bolts. Light pictures can use simple plastic anchors. Always allow extra capacity for safety.
Credit: www.walmart.com
Tools And Materials Needed
Hanging pictures securely requires the right tools and materials. Using wall anchors ensures your pictures stay firmly in place. Prepare all necessary items before starting. This saves time and prevents mistakes.
Essential Tools
You need a drill or screwdriver to insert anchors and screws. A hammer helps tap in certain types of anchors. A tape measure measures the exact spot for hanging. A pencil marks where to place anchors. A level keeps your pictures straight. Safety glasses protect your eyes during drilling.
Selecting Appropriate Anchors And Screws
Choose anchors based on your wall type—drywall, plaster, or masonry. Plastic expansion anchors work well for light pictures on drywall. Metal anchors support heavier pictures and offer more strength. Toggle bolts hold the most weight on drywall. Match screws to the anchor size for a secure fit. Use rust-resistant screws for long-lasting support.
Preparing The Wall
Preparing the wall is the first step to hang pictures securely using wall anchors. This step helps to avoid damage and ensures your picture stays in place. Take time to prepare well. It makes the job easier and safer.
Locating Studs And Marking Spots
Start by finding the wall studs. Studs are wooden beams behind the drywall. They provide strong support for heavy items. Use a stud finder tool to locate them. Move the tool slowly along the wall. Mark each stud with a pencil.
If no stud is at the desired spot, use wall anchors. Mark the exact point where you want the picture hook. Make sure the mark is clear and visible. This helps to drill at the right place.
Measuring And Leveling
Measure the distance between your marks carefully. Use a tape measure for accuracy. Check the height where you want the picture to hang. Measure twice to avoid mistakes.
Use a level tool to ensure marks are straight. Hold the level against the wall near the marks. Adjust marks until the bubble is centered. This guarantees the picture hangs evenly and looks good.
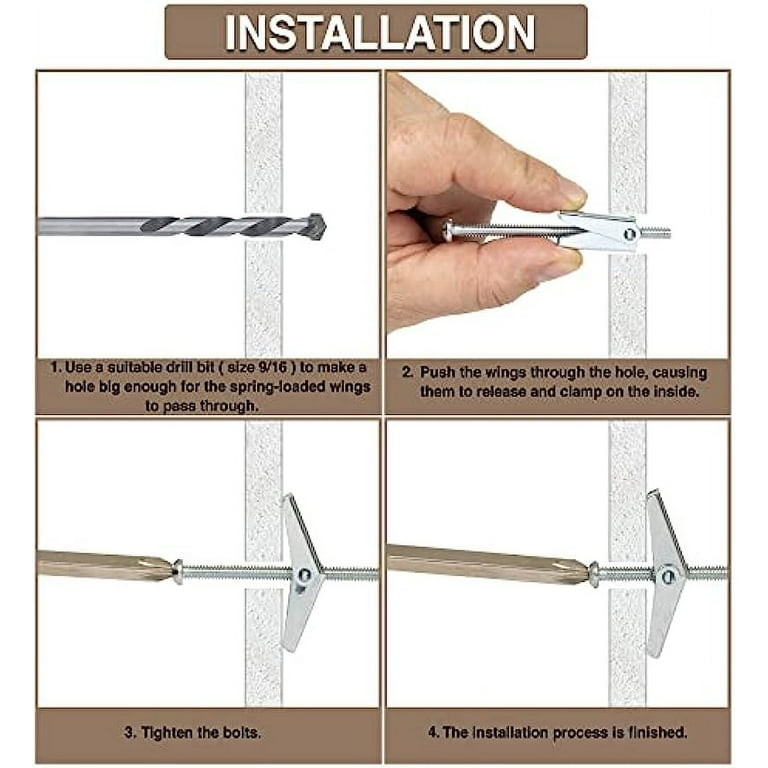
Installing Wall Anchors
Installing wall anchors is a key step in hanging pictures safely. Anchors hold the screw tightly in the wall. They stop the picture from falling or making holes bigger over time.
Follow clear steps to place anchors properly. This makes sure your picture stays secure and looks great on the wall.
Drilling Pilot Holes
Start by marking the spot for the anchor. Use a pencil to make a small mark on the wall. Choose a drill bit that matches the anchor size. Drill a straight, shallow hole at the mark. Be careful not to drill too deep or wide.
This hole guides the anchor and makes it easier to insert. It also prevents wall damage.
Inserting Different Types Of Anchors
Plastic expansion anchors push into the hole and expand when you insert the screw. Tap them gently with a hammer until flush with the wall. Toggle anchors have wings that open inside the wall. Push them through the hole and tighten the screw to lock. Threaded anchors screw into drywall like a large screw. Turn them by hand or with pliers until secure.
Choose the anchor type based on wall material and weight of your picture.
Ensuring Secure Fit
After inserting the anchor, add the screw slowly. Stop when it feels tight but do not over-tighten. Check if the anchor holds firm by gently pulling the screw. A solid anchor will not wiggle or pull out.
This step ensures your picture will stay on the wall without slipping or falling.
Hanging Pictures Safely
Hanging pictures safely keeps your walls and frames secure. Using wall anchors adds strength and support. It stops pictures from falling and causing damage. Follow these steps to hang your pictures firmly and neatly.
Attaching Hooks Or Brackets
First, choose hooks or brackets that fit your frame size and weight. Insert wall anchors into the drilled holes for strong hold. Screw hooks or brackets into the anchors tightly. Check that they do not wiggle or feel loose.
Mounting The Picture Frame
Lift the picture frame carefully and place it on the hooks or brackets. Make sure the frame hangs evenly and does not tilt. Use two hooks for larger frames to spread the weight. This prevents the frame from slipping or falling.
Final Adjustments
Step back and see if the picture is straight. Adjust the frame slightly left or right to perfect the angle. Press the frame gently against the wall to secure it. Check again after a few days to ensure it stays firm.
Troubleshooting Common Issues
Using wall anchors to hang pictures is simple but can have common issues. These problems may affect how well your pictures stay on the wall. Troubleshooting these issues helps you fix them quickly and protect your walls.
Loose Anchors
Loose anchors cause pictures to fall or tilt. This happens if the hole is too big or the anchor is weak. To fix this, remove the anchor and fill the hole with wood filler or putty. Let it dry, then drill a smaller hole. Use a proper-sized anchor for a tight fit.
Wall Damage Prevention
Prevent wall damage by choosing the right anchor for your wall type. Drywall anchors work best for drywall, while masonry anchors fit brick or concrete. Avoid drilling too deep or wide holes. Use a level and measure before drilling. This keeps your wall strong and neat.
Removing Anchors Without Damage
Remove anchors gently to avoid wall damage. For plastic anchors, try pushing them inside the wall with a screwdriver. For metal anchors, unscrew them carefully. If the anchor is stuck, use pliers to pull it out slowly. Patch the hole with filler and sand smooth for a clean finish.
Tips For Long-lasting Picture Hanging
Using wall anchors properly helps pictures stay secure on walls. To keep them hanging strong for a long time, follow simple tips. These tips prevent damage and keep your walls safe. A little care makes a big difference.
Avoiding Overloading
Check the weight limit of your wall anchors. Use anchors that match the picture’s weight. Heavy pictures need strong, heavy-duty anchors. Don’t hang many pictures on one anchor. Spread the weight evenly across several anchors. Overloading can cause anchors to fail and pictures to fall.
Regular Checks And Maintenance
Look at your pictures and anchors regularly. Make sure anchors stay tight in the wall. Loose anchors can cause pictures to tilt or fall. Tighten screws or replace anchors if needed. Clean dust from the picture hooks and wall area. Small checks prevent bigger problems later.

Credit: thediyplaybook.com
Frequently Asked Questions
What Are Wall Anchors Used For In Picture Hanging?
Wall anchors provide extra support for hanging pictures on drywall or hollow walls. They prevent nails or screws from pulling out. Anchors distribute weight evenly and ensure your pictures stay secure and level.
How Do I Choose The Right Wall Anchor Size?
Select anchors based on your picture’s weight and wall type. Light pictures need small plastic anchors, while heavier frames require metal or toggle anchors. Always check the anchor’s weight rating before installation.
Can I Hang Pictures Without Wall Anchors?
You can hang pictures without anchors on solid walls like wood or masonry. For drywall or plaster, anchors are necessary to prevent damage and ensure stability, especially for heavier frames.
How Do I Install Wall Anchors Correctly?
First, drill a pilot hole matching the anchor size. Insert the anchor flush with the wall surface. Then, screw in the hook or screw to hang your picture securely.
Conclusion
Using wall anchors helps hang pictures securely on any wall type. Choose the right anchor for your wall and picture weight. Drill carefully, insert the anchor, and screw in the hook or nail. This method prevents damage and keeps your pictures steady.
With practice, hanging art becomes quick and simple. Enjoy decorating your space with confidence and ease.