Are you looking to boost your home’s security without spending a fortune? Installing a deadbolt lock is one of the simplest and most effective ways to protect your space.
But if you’ve never done it before, the process might seem confusing or intimidating. Don’t worry—this step-by-step video guide will walk you through every part of the installation. By the end, you’ll have the confidence and know-how to secure your door like a pro.
Keep reading to discover how easy it can be to add this extra layer of safety to your home.

Credit: www.amazon.com
Choosing The Right Deadbolt
Choosing the right deadbolt is important for your home’s security. It protects your door from forced entry. Picking the correct type helps you feel safe and secure. There are different deadbolts designed for various needs and doors.
Types Of Deadbolts
Single-cylinder deadbolts use a key outside and a thumb turn inside. They are common for most front doors. Double-cylinder deadbolts need a key on both sides. These are good for doors with glass near the lock. There are also lockable thumb turn deadbolts, which add extra security. They let you lock the thumb turn with a key. Choose the type that best fits your door and safety needs.
Key Features To Consider
Look for a deadbolt with a solid metal bolt. A bolt at least one inch long is stronger. The lock’s grade is important. Grade 1 is the highest security level. Choose a lock with an easy-to-use key or thumb turn. Check if the deadbolt fits your door’s thickness. Also, consider the finish. It should match your door hardware and resist rust.
Tools And Materials Needed
Installing a deadbolt lock is a simple task with the right tools and materials. Having everything ready makes the process faster and easier. This section lists all items needed to install a deadbolt lock successfully.
Tools Required For Installation
You will need a drill to make holes in the door. Use drill bits that match the size of the lock parts. A screwdriver is necessary to tighten screws securely. A tape measure helps to mark exact spots for drilling. A pencil or marker is useful for marking measurements. A chisel can be needed to create space for the lock plate. A hammer helps to use the chisel properly. A level ensures the lock is straight.
Materials Needed For The Deadbolt Lock
The main material is the deadbolt lock kit. It includes the lock mechanism and keys. Make sure the lock fits your door thickness. Use screws that come with the kit for best results. Wood filler can fix any small mistakes around the holes. Sandpaper smooths the edges after drilling or chiseling. Tape can hold parts in place during installation.
Preparing The Door
Preparing the door is a key step before installing a deadbolt lock. It ensures the lock fits well and works smoothly. Take your time in this stage to avoid mistakes. The door must be ready for precise fitting and secure locking. Follow these steps carefully to prepare your door for the deadbolt.
Measuring And Marking
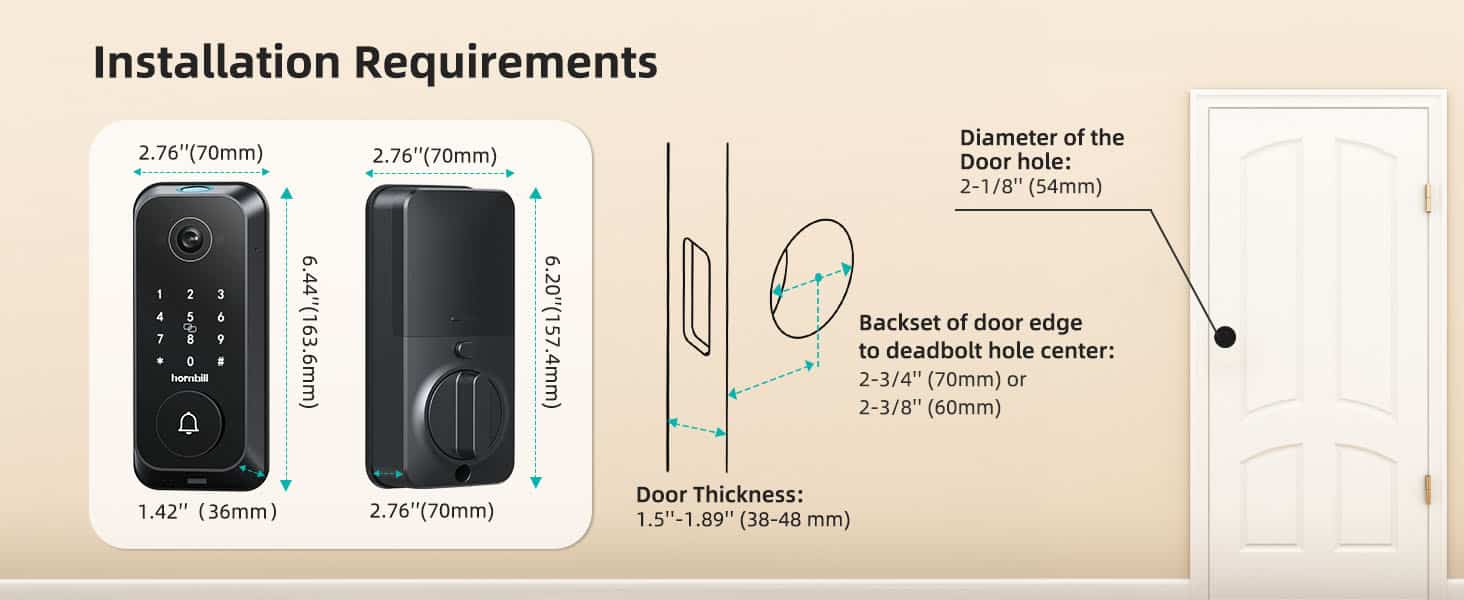
Start by measuring the door thickness and edge. Most deadbolts fit doors 1 3/8 to 1 3/4 inches thick. Use a tape measure to check this. Next, find the right height for the lock, usually 6 to 12 inches above the door handle.
Mark the spot clearly with a pencil. This mark shows where to drill the hole for the lock cylinder. Use the lock template if included. Mark the edge of the door for the bolt hole too. Accurate marks keep the lock straight and strong.
Drilling Holes
Choose a drill bit size that matches the lock instructions. Drill the hole on the door face first. Drill slowly to avoid splintering the wood. After the large hole, drill the smaller hole on the door edge for the bolt.
Clean the holes from dust and wood chips. Check the holes match the lock parts perfectly. If needed, use a chisel to smooth edges. Proper holes help the lock fit tightly and work well.
Installing The Deadbolt
Installing the deadbolt is an important step to secure your door. This process needs care and attention to ensure the lock works properly. Follow each step to fit the lock and strike plate correctly. A well-installed deadbolt adds strong protection to your home.
Fitting The Lock Mechanism
Start by placing the lock body inside the door hole. Align the lock so the bolt slides smoothly. Use screws to fix the lock firmly. Check the lock turns without sticking. Adjust the position if needed for smooth operation.
Attaching The Strike Plate
Next, position the strike plate on the door frame. Mark where the bolt will touch the frame. Chisel a small recess to fit the plate flush. Secure the plate with screws tightly. Test the bolt to ensure it fits well inside.
Testing The Lock
Testing the deadbolt lock after installation is very important. It ensures your lock works properly and keeps your home safe. Take time to check every part of the lock. This helps find any issues early. Proper testing saves frustration and extra work later.
Ensuring Smooth Operation
Turn the key gently to lock and unlock the door. The bolt should move easily without sticking. Test the lock from both inside and outside. Make sure the door closes fully before locking. Check if the key turns smoothly without force. The deadbolt should slide in and out without noise. Repeat this several times to confirm smooth action.
Troubleshooting Common Issues
If the lock feels stiff, try lubricating the bolt with graphite powder. Avoid using oil as it attracts dust. Make sure the strike plate is aligned with the bolt. Adjust the plate if the bolt hits or does not enter fully. Check the screws to ensure they are tight but not over-tightened. If the key won’t turn, inspect the key for damage or dirt. Clear any debris from the keyhole with compressed air. Testing early helps fix problems before they become bigger.
Credit: hornbilllock.com
Maintenance Tips
Proper maintenance keeps your deadbolt lock working well for years. It helps avoid problems like sticking or jamming. Small steps can save you from costly repairs or replacements. Follow these simple tips to keep your lock smooth and secure.
Lubricate The Lock Regularly
Use a graphite or silicone spray to lubricate the lock. Avoid oil-based lubricants. They attract dust and dirt. Spray a little inside the keyhole. Turn the key several times to spread the lubricant evenly. Do this twice a year for best results.
Clean The Lock Exterior
Wipe the outside of the lock with a damp cloth. Remove dirt and dust that can cause wear. Avoid harsh chemicals that damage the finish. Dry the lock completely after cleaning to stop rust.
Check The Screws And Alignment
Inspect screws on the lock and strike plate regularly. Tighten any loose screws. Check the lock’s alignment with the door frame. Misalignment can make the lock hard to use. Adjust the strike plate if needed to ensure smooth locking.
Test The Lock Often
Turn the key and thumb turn regularly. Make sure the lock operates smoothly every time. Early detection of problems helps prevent lock failure. Act quickly if the lock feels stiff or sticks.

Credit: www.amazon.com
Frequently Asked Questions
What Tools Do I Need To Install A Deadbolt Lock?
You need a drill, screwdriver, measuring tape, pencil, chisel, and the deadbolt lock kit. These tools ensure precise and secure installation.
How Long Does It Take To Install A Deadbolt Lock?
Installing a deadbolt lock typically takes 30 to 60 minutes. Time varies based on skill level and door type.
Can I Install A Deadbolt Lock On Any Door?
Most wooden and metal doors can support deadbolt locks. Check door thickness and material before installation for compatibility.
How Do I Align The Deadbolt Lock Correctly?
Measure and mark the door edge and frame carefully. Proper alignment ensures smooth locking and increased security.
Conclusion
Installing a deadbolt lock is easier than it seems. Watch the video carefully and follow each step. Take your time and use the right tools. A strong deadbolt improves your home’s security. You can protect your family and belongings better.
Practice makes perfect, so don’t rush. Soon, you will feel confident handling lock installations. Keep your home safe with this simple upgrade.