If you’re trying to install a deadbolt and realize the hole is too small, it can be frustrating. You want your lock to fit perfectly for security and peace of mind.
But don’t worry—making the hole bigger isn’t as hard as it seems. In this guide, you’ll learn simple, step-by-step tips to safely enlarge the hole without damaging your door. Keep reading, and you’ll have your deadbolt installed quickly and securely.
Tools Needed
Making a hole bigger for a deadbolt requires the right tools. Using proper tools ensures the job is safe and done well. Below are the key tools you need to prepare.
Drill And Drill Bits
A drill is essential for enlarging the hole. Choose a drill with good power and control. Use drill bits that match the size needed for the new hole. Start with smaller bits to avoid splitting the wood.
Hole Saw
A hole saw is a special blade for cutting large holes. It fits onto the drill and cuts clean edges. Pick a hole saw size that matches the deadbolt diameter. This tool helps make a smooth, round hole quickly.
Measuring Tape
Measure carefully before drilling. Use a measuring tape to check hole size and placement. Accurate measurements prevent mistakes and ensure the deadbolt fits well. Mark the spots clearly with a pencil.
Safety Gear
Safety comes first. Wear safety goggles to protect your eyes from dust and debris. Use gloves to shield your hands during drilling. Ear protection helps reduce noise from power tools. Safety gear keeps you safe throughout the process.

Credit: www.youtube.com
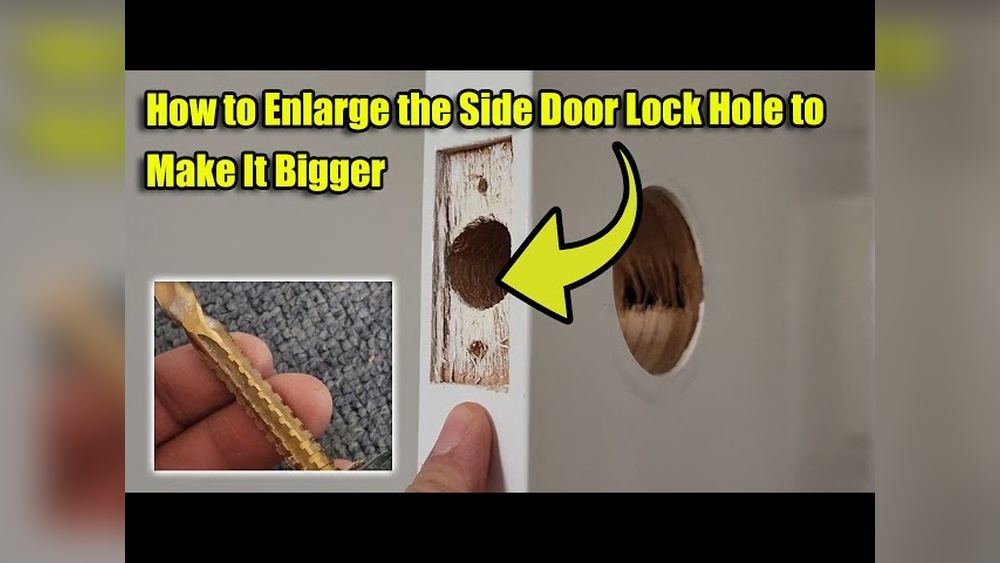
Measure The Existing Hole
Measuring the existing hole is the first step to making it bigger for a deadbolt. This step ensures the new hole fits the lock properly. Accurate measurement prevents mistakes and saves time. Take your tools and get ready to check the hole size carefully.
Check Hole Diameter
Use a tape measure or ruler to find the hole diameter. Measure across the widest part of the hole. Note the number in inches or millimeters. Write down this measurement. This helps you know how much to enlarge the hole.
Mark The New Size
Decide the new hole size based on your deadbolt’s requirements. Use a pencil or marker to draw the new circle around the hole. Make sure the mark is clear and even. This guide keeps you on track while drilling. Double-check the mark before starting any work.
Choose The Right Drill Bit Or Hole Saw
Choosing the right drill bit or hole saw is key to making a hole bigger for a deadbolt. The correct tool helps create a clean, precise hole. It also protects your door from damage. Using the wrong bit can cause splintering or uneven edges. This section explains how to pick the right drill bit or hole saw for your project.
Match Bit To Deadbolt Size
Start by checking the size of your deadbolt. Measure the diameter of the hole needed. The drill bit or hole saw must match this size exactly. A bit that is too small will not fit the deadbolt. One that is too large will leave gaps, reducing security. Always choose a bit that fits snugly to the deadbolt size. This ensures a strong, clean fit for your lock.
Types Of Drill Bits
Several drill bits work well for enlarging deadbolt holes. Spade bits are flat with a sharp point. They cut quickly through wood but may cause splintering. For a smoother finish, use a hole saw. It has a circular blade that cuts clean edges. For metal doors, a bi-metal hole saw is best. It cuts through metal without dulling fast. Choose the bit based on your door material and desired finish.
Prepare The Door
Preparing the door is the first step to make the hole bigger for a deadbolt. This step ensures a smooth and safe process. Taking time here helps avoid damage to the door or lock.
Remove Hardware
Start by taking off the existing lock and handle. Use a screwdriver to remove screws carefully. Keep all parts in a safe place. Removing hardware clears the area for drilling and enlarging the hole.
Protect Door Surface
Cover the door surface near the hole with painter’s tape. This prevents scratches and splinters while drilling. Use a cloth or cardboard behind the door to catch debris. Protecting the surface keeps the door looking good.
Drilling The Larger Hole
Drilling the larger hole for a deadbolt is a key step in the installation process. It allows the new lock to fit properly and work smoothly. Taking care during drilling helps avoid damage to the door. Follow these tips to make the hole clean and accurate.
Secure The Door
Keep the door steady before you start drilling. Use clamps or ask someone to hold it firmly. A moving door can cause mistakes or injury. Stability makes drilling safer and more precise.
Drill Slowly And Steadily
Begin drilling at a slow speed to control the bit. Press gently, letting the drill do the work. Fast drilling can crack the wood or damage the door. Steady pressure creates a smooth and even hole.
Check Progress Frequently
Stop often to check the hole size and depth. Use the deadbolt or a measuring tape for reference. This prevents drilling too far or making the hole too wide. Careful checks ensure the perfect fit for your lock.

Credit: www.reddit.com
Smooth And Finish The Hole
After making the hole bigger for your deadbolt, the next step is to smooth and finish the edges. This step is important to ensure the lock fits well and the door looks neat. Rough or sharp edges can cause problems when installing the deadbolt. Taking time to smooth the hole helps avoid damage to the lock and improves the door’s appearance.
Use Sandpaper Or File
Start by using sandpaper or a metal file. Choose medium-grit sandpaper or a fine file for best results. Rub the edges of the hole gently but firmly. Move in a circular motion to remove any rough spots or splinters. Keep checking the hole size as you smooth it. This prevents making the hole too large. Take your time until the edges feel smooth to touch.
Clean Debris
After smoothing, clear away all dust and debris. Use a brush or a cloth to wipe inside and around the hole. Dust can stop the deadbolt from fitting properly. Cleaning also helps the door paint or finish stick better if you plan to repaint. Ensure the hole is dry and clean before installing the deadbolt. A clean surface makes installation easier and stronger.
Install The Deadbolt
Installing the deadbolt is the key step after making the hole bigger. It ensures your door locks properly and stays secure. Follow these steps carefully to fit the deadbolt perfectly and keep your home safe.
Test Fit
Place the deadbolt into the hole to check the fit. Make sure it slides in easily without force. The bolt should line up with the hole in the door frame. Adjust the hole slightly if the deadbolt feels too tight. This prevents damage and ensures smooth operation.
Secure With Screws
Once the deadbolt fits well, secure it with screws. Use the screws provided with the lock set for best results. Tighten the screws evenly to avoid misalignment. Check that the lock moves smoothly after tightening. Properly secured screws keep the deadbolt firm and reliable.
Troubleshooting Tips
Making the hole bigger for a deadbolt can sometimes cause issues. Wood may splinter or holes might not align properly. These problems slow down your work and create frustration. This section offers easy tips to fix common troubles fast. Follow these steps to get a clean, strong hole every time.
Fixing Splintered Wood
Splintered wood around the hole looks bad and weakens the door. Use fine sandpaper to smooth rough edges carefully. Avoid sanding too much or the hole will grow too large. A small wood filler can fill deep cracks or chips. Let the filler dry fully before sanding it flat. This keeps the door strong and neat.
Adjusting Misaligned Holes
Misaligned holes make it hard to fit the deadbolt. Check the alignment with the lock and strike plate first. Mark the correct hole position using a pencil. Drill a new hole carefully in the right spot, slightly bigger if needed. Fill the old hole with wood filler or a wooden dowel. Sand it smooth and paint to match the door. This fixes fit issues and keeps the door secure.

Credit: www.reddit.com
Frequently Asked Questions
How Do I Enlarge A Deadbolt Hole Safely?
Use a hole saw or spade bit slightly larger than the current hole. Drill carefully to avoid damaging the door. Always wear safety goggles and measure twice before drilling.
What Tools Are Needed To Make A Deadbolt Hole Bigger?
You need a power drill, a larger hole saw or spade bit, a pencil, tape measure, and safety goggles. These tools help ensure precision and safety while enlarging the hole.
Can I Make The Deadbolt Hole Bigger Without Damaging The Door?
Yes, by measuring accurately and drilling slowly, you can avoid damage. Use the right drill bit size and steady pressure. Sand edges smoothly after drilling to prevent splinters.
How Much Bigger Should The Deadbolt Hole Be?
Make the hole slightly larger than the deadbolt’s diameter, usually 2 1/8 inches. This ensures the lock fits securely without forcing the door or lock components.
Conclusion
Making the hole bigger for your deadbolt is easier than it seems. With the right tools and steps, you can do it safely. Take your time and measure carefully to avoid mistakes. This small fix improves your door’s security and fit.
Practice patience and follow the instructions well. Soon, your deadbolt will work perfectly and keep your home safe. Don’t rush; a good job lasts longer. Simple steps lead to strong results. You’ve got this!