Are you tired of struggling with that tricky 3-way light switch in your home? Changing it might seem confusing, but with the right steps, you can do it yourself quickly and safely.
Imagine flipping a switch that works perfectly every time, without calling an electrician or dealing with complicated wiring. In this guide, you’ll learn exactly how to change a 3-way light switch with simple, clear instructions. Keep reading, and you’ll gain the confidence to tackle this common home fix on your own.

Credit: www.youtube.com
Tools And Materials Needed
Changing a 3-way light switch requires specific tools and materials. Having the right items helps complete the job safely and quickly. Prepare everything before you start to avoid interruptions.
Gather each tool and material carefully. This ensures you do not miss anything important. Safety is the top priority during electrical work.
Basic Hand Tools
You need a flathead screwdriver and a Phillips screwdriver. These help remove and install screws on the switch plate. A pair of needle-nose pliers is useful for bending and gripping wires.
Wire Strippers And Cutters
Wire strippers remove insulation without damaging the wire. Wire cutters trim wires to the right length. Both tools are important for clean, safe connections.
Voltage Tester
A voltage tester checks if wires carry electricity. It protects you from electric shock. Always test wires before touching them.
Electrical Tape And Wire Nuts
Electrical tape insulates wire connections. Wire nuts join wires securely. Use these to keep connections safe and tidy.
Replacement 3-way Switch
Buy a new 3-way switch that matches your old one. Check its voltage and amperage ratings. Using the correct switch prevents electrical problems.
Safety Gear
Wear safety goggles and insulated gloves. These protect your eyes and hands during the work. Always prioritize your safety.

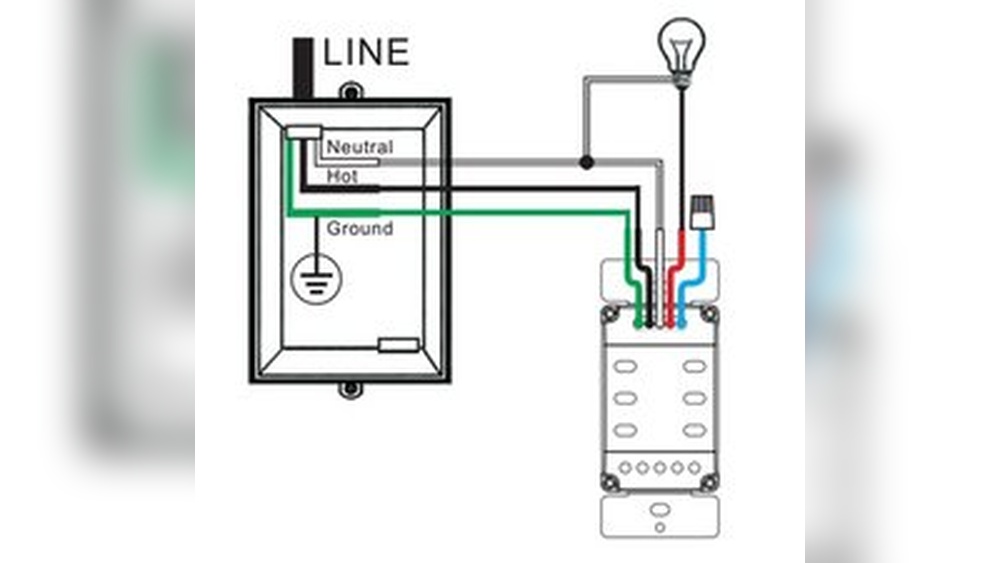
Credit: diy.stackexchange.com
How A 3 Way Switch Works
A 3 way switch controls one light from two different places. This setup is common in hallways and large rooms. It lets you turn the light on or off from either switch.
Understanding how it works helps with changing or fixing the switch safely. The 3 way switch uses a special wiring method. It sends power through two traveler wires that connect the switches.
Basic Components Of A 3 Way Switch
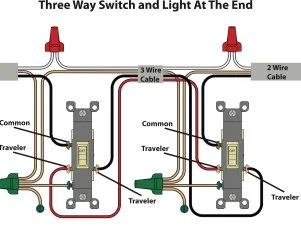
There are two switches involved in a 3 way setup. Each switch has three terminals: one common and two travelers. The common terminal connects to the power source or light fixture. The traveler terminals connect the two switches.
How Electricity Flows In A 3 Way Circuit
Electricity flows through the common terminal. It then travels via one of the traveler wires. The path changes depending on the switch position. This allows the light to turn on or off from either switch.
Switch Positions And Light Control
Each switch can be up or down, creating four possible positions. Two positions complete the circuit and turn the light on. The other two break the circuit, turning the light off. This simple method controls the light from two places.
Safety Precautions
Working on a 3 way light switch can be tricky. Safety is the top priority before starting any electrical task. Taking the right precautions protects you from electric shock or injury. It also helps prevent damage to your home’s wiring. Follow these safety steps closely to ensure a safe and smooth repair.
Turn Off The Power
Always switch off the power at the circuit breaker. Do not rely on the light switch to cut power. Use a voltage tester to check that wires are not live. This step is crucial to avoid electric shocks.
Use Insulated Tools
Choose tools with insulated handles made for electrical work. They reduce the risk of electric shock. Avoid using metal tools without insulation. Keep your hands dry while working.
Wear Safety Gear
Wear rubber-soled shoes to prevent grounding yourself. Use safety glasses to protect your eyes from sparks or debris. Gloves made for electricians add extra protection.
Work In A Dry Area
Never work on electrical switches in wet or damp places. Water increases the chance of electric shock. Ensure the area is dry and well-lit before starting.
Label Wires Before Disconnecting
Mark each wire’s position before removing it. This helps during reassembly and avoids wiring mistakes. Use tape or a marker to label wires clearly.
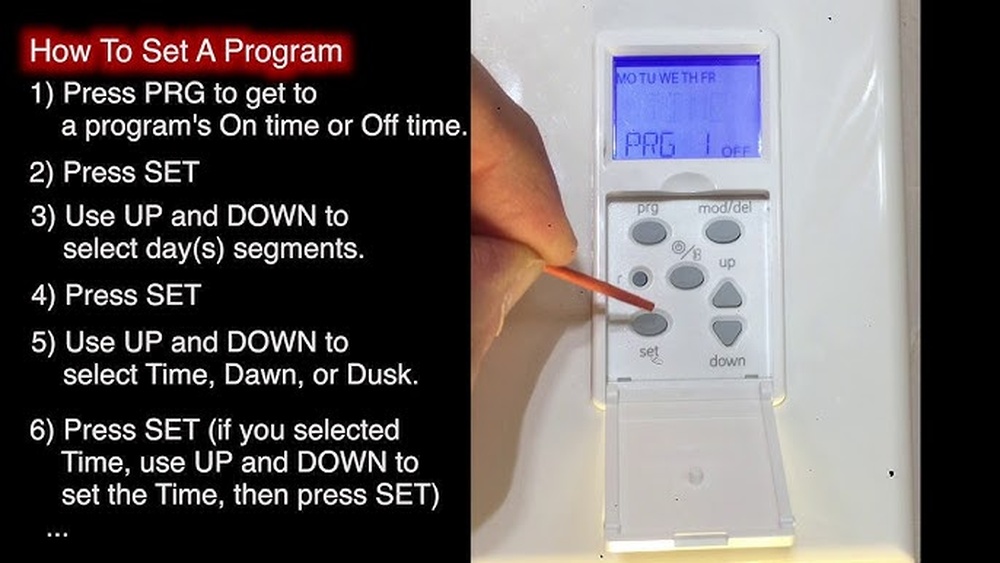
Credit: www.hgtv.com
Turn Off Power
Turning off power is the first step before changing a 3 way light switch. Safety is the top priority. Working with electricity without cutting power can cause shocks or injury.
Always make sure the power is completely off. This protects you and prevents damage to the switch or wiring.
Locate The Circuit Breaker
Find the main electrical panel in your home. It is usually in the basement, garage, or utility room. Look for the breaker labeled for the room or lights you want to work on.
Switch Off The Correct Breaker
Flip the breaker to the OFF position. This stops electricity from flowing to the switch. Check carefully to avoid turning off the wrong breaker.
Confirm Power Is Off
Use a voltage tester or a non-contact tester on the switch wires. Make sure no current is running before touching the switch. Test twice to be sure.
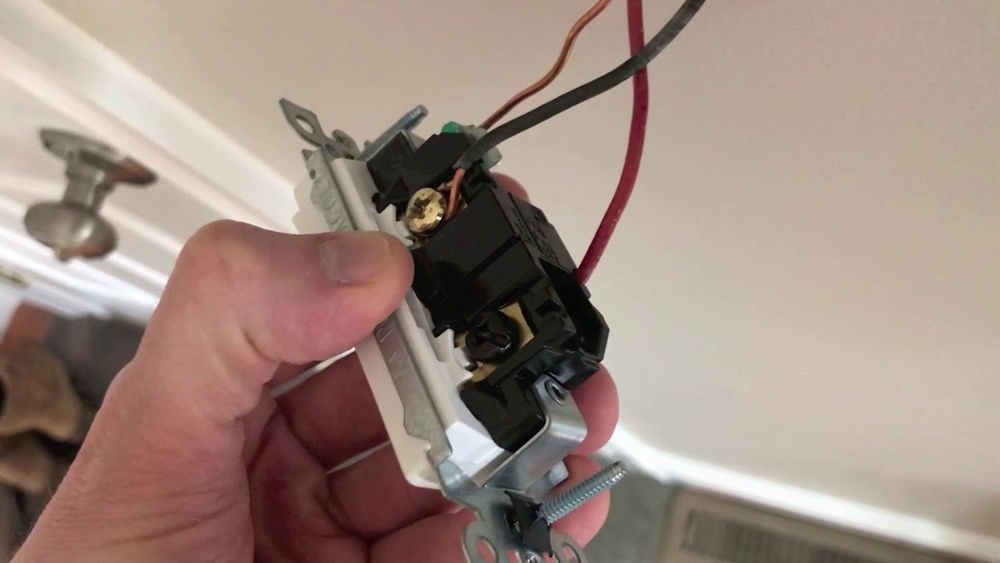
Remove The Old Switch
Removing the old 3-way light switch is the first step in the replacement process. It requires care and safety to avoid electrical hazards. Take time to prepare before touching any wires or screws.
Turn off the power to the switch at the circuit breaker. This stops any electricity from flowing and keeps you safe. Double-check with a voltage tester to confirm no current is present.
Gather Your Tools
Get a screwdriver, voltage tester, and a small container for screws. These tools make the removal easier and help keep parts organized.
Remove The Switch Cover Plate
Use the screwdriver to take off the cover plate. This exposes the switch and wiring behind it. Keep the screws safe to use later.
Unscrew The Old Switch
Loosen the screws holding the switch in place. Pull the switch gently out of the electrical box. Avoid yanking to prevent wire damage.
Test For Power
Use the voltage tester on the wires connected to the switch. Confirm no electricity flows before touching wires. Safety first.
Disconnect The Wires
Note how wires connect to the old switch. Take a photo if needed. Loosen the terminal screws and remove the wires carefully.
Identify And Label Wires
Before changing a 3 way light switch, identifying and labeling the wires is crucial. This step helps prevent confusion and ensures a safe, smooth installation. Each wire has a specific role, so knowing which is which saves time and avoids mistakes.
Take your time to check every wire carefully. Use labels or colored tape to mark them clearly. This way, you keep track of their functions as you work on the switch.
Turn Off Power And Open The Switch Box
First, turn off the power at the circuit breaker. This step keeps you safe from electric shock. Next, remove the switch cover and pull out the switch gently. Expose the wires connected to it.
Identify The Common Wire
The common wire is usually black or dark-colored. It connects to the common terminal on the switch. This wire carries power either from the power source or to the light fixture.
Find The Traveler Wires
Traveler wires are often red and black. They connect the two switches together. These wires allow control of the light from both switch locations.
Locate The Ground Wire
The ground wire is usually bare copper or green. It connects to the green ground screw on the switch. This wire protects you from electrical faults.
Label Each Wire Clearly
Use masking tape or wire labels to mark each wire. Write names like “common,” “traveler 1,” “traveler 2,” and “ground.” Labeling helps when you install the new switch.
Connect The New Switch
Connecting the new 3-way switch is a key step in the process. This step controls how the electricity flows to your lights from different switches. Proper connection ensures your lights work from both switch locations.
Before connecting, make sure the power is off. Safety first. Use a voltage tester to check the wires. No power means no shock risk.
Identify The Terminals On The New Switch
Look at the new switch carefully. You will see three terminals. Two are brass-colored for traveler wires. One is black for the common wire. Sometimes a green screw is for the ground wire.
Remember the common terminal. It connects to the power source or the light. The traveler terminals connect to the wires going to the other switch.
Attach The Ground Wire
Find the green or bare copper wire. This is the ground wire. Connect it to the green screw on the switch. Tighten the screw firmly. Grounding protects you from electrical faults.
Connect The Common Wire
Take the black wire. This is the common wire. Attach it to the black or dark-colored terminal. Tighten the screw securely. This wire carries power to the light or from the power source.
Attach The Traveler Wires
Find the two remaining wires. These are traveler wires. Connect each to one of the brass terminals. It does not matter which wire goes to which brass screw. Tighten both screws well.
Check All Connections
Double-check every wire is tight. Loose wires cause flickering or no light. Ensure no bare wire is exposed outside the screws. Proper connections keep your switch working well and safe.
Test The New Switch
Testing the new switch is a key step after installation. It confirms the switch works correctly. Safety depends on this test. Make sure power is on before testing.
Check Both Switches
Turn on the light using the first switch. Then try the second switch. The light should turn on and off with both switches. If not, wiring may need checking.
Test All Switch Positions
Flip each switch up and down. The light should respond every time. Test all combinations to be sure. This ensures the 3-way switch works fully.
Look For Flickering Or Dim Light
Notice if the light flickers or dims. This can signal a loose wire or poor connection. Tighten any loose wires and test again.
Use A Voltage Tester For Safety
Use a voltage tester to check power at the switch. This confirms safe and correct electrical flow. Always handle with care during this step.
Troubleshooting Tips
Troubleshooting a 3 way light switch can be tricky. Small mistakes in wiring cause big problems. This section offers simple tips to find and fix common issues fast.
Start by checking each connection. A loose wire can stop the switch from working. Make sure all wires are tight and in the right place.
Check The Power Supply
Confirm power is off before touching wires. Use a voltage tester to check if power reaches the switch. No power means a problem with your circuit breaker or fuse.
Inspect Wire Connections
Look for loose or disconnected wires. Wires must connect firmly to the correct terminals. Different colors have specific roles in a 3 way switch setup.
Test The Switches Individually
Remove the switches and test each with a multimeter. A faulty switch will not show continuity. Replace any switch that fails the test.
Check For Short Circuits
Short circuits cause flickering or no light. Look for damaged insulation or crossed wires. Repair or replace any damaged parts.
Verify The Traveler Wires
Traveler wires carry current between switches. They must connect to the right terminals. Swapping these wires can cause the switch to fail.
Frequently Asked Questions
How Do I Identify A 3-way Light Switch?
A 3-way switch has three terminal screws plus a ground screw. It controls lights from two locations. Look for these screws and multiple wires behind the switch.
Can I Replace A 3-way Switch Myself Safely?
Yes, if you turn off the power at the breaker. Use a voltage tester to confirm no current. Follow wiring diagrams carefully and work patiently.
What Tools Are Needed To Change A 3-way Switch?
You’ll need a screwdriver, voltage tester, wire stripper, and electrical tape. These tools help safely remove and install the switch.
How Do I Connect Wires To A New 3-way Switch?
Match each wire to the corresponding terminal: common, traveler 1, and traveler 2. Tighten screws securely to ensure proper electrical contact.
Conclusion
Changing a 3 way light switch can seem tricky at first. Take your time and follow each step carefully. Always turn off the power before starting to stay safe. Use the right tools and check your work twice. With patience, you can fix or replace the switch yourself.
This saves money and gives you confidence. Remember, if unsure, ask a professional for help. Keep your home bright and working well. Simple steps make the job easier than you think. You can do this!