Have you ever wondered how hard it really is to replace a light switch in your home? You might think it’s a job best left to a professional, but what if you could do it yourself safely and quickly?
Imagine saving time and money by handling this simple fix on your own. You’ll discover exactly what’s involved in replacing a light switch, step-by-step. By the end, you’ll know if this is a task you can tackle confidently or if it’s better to call in an expert.
Keep reading—you might be closer to your next DIY success than you think!

Credit: www.youtube.com
Tools Needed
Replacing a light switch requires some basic tools and safety gear. Having the right tools makes the job easier and safer. You do not need many items to complete this task.
Basic Tools
A flathead screwdriver and a Phillips screwdriver are essential. These help remove the switch cover and screws. Wire strippers are useful for preparing wires. A voltage tester checks if power is off. Needle-nose pliers help bend and hold wires. A small flashlight can assist in dark spaces.
Safety Equipment
Safety goggles protect your eyes from sparks or debris. Insulated gloves reduce the risk of electric shock. Turn off the power at the breaker before starting. Avoid working on live circuits. Keep a first aid kit nearby for emergencies.

Credit: blueskysparky.com
Safety Precautions
Replacing a light switch requires careful attention to safety. Electricity can be dangerous if not handled properly. Taking the right safety steps prevents accidents and injuries. Always prepare before starting any electrical work.
Turning Off Power
Locate the main breaker or fuse box in your home. Switch off the power to the circuit that controls the light switch. Do not rely on the switch itself to cut power. Confirm the power is off before touching any wires. This step keeps you safe from electric shock.
Testing For Electricity
Use a voltage tester to check the wires at the switch. Touch the tester to each wire to see if current is present. The tester should show no electricity if the power is off. Double-check to be certain before proceeding. Never assume wires are safe without testing.
Removing The Old Switch
Removing the old light switch is the first step in replacement. It needs care and safety. Turn off the power at the breaker box before starting. Use a voltage tester to check the switch is off. This step stops electric shocks. Follow these clear steps to remove the switch safely.
Unscrewing The Cover Plate
Start by locating the screws on the cover plate. Use a screwdriver that fits the screws well. Turn the screws counterclockwise to remove them. Keep the screws in a safe place. Gently pull the cover plate away from the wall. Sometimes paint or dirt can make it stick. Use slow, steady pressure to avoid breaking the plate.
Detaching The Switch
Next, find the screws holding the switch to the electrical box. Unscrew them carefully and set them aside. Pull the switch out slowly to see the wires behind. Wires may be tight, so do not force them. Note how the wires connect to the switch. This helps when attaching the new switch. Use a screwdriver to loosen the wire screws. Detach the wires one by one, keeping track of their positions.
Identifying Wiring Types
Identifying wiring types is the first step in replacing a light switch. Knowing the wiring helps you work safely and correctly. Different switches use different wiring setups. Understanding these will make the replacement easier.
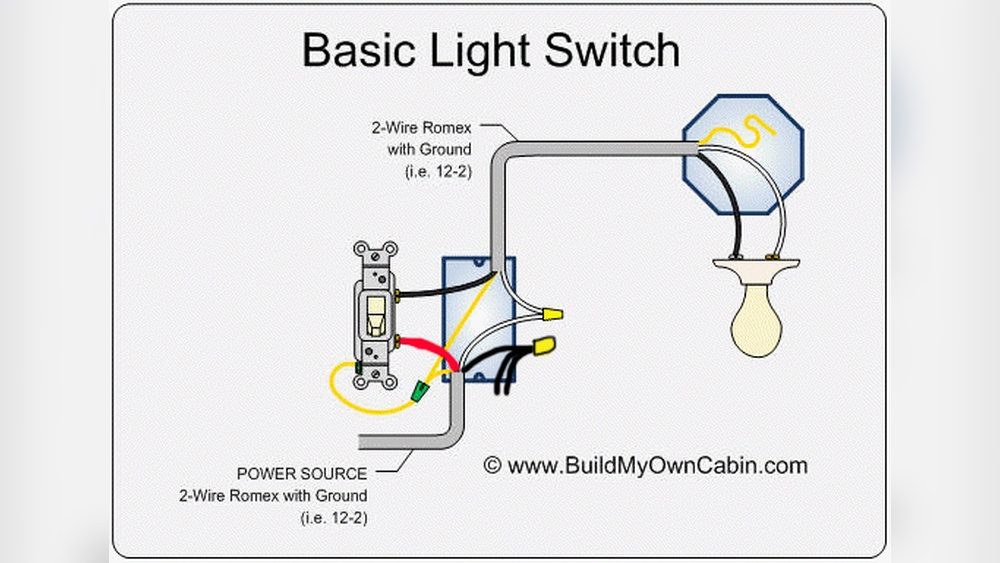
Single-pole Switch Wiring
A single-pole switch controls one light from one location. It has two wires connected to it. One wire brings power in, the other sends power to the light. There is also a ground wire for safety. These switches are the simplest to replace.
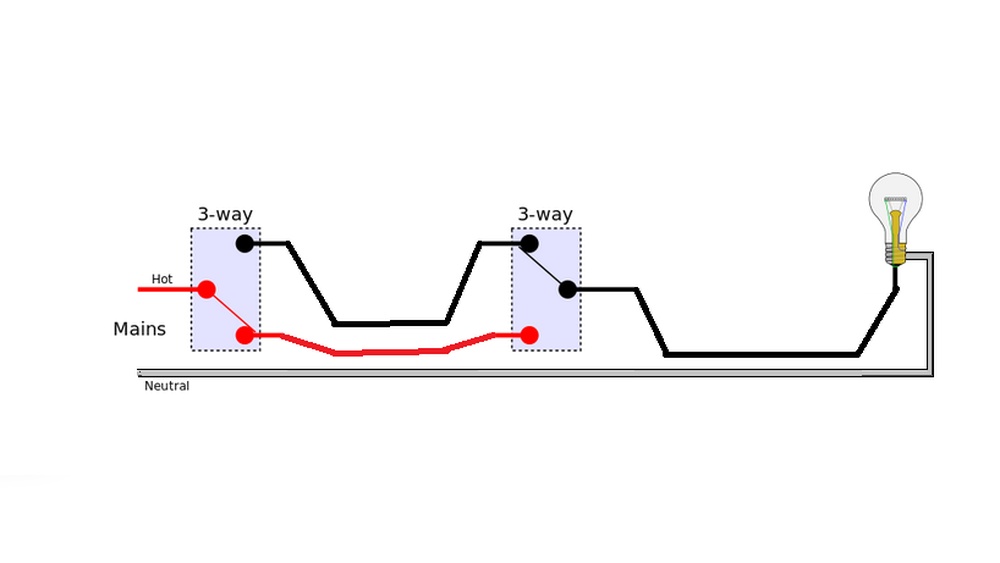
Three-way Switch Wiring
A three-way switch controls one light from two locations. It has three wires plus a ground wire. Two wires are travelers that carry current between switches. The third wire connects to the light or power source. This wiring is more complex and needs careful handling.
Installing The New Switch
Installing a new light switch is the key step after removing the old one. It requires careful handling to ensure safety and proper function. This part of the process involves connecting wires and securing the switch in place. Doing these tasks right prevents electrical problems and keeps the switch working well.
Connecting Wires Correctly
First, match the wires to the correct terminals on the new switch. Usually, black or red wires connect to brass screws. White wires go to silver screws if the switch controls a light with a neutral wire. Green or bare copper wires attach to the green grounding screw. Tighten each screw firmly to hold the wire in place. Loose wires can cause sparks or switch failure. Double-check connections before moving on.
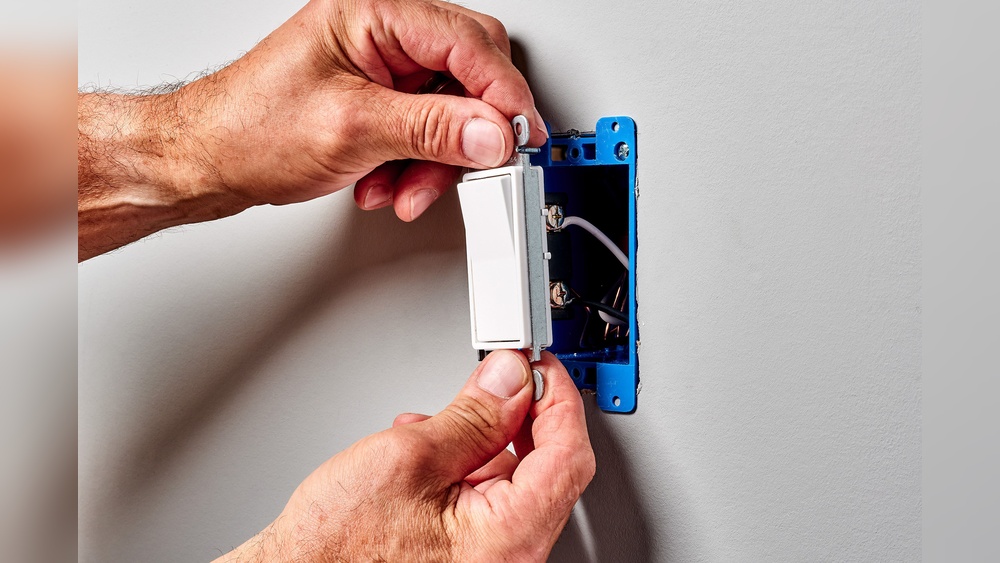
Securing The Switch
Push the switch carefully back into the electrical box. Avoid pinching wires or forcing them. Align the switch holes with the box screws. Use a screwdriver to tighten the mounting screws evenly. The switch should sit flush with the wall, not crooked or loose. Finally, attach the switch cover plate. Secure it with screws to finish the installation. A well-secured switch looks neat and stays safe to use.
:max_bytes(150000):strip_icc()/how-to-replace-a-light-switch-1824670_07_newswitch_40431-69f2872f4a734dc89e3c2bed8711fc69.jpg)
Credit: www.thespruce.com
Testing The New Switch
Testing the new switch is a crucial step after installation. It ensures the switch works properly and safely. This process involves restoring power and checking the switch’s functionality. Taking time here prevents future problems and saves effort.
Restoring Power
First, turn the power back on at the circuit breaker. Make sure the switch is in the off position before restoring power. This prevents any sudden sparks or shocks. After turning on the breaker, return to the switch and prepare to test it.
Checking Functionality
Press the switch up and down to see if the light responds. The light should turn on and off smoothly. If it flickers or does not work, turn off the power again and check your wiring. A properly installed switch will work without any issues.
Common Issues And Fixes
Replacing a light switch can seem tricky. Many common problems cause switches to stop working. Understanding these issues helps fix them quickly. This section covers typical problems and simple solutions.
Switch Not Working
A switch that does not work might be broken inside. The switch can wear out after many uses. Sometimes, the problem is the wiring, not the switch itself.
Test the switch with a voltage tester to see if it gets power. If no power reaches the switch, the problem is elsewhere. If power is there, the switch likely needs replacing.
Loose Connections
Loose wires cause switches to fail or work intermittently. Wires can loosen over time from movement or poor installation. Check all wire connections behind the switch plate carefully.
Tighten any loose wires with a screwdriver. Make sure wires are wrapped correctly around screws. Loose connections can cause flickering lights or no light at all.
When To Call A Professional
Replacing a light switch may seem simple. Some jobs are easy to do yourself. Others need a professional’s skill and tools. Knowing when to call a pro keeps your home safe. It also saves time and stress.
Complex Wiring
Homes with old or unusual wiring need expert care. Multiple switches controlling one light can confuse beginners. Circuit breakers and wiring colors differ in some houses. Professionals understand these systems well. They ensure the new switch works correctly and safely.
Safety Concerns
Electricity is dangerous without proper knowledge. Mistakes can cause shocks or fires. Professionals follow safety rules and use proper tools. They turn off power and test wires before work. Avoid risks by letting experts handle electrical tasks.
Frequently Asked Questions
How Difficult Is It To Replace A Light Switch?
Replacing a light switch is moderately easy for those with basic electrical knowledge. It involves turning off power, removing the old switch, and wiring the new one correctly. Always prioritize safety and consider consulting a professional if unsure.
What Tools Do I Need To Replace A Light Switch?
You need a screwdriver, voltage tester, wire stripper, and new light switch. These tools help safely remove the old switch and install the new one properly. Having the right tools ensures a smooth, efficient replacement process.
How Long Does It Take To Replace A Light Switch?
Replacing a light switch typically takes 15 to 30 minutes for most people. Time depends on experience and switch type. Careful preparation and following safety steps can make the process quicker and safer.
Can I Replace A Light Switch Without Turning Off Power?
No, always turn off the circuit breaker before replacing a light switch. Working with live wires is dangerous and can cause electric shocks or damage. Safety should be your top priority.
Conclusion
Replacing a light switch is not as hard as it seems. With basic tools and care, many can do it safely. Always turn off the power first. Follow simple steps, and take your time. Mistakes can cause problems or injuries.
If unsure, ask a professional for help. Trying it yourself can save money and boost confidence. Small tasks like this can teach useful skills. Give it a try, but stay safe above all.