Are you looking to add a light switch to an existing switch but don’t know where to start? You’re not alone.
Many homeowners want to improve their lighting setup without calling an electrician. The good news is, with the right steps, you can do it yourself safely and quickly. In this guide, you’ll discover simple instructions that anyone can follow, even if you have little experience.
By the end, you’ll have the confidence to add that extra switch and brighten up your space just the way you want. Keep reading to learn how!
Tools And Materials Needed
Adding a light switch to an existing switch needs the right tools and materials. Having everything ready helps make the job smooth and safe. This section lists what you need before starting the work.
Essential Tools For The Job
Use a screwdriver set with flat and Phillips heads. A voltage tester is key to check if wires are live. Wire strippers help remove insulation cleanly. Pliers come in handy for bending and twisting wires. A drill with bits may be needed for new holes. Measuring tape ensures precise placement of the switch box.
Choosing The Right Switch
Select a switch that matches your existing setup. Standard single-pole switches work for simple on/off control. For controlling one light from two spots, pick a three-way switch. Check the amperage rating to fit your home’s wiring. Buy a switch that fits the switch box size and style.
Safety Gear And Precautions
Wear insulated gloves to protect from shocks. Safety glasses shield your eyes from debris. Turn off power at the breaker before starting work. Use a voltage tester again to confirm no power is present. Work in a dry area to avoid electric hazards. Keep tools organized to prevent accidents.
Preparing The Work Area
Preparing the work area is the first step before adding a light switch. A clean and safe space helps you work faster. It also prevents accidents and mistakes. Take time to organize and check everything. Safety should be your top priority.
Turning Off Power Safely
Find the main electrical panel in your home. Switch off the circuit breaker that controls the switch you want to work on. Use a label or tape to mark it off. This stops anyone from turning the power back on by mistake. Double-check that the power is off before you start.
Clearing The Workspace
Remove any furniture or objects near the switch. Keep the area free of clutter and dust. Use a bright light to see clearly. A tidy workspace helps avoid trips or falls. It also gives you enough room to move tools and parts.
Testing For Live Wires
Use a voltage tester to check the wires in the switch box. Touch the tester to each wire carefully. The tester shows if electricity is still flowing. Never touch wires with your hands before testing. Confirm that all wires are dead before you continue.
Removing The Existing Switch
Removing the existing switch is the first step to add a new light switch. This step requires care and attention to safety. Always turn off the power at the circuit breaker before you start. Removing the switch allows you to access the wiring behind it. This access is necessary to connect the new switch properly.
Unscrewing The Switch Plate
Start by unscrewing the switch plate cover. Use a screwdriver that fits the screws well. Place the screws somewhere safe so you do not lose them. Gently pull off the switch plate to expose the switch and wiring.
Disconnecting Wires
Next, identify the wires connected to the switch. Take a photo for reference if needed. Use a screwdriver to loosen the screws holding the wires. Carefully disconnect each wire from the switch. Keep the wires from touching each other to avoid shorts.
Inspecting The Wiring Setup
Check the wiring setup after removing the switch. Look for any damaged or loose wires. Note the color and position of each wire. This step helps you understand how to connect the new switch. Make sure the wires are clean and ready for connection.

Credit: diy.stackexchange.com
Wiring The New Switch
Wiring the new switch is the key step in adding it to your existing setup. It requires care and attention to detail. Following the right steps ensures the switch works safely and properly. Understanding the wires and making strong connections is essential.
Identifying Wire Types
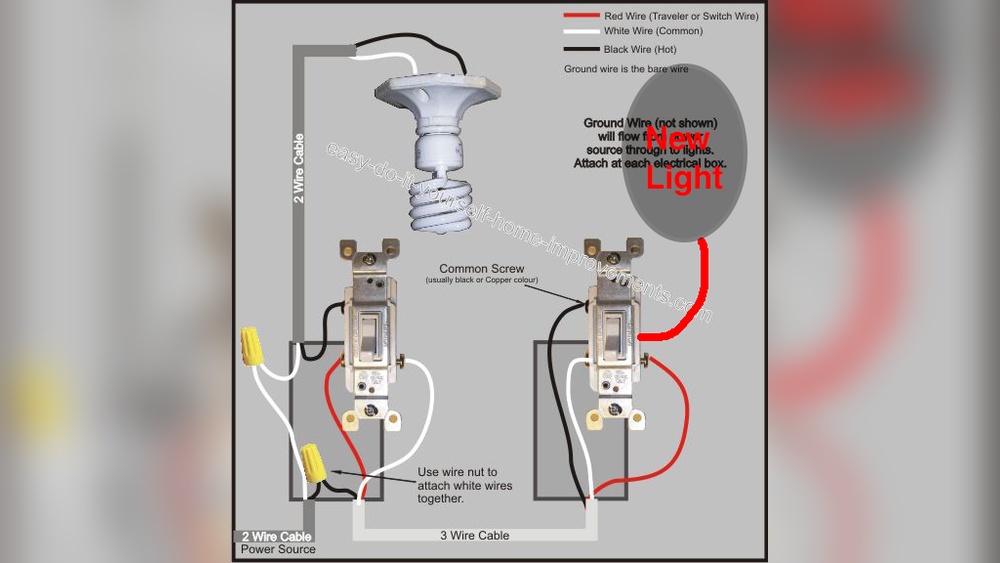
Start by looking at the wires in your switch box. Usually, you will see black, white, and green or bare copper wires. Black wires carry current and are called “hot” wires. White wires are neutral and complete the circuit. Green or bare wires are for grounding and safety. Knowing these helps avoid mistakes and keeps you safe.
Connecting Wires To The New Switch
Match the wires from the wall to the new switch terminals. Connect the black “hot” wire to the switch’s brass or black screw. Attach the white neutral wires together with a wire nut, not to the switch. Connect the green or bare ground wire to the green screw on the switch. Tighten all screws firmly to hold the wires in place.
Securing Wire Connections
Use wire nuts to join wires tightly. Twist wires together before placing the nut on. Tug gently on wires to check security. Wrap electrical tape around wire nuts for extra safety. Push all wires neatly into the box. Close the switch plate carefully without pinching wires.
Installing The New Switch
Installing the new switch completes the process of adding a light switch. This step requires care and precision. Proper installation ensures the switch works safely and correctly. Follow the instructions below to mount the switch, attach the plate, and check your work.
Mounting The Switch In The Box
Start by placing the new switch inside the electrical box. Align the switch’s screw holes with the box’s mounting holes. Use a screwdriver to tighten the screws. Do not overtighten, or the switch may crack. The switch should sit flush against the wall plate. Make sure the wires are not pinched or loose.
Attaching The Switch Plate
Place the switch plate over the mounted switch. Line up the plate holes with the switch’s screws. Secure the plate using the small screws provided. Tighten them evenly to avoid cracking the plate. The plate should fit snugly against the wall. This step protects the wiring and gives a clean look.
Double-checking Installation
Check the switch for any loose screws or gaps. Ensure the switch moves smoothly without resistance. Confirm all wires are secured and tucked inside the box. Turn the power back on and test the switch. The light should turn on and off without flickering. Proper checks prevent future electrical issues and ensure safety.

Credit: www.youtube.com
Testing The New Setup
Testing the new setup is a key step after adding a light switch. It ensures safety and functionality. Take time to check every part carefully. This helps avoid future problems and keeps your home safe.
Restoring Power
Start by turning the power back on at the circuit breaker. Make sure the breaker is fully switched on. Test other devices on the same circuit to confirm power is restored. Use a voltage tester to check the new switch wires. Never skip this step to avoid shocks or damage.
Checking Switch Functionality
Flip the new switch on and off several times. Watch if the connected light responds correctly each time. Check for any flickering or delays in turning on. Test the original switch too, as it may be on the same circuit. Both switches should work smoothly without issues.
Troubleshooting Common Issues
If the light does not turn on, double-check wiring connections. Loose or reversed wires often cause problems. Use a screwdriver to tighten terminal screws. Make sure the switch is compatible with your light fixture. Replace the switch if it feels loose or damaged. If issues persist, consider consulting a professional electrician.
Tips For A Professional Finish
Achieving a professional finish when adding a light switch is important. It improves safety and looks neat. Paying attention to small details makes a big difference. Follow these tips to ensure your work looks clean and works well.
Managing Loose Wires
Loose wires cause problems and can be dangerous. Always secure wires tightly inside the box. Use wire nuts to join wires firmly. Push wires carefully so nothing gets pinched. Keep wires organized to avoid tangling. This keeps everything safe and easy to maintain.
Labeling Switches
Labeling switches helps everyone understand their purpose. Use simple labels like “Light” or “Fan.” Place labels near the switch or inside the box. Clear labels prevent confusion later. It saves time and avoids mistakes during repairs or upgrades.
Maintaining Safety Standards
Safety is the top priority in any electrical work. Turn off power before starting the job. Use tools with insulated handles to protect yourself. Follow local electrical codes and guidelines strictly. Check connections twice to ensure they are secure. Proper safety prevents accidents and keeps your home safe.

Credit: www.do-it-yourself-help.com
Frequently Asked Questions
How Do I Safely Add A Light Switch To An Existing Switch?
Turn off the power at the circuit breaker before starting. Use a voltage tester to confirm no electricity flows. Follow wiring diagrams and local codes for safe installation. If unsure, consult a licensed electrician to avoid hazards and ensure compliance.
What Tools Are Needed To Add A New Light Switch?
You’ll need a screwdriver, wire stripper, voltage tester, electrical tape, and wire nuts. A drill and a voltage detector can also help. Having proper tools ensures a safe and efficient installation process when adding a light switch.
Can I Add A Light Switch Without Rewiring The Entire Circuit?
Yes, you can add a switch by tapping into the existing wiring. Use a switch loop or connect to the existing switch box. Make sure to follow electrical codes and turn off power before working on the circuit.
How Do I Connect Wires When Adding A Second Switch?
Match wire colors: black (hot), white (neutral), and green or bare (ground). Connect the new switch in parallel with the existing one. Use wire nuts to secure connections and ensure proper grounding for safety and functionality.
Conclusion
Adding a light switch to an existing switch is easier than it seems. Follow the steps carefully and keep safety in mind. Turn off the power before starting any work. Use the right tools and materials for the job. Check your connections twice to avoid problems later.
Taking your time helps you do it right. Soon, you will have control over more lights in your home. A small change can make a big difference in comfort and convenience. Give it a try and see how simple it can be.