Have you ever wondered if your light switch is really working or if it’s just a simple wiring problem? Knowing how to check a light switch with a multimeter can save you time, money, and frustration.
You don’t need to be an expert electrician to do this—you just need the right tool and a few easy steps. You’ll discover how to use a multimeter to quickly find out if your switch is faulty or fine. Keep reading, and you’ll gain the confidence to troubleshoot your light switches like a pro.
:max_bytes(150000):strip_icc()/testing-single-pole-switches-1152811-03-8b89394a236d499ebee520df31a0ce27.jpg)
Credit: www.thespruce.com
Tools Needed
Checking a light switch with a multimeter requires some basic tools. These tools help you test the switch safely and accurately. Having the right tools makes the job easier and faster.
This section lists the essential tools you need before starting your check. Each tool plays a specific role in the process.
Multimeter
A multimeter is the main tool for testing electrical switches. It measures voltage, current, and resistance. Choose a multimeter that is easy to read and use.
Screwdriver
A screwdriver helps remove the switch cover and access the wires. Use a flathead or Phillips screwdriver based on your switch screws.
Voltage Tester
A voltage tester checks if the power is off before you start work. It ensures safety by detecting live wires quickly.
Insulated Gloves
Insulated gloves protect your hands from electric shocks. Always wear them when working with electrical parts.
Flashlight
A flashlight provides extra light in dark areas. It helps you see small parts and connections clearly.
Safety Precautions
Checking a light switch with a multimeter can be risky without safety steps. It is important to protect yourself from electric shock and injury. Follow these safety rules carefully before starting your test. Stay safe and avoid accidents.
Turn Off The Power
Always switch off the power at the circuit breaker. Do not rely on the light switch alone. Verify the power is off by testing the wires with the multimeter. This step prevents electric shock while you work.
Use Insulated Tools
Choose tools with insulated handles only. This stops electricity from passing through your hands. Avoid metal or damaged tools that lack proper insulation. Safety first during any electrical check.
Wear Protective Gear
Wear rubber-soled shoes and safety glasses. Rubber shoes reduce the chance of shock. Glasses protect your eyes from sparks or dust. These simple items add a strong layer of safety.
Check Multimeter Settings
Set your multimeter to the correct measurement mode. Use the voltage or continuity setting as needed. Incorrect settings can damage the device or cause wrong readings. Confirm settings before touching wires.
Work In A Dry Area
Never work in wet or damp places. Water conducts electricity and increases risk. Ensure your hands are dry before starting. A dry environment makes testing safer and easier.
Setting Up The Multimeter
Setting up the multimeter correctly is the first step to check a light switch safely and accurately. This process ensures the readings you get are reliable. Taking time to prepare the device helps avoid mistakes and protects you from electrical hazards. The setup involves choosing the right mode and calibrating the multimeter before testing the switch.
Choosing The Right Mode
Set the multimeter to the proper mode for testing a light switch. Most switches are tested in continuity or resistance mode. Continuity mode checks if the switch allows electricity to flow. Resistance mode measures how much the switch resists the electric current.
Turn the dial to the symbol that looks like a sound wave for continuity. For resistance, select the ohm symbol (Ω). Choosing the correct mode avoids wrong readings and confusion. This step is simple but important for accurate testing.
Calibrating The Device
Calibrate the multimeter before use to ensure precision. Some models require zeroing the device to remove any internal errors. To do this, touch the two probes together and adjust the reading to zero or near zero.
Calibration guarantees the multimeter shows the correct value during testing. Skipping this step may lead to false results. Always check the user manual for specific calibration instructions for your multimeter model.
Credit: www.youtube.com
Preparing The Light Switch
Preparing the light switch is the first step before checking it with a multimeter. This process helps ensure safety and clear access to the switch’s wiring. Taking the right steps prevents accidents and makes testing easier.
Careful preparation also protects your multimeter and the light switch from damage. Follow the steps below to prepare your switch safely and effectively.
Turning Off Power
Turn off the power to the switch at the circuit breaker. This stops electricity flow and lowers the risk of shock. Confirm the power is off by flipping the switch and checking if the light stays off.
Use a voltage tester on the switch to double-check no current is present. Never work on a live switch. Safety is the top priority.
Removing The Switch Cover
Unscrew the switch cover plate using a screwdriver. Keep screws safe for reassembly. Gently pull the cover off to expose the switch and wires.
Inspect the area for any damage or loose wires. Be careful not to touch any wires before confirming power is off. Now, the switch is ready for testing with your multimeter.
Testing For Continuity
Testing for continuity is a simple way to check if a light switch works properly. It helps find breaks or faults inside the switch. A multimeter can test continuity by sending a small electric signal through the switch. If the switch allows the signal to pass, it means the switch is working. If not, the switch may be broken or faulty.
This test is safe and easy, even for beginners. You only need to connect the multimeter probes to the switch terminals. The multimeter then shows if there is a complete path for electricity. This method quickly tells if the switch can open or close the circuit as it should.
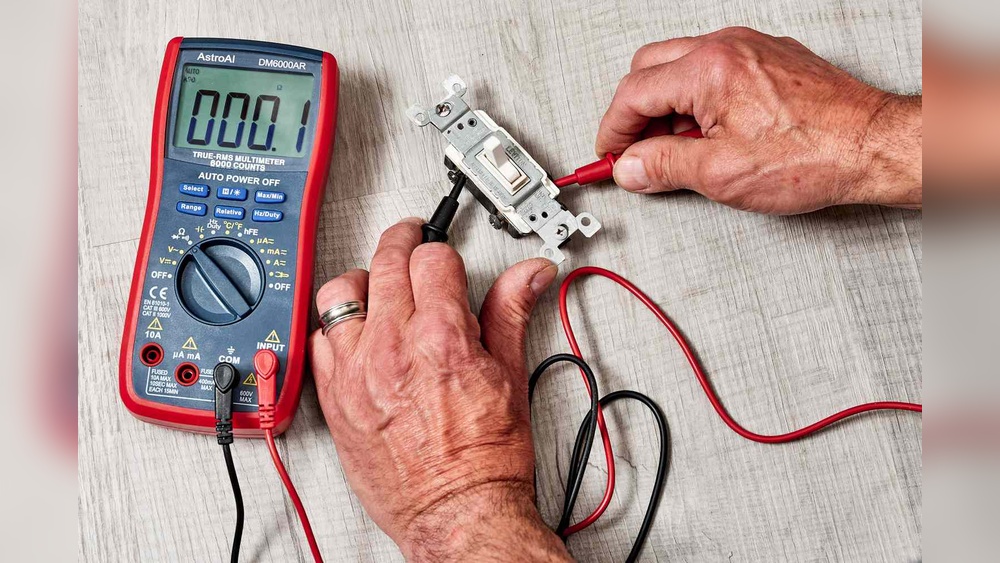
Connecting The Probes
Turn off the power to the switch before testing. Set the multimeter to the continuity mode. This mode often has a symbol like a sound wave or diode. Touch one probe to one terminal of the switch. Then touch the other probe to the other terminal.
Hold the probes steady. Make sure they touch the metal parts well. Avoid touching the probe tips with your hands. Good contact helps get accurate results. The multimeter will beep or show a reading if the switch has continuity.
Interpreting The Readings
A beep or a low number on the multimeter means the switch is good. It means electricity can flow through the switch. No beep or an infinite reading means no continuity. The switch might be damaged or stuck in the off position.
Test the switch in both on and off positions. Continuity should only show when the switch is on. If you get continuity in the off position, the switch might be shorted. Use these readings to decide if the switch needs replacement.
Checking Voltage
Checking the voltage of a light switch helps you understand if electricity flows properly. It tells if the switch works or if there is a problem in the wiring. Using a multimeter to check voltage is a simple and effective way to test your switch.
Measuring Live Voltage
First, set your multimeter to the AC voltage setting. This is usually marked with a “V~” symbol. Next, carefully touch the multimeter probes to the switch terminals. The live terminal shows voltage if the switch is on.
Read the number on the multimeter screen. A normal household switch usually shows around 120 volts or 230 volts, depending on your location. No voltage means the switch might be off or broken.
Safety Tips During Voltage Check
Always wear insulated gloves to avoid electric shock. Make sure your hands are dry and you stand on a dry surface. Never touch the metal parts of the probes during testing.
Turn off the main power if you need to adjust the switch or wiring. Keep the multimeter probes steady to avoid slipping. Safety first to prevent accidents.
Diagnosing Common Issues
Diagnosing common issues with a light switch is important for safety and function. A multimeter helps find electrical problems fast. It checks if the switch works right or if it has faults. This section explains how to spot problems and decide if you must replace the switch.
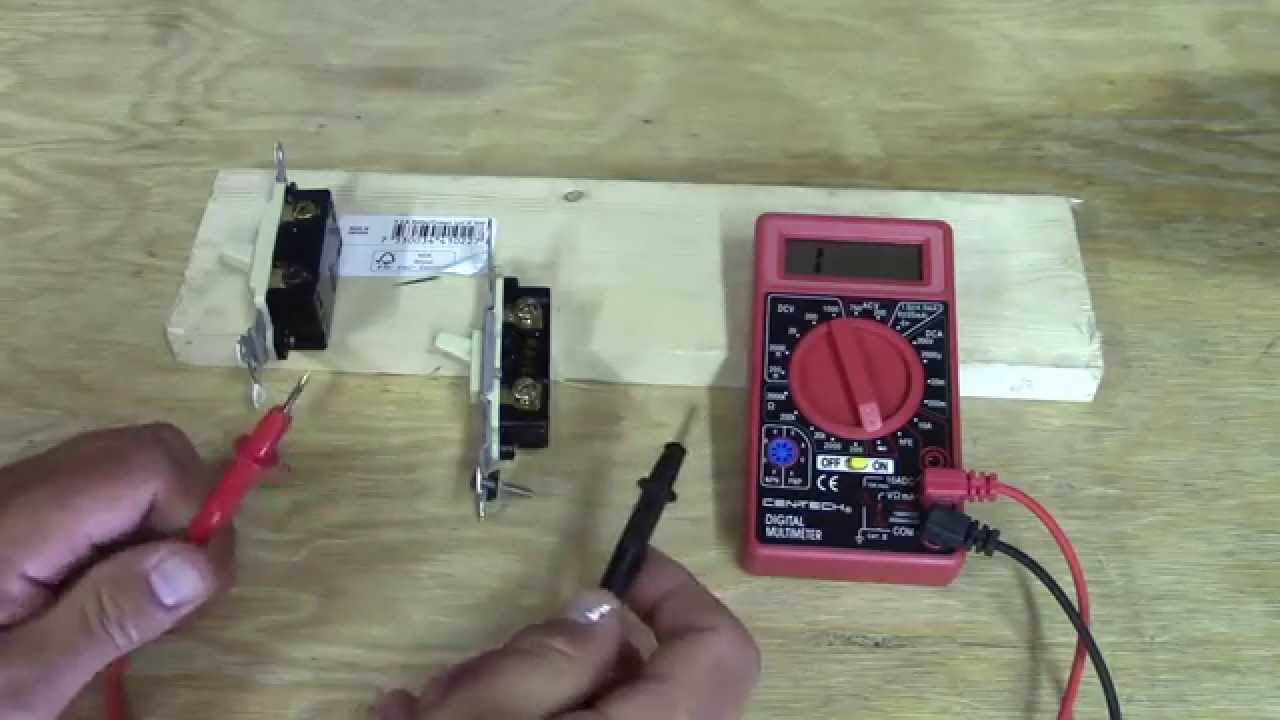
Identifying Faulty Switches
Start by turning off the power to the switch. Use a multimeter set to continuity mode. Place the probes on the switch terminals. Press the switch on and off. If the multimeter beeps or shows zero resistance, the switch works. No beep or infinite resistance means a fault.
Look for signs like burning smell, cracks, or loose parts. These often point to switch failure. Faulty switches may cause flickering lights or no power. Testing with a multimeter confirms if the switch is the problem.
When To Replace The Switch
Replace the switch if the multimeter shows no continuity when on. Also, change it if you see physical damage. Switches that spark or feel hot need immediate replacement. Old switches may wear out and fail over time.
Replacing a bad switch keeps your home safe and your lights working. Always use a switch that matches your electrical system. Proper replacement prevents future issues and electrical hazards.

Credit: www.youtube.com
Final Steps
After testing the light switch with your multimeter, you must finish the job safely. The final steps include putting the switch back together and turning the power on. These steps are important to avoid any damage or accidents. Follow the instructions carefully to complete your work.
Reassembling The Switch
First, place the switch parts back in their original position. Make sure the wires are tight and connected correctly. Use a screwdriver to secure the switch cover. Check that no wires are loose or exposed. The switch should feel firm and not move around.
Restoring Power
After reassembling, go to the circuit breaker panel. Turn the switch for the power back on. Test the light switch by flipping it on and off. If the light works, the switch is fixed. If not, double-check your connections or test again with the multimeter.
Frequently Asked Questions
How Do I Test A Light Switch With A Multimeter?
Set the multimeter to continuity mode. Turn off power, remove the switch cover, and test across terminals. A beep or zero reading means the switch works.
What Multimeter Setting Is Best For Light Switch Testing?
Use the continuity or resistance setting. Continuity mode beeps when the circuit is complete. Resistance mode shows near zero ohms for a good switch.
Can I Test A Light Switch Without Removing It?
Yes, but turn off power first. Test across terminals or wires connected to the switch carefully. Removing the switch gives more accurate results.
What Does A Multimeter Reading Of Zero Ohms Mean?
Zero ohms means no resistance, indicating a closed circuit. For a light switch, this means the switch is ON and working properly.
Conclusion
Checking a light switch with a multimeter is simple and safe. Always turn off the power before starting. Use the multimeter to test for voltage and continuity. This helps find faulty switches quickly. Understanding the readings saves time and money.
Practice these steps to feel confident fixing switches. Keeping basic tools handy makes home repairs easier. Try this method next time a light switch acts strange. You will see how useful a multimeter can be.