Are you ready to take your SolidWorks skills to the next level? Learning how to create a fastener in SolidWorks can save you time and make your designs much more precise.
Whether you’re working on a simple project or a complex assembly, knowing how to add custom fasteners will give you full control over every detail. In this guide, you’ll discover easy steps that anyone can follow, even if you’re new to SolidWorks.
Keep reading to unlock the secret to designing fasteners that fit perfectly and boost your overall workflow.
Credit: www.youtube.com
Selecting Fastener Type
Selecting the right fastener type is an important step in SolidWorks. Fasteners hold parts together and affect the design’s strength. Choosing the correct fastener ensures your assembly works well and looks professional.
SolidWorks offers many options for fasteners. You can pick from standard types or create custom ones. Each choice fits different needs and projects. Understanding these options helps you save time and improve your design.
Choosing Standard Fasteners
Standard fasteners come from a built-in library in SolidWorks. These include screws, bolts, nuts, and washers. They follow common sizes and shapes used in many industries. This makes them easy to add and adjust in your model.
Using standard fasteners saves time. They fit most designs without extra work. SolidWorks automatically adjusts holes and clearances to match the fastener size. This keeps your assembly accurate and ready for production.
Custom Fastener Options
Custom fasteners suit unique or special designs. You can create your own shapes and sizes in SolidWorks. This option works when standard fasteners do not fit your needs.
Design custom fasteners by sketching and extruding parts. Save them in your library for future projects. Custom fasteners let you control every detail of the part. This improves your design’s fit and function.
Setting Up The Workspace
Setting up the workspace is the first step to creating a fastener in SolidWorks. A clean and organized workspace helps you work faster and with fewer mistakes. It also makes sure your fastener fits perfectly in your design.
Before drawing or assembling, you must set the right units and prepare your assembly environment. These steps save time and ensure accuracy throughout your project.
Configuring Units And Dimensions
Start by choosing the correct units for your fastener. SolidWorks lets you select millimeters, inches, or other units. The right units keep your measurements clear and consistent.
Go to the “Options” menu and find the units section. Change the units to match your project needs. For example, choose millimeters for metric fasteners or inches for imperial ones.
Set the decimal places and precision too. This controls how detailed your measurements appear. A higher precision helps when working with small parts.
Preparing The Assembly Environment
Next, open a new assembly file. This is where you will put your fastener with other parts. Keep the workspace tidy by hiding unused toolbars and panels.
Check your design tree to make sure it shows all parts clearly. Use folders to group parts if needed. This keeps your assembly easy to manage.
Turn on the “Snap” and “Grid” features. These help you place parts accurately. Align parts quickly and avoid errors in positioning.
Creating Fastener Geometry
Creating fastener geometry in SolidWorks is a key step in designing parts that fit and work together properly. SolidWorks provides tools to build precise shapes that represent bolts, screws, and other fasteners. This section covers how to create these shapes efficiently using basic sketch and feature tools.
Sketching The Profile
Start by opening a new part and selecting a plane to sketch on. Draw the fastener’s cross-section profile using simple lines and arcs. Focus on basic shapes like circles for the shaft and hexagons for the head. Keep the sketch clean and fully defined for better control. Use dimensions to set exact sizes for the fastener features.
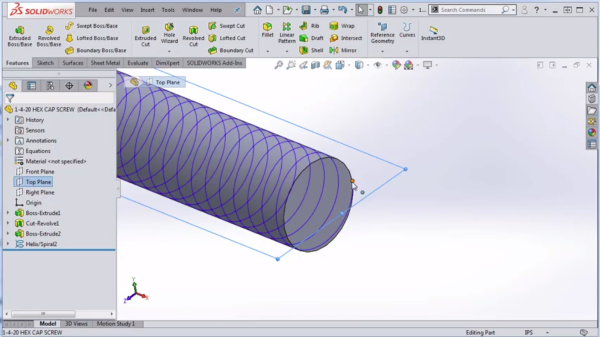
Extruding And Revolving Features
After the profile is complete, use the Extrude Boss/Base tool to create the fastener’s main body. For round parts like shafts, the Revolve Boss/Base feature works well. Select the profile and an axis to revolve around. This creates smooth cylindrical parts quickly. Combine extrudes and revolves to build complex fastener shapes with ease and accuracy.
Credit: hawkridgesys.com
Adding Threads And Details
Adding threads and details to a fastener in SolidWorks gives it a realistic look. These features help the part fit and function correctly in assemblies. SolidWorks offers tools to create precise threads and smooth edges. This section explains how to apply thread features and include chamfers and fillets.
Applying Thread Features
Start by selecting the cylindrical face where the thread will appear. Use the Thread tool from the Features tab. Choose the thread type, size, and direction that matches your design. You can create either cosmetic or modeled threads. Cosmetic threads show the thread pattern without affecting the geometry. Modeled threads create the actual 3D shape of the thread. This option is best for detailed renderings or 3D printing. Adjust the thread length to match your fastener’s requirements. Confirm your settings to add the thread to your part.
Including Chamfers And Fillets
Chamfers and fillets improve the fastener’s fit and appearance. Chamfers create a beveled edge, which helps parts slide together smoothly. Use the Chamfer tool to select edges and set the distance or angle. Fillets round off sharp corners, reducing stress and improving strength. Choose the Fillet tool, pick edges, and define the radius size. Both chamfers and fillets make the fastener safer and easier to use. Add these details to critical edges for the best results.
Using Toolbox And Design Library
Using Toolbox and Design Library in SolidWorks simplifies creating fasteners. These tools save time and ensure accuracy. You get standard parts ready for use. No need to create fasteners from scratch.
Toolbox has many standard fasteners like bolts, nuts, and screws. Design Library stores custom parts and features for easy access. Both tools help you keep your designs organized and consistent.
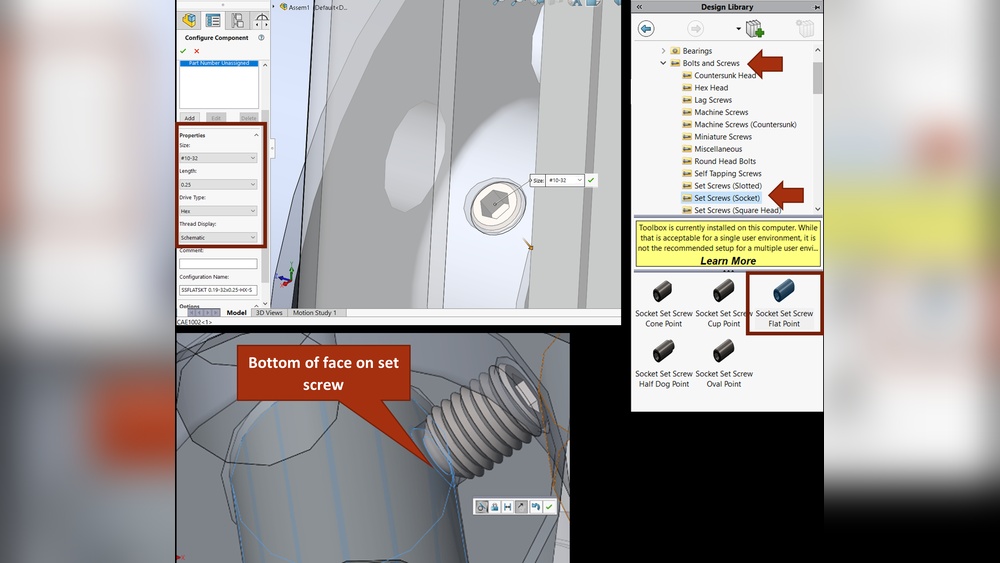
Accessing Standard Fasteners
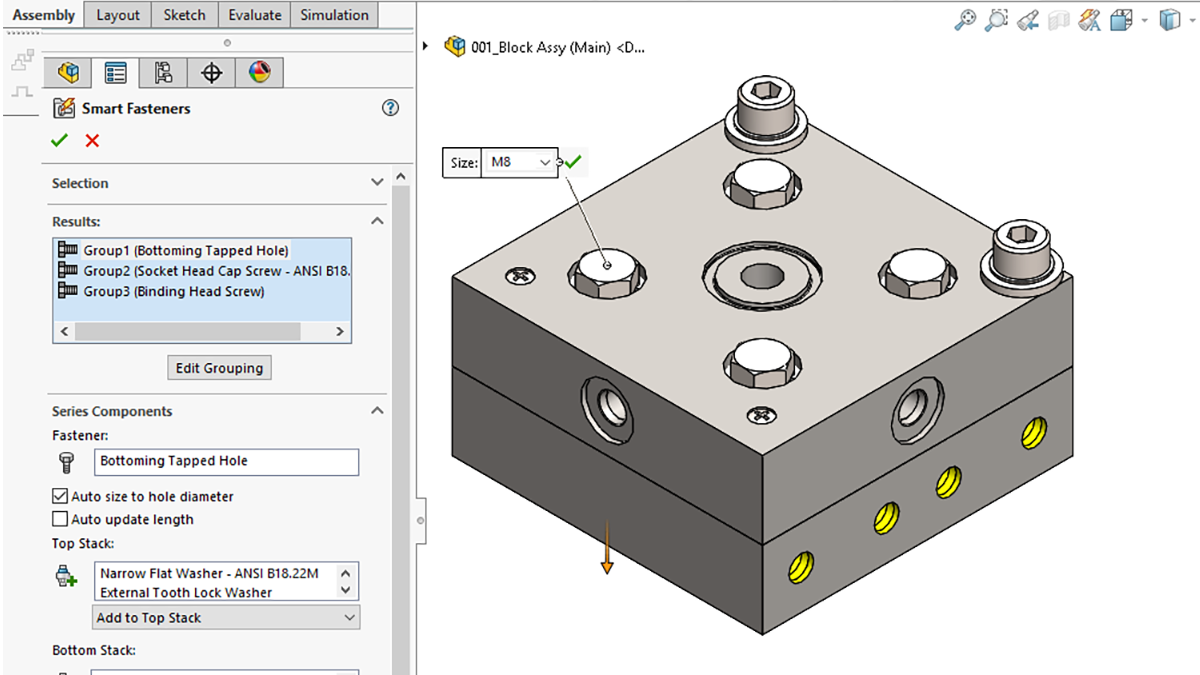
Open SolidWorks and find the Toolbox tab. Click on it to see available fasteners. You can select different types and sizes here. Drag and drop the fastener into your assembly. SolidWorks will add it with the correct dimensions. This method ensures fasteners fit perfectly in your design.
Modifying Toolbox Settings
Go to the Toolbox settings to customize fasteners. Change sizes, materials, or standards to match your needs. You can add new fastener types here too. Adjust how parts appear in your drawings. These settings help keep your project consistent. Saving your preferences speeds up future designs.
Inserting Fasteners Into Assemblies
Inserting fasteners into assemblies is a key step in SolidWorks design. Fasteners hold parts together and ensure your model works as planned. SolidWorks offers tools to add screws, bolts, and nuts quickly. These tools help place fasteners exactly where needed in your assembly.
This process saves time and improves accuracy. It also helps check if fasteners fit well in your design. Proper insertion keeps your assembly strong and realistic.
Mating And Positioning Fasteners
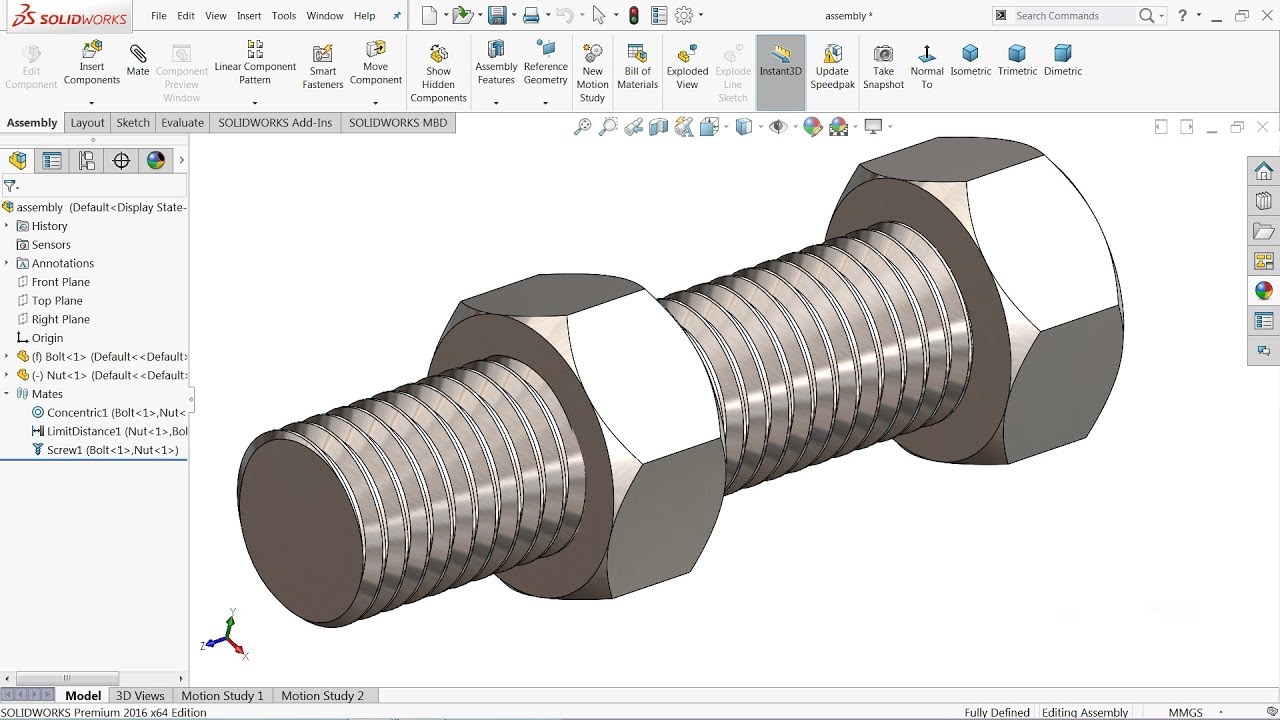
Start by selecting the fastener type from the Toolbox. Place it near the holes or surfaces to join. Use mates to connect the fastener to the parts. Mates control how the fastener moves or stays fixed.
Choose faces or edges on the fastener and parts to create mates. Common mates include coincident, concentric, and distance mates. These keep the fastener aligned and properly positioned.
Adjusting Fastener Properties
After placing the fastener, adjust its size and length. Change thread type or diameter to match design needs. You can also modify appearance or material.
Use the Property Manager to edit fastener details. Check clearances and fit to avoid clashes. Adjusting properties ensures the fastener works in the assembly.
Saving And Reusing Fasteners
Saving and reusing fasteners in SolidWorks saves time and ensures design consistency. It allows you to keep your frequently used fasteners ready. You avoid making the same fastener from scratch every time. This process improves your workflow and helps maintain standard parts across projects.
Creating Custom Fastener Templates
Create custom fastener templates for quick access. Start by designing a fastener that meets your needs. Save it as a part file with clear naming. Use this file as a template for future projects. This method helps keep your fasteners organized and easy to find.
Managing Fastener Configurations
Fastener configurations let you store multiple sizes and types in one file. Create different versions of a fastener within a single part. Switch between configurations based on project requirements. This reduces the number of files and keeps your library neat. Managing configurations improves flexibility and saves storage space.
Tips For Efficiency
Creating fasteners in SolidWorks can take time without the right approach. Efficiency helps save hours and reduces errors. Small changes in your workflow make a big difference. Focus on tools and design habits that speed up the process.
Using Macros And Automation
Macros automate repetitive tasks in SolidWorks. They run a series of commands with one click. This saves time when creating similar fasteners often. You can record your own macros or find them online. Use macros to insert fastener features quickly. Automation reduces manual work and avoids mistakes.
SolidWorks also supports design tables and configurations. These tools adjust fastener sizes and types automatically. They help create families of fasteners without starting from scratch. Use these features to manage many fastener variants easily.
Best Practices For Fastener Design
Start with standard fastener sizes and threads. This avoids custom work and fits common parts. Use SolidWorks Toolbox for ready-to-use fasteners. It includes bolts, screws, and nuts with correct dimensions.
Keep your fastener models simple. Avoid extra details that do not affect function. Simple models load faster and use less computer power. Use lightweight components if possible for better assembly speed.
Name and organize your fastener files clearly. This helps find and reuse them later. Consistent naming saves time in large projects. Group fasteners by type or size in folders.
Credit: www.goengineer.com
Frequently Asked Questions
What Are The Basic Steps To Create A Fastener In Solidworks?
To create a fastener in SolidWorks, start by selecting the appropriate tool. Sketch the fastener profile, define dimensions, and use features like extrude or revolve. Apply material properties, and save the part for assembly use. This method ensures accurate and customizable fastener creation.
How Do I Customize Fastener Dimensions In Solidworks?
You can customize fastener dimensions by editing the sketch or feature parameters. Use the dimension tool to set length, diameter, and thread size. Adjusting these values helps tailor the fastener to specific design requirements, improving fit and function.
Can I Use Solidworks Toolbox For Fastener Creation?
Yes, SolidWorks Toolbox offers a library of standard fasteners. It allows easy insertion and modification of bolts, screws, and nuts. Toolbox saves time by providing ready-made components that comply with industry standards.
How To Apply Threads To A Fastener In Solidworks?
Threads can be applied using the Thread feature or cosmetic threads. The Thread tool creates 3D threads, while cosmetic threads visually represent them without extra geometry. Choose based on your modeling needs and performance optimization.
Conclusion
Creating a fastener in SolidWorks is simple with the right steps. You can design parts that fit together perfectly. This skill saves time and avoids mistakes later. Practice often to get better and faster. Use the tools in SolidWorks to check your design.
Soon, making fasteners will feel natural and easy. Keep experimenting and learning to improve your work. SolidWorks helps bring your ideas to life.