When you’re building or repairing a deck, floor, or any wooden structure, knowing how to fasten board ends to a joist correctly is crucial. If you miss this step or do it wrong, your project might end up weak, wobbly, or even unsafe.
But don’t worry—this isn’t as complicated as it sounds. You’ll discover simple and effective ways to secure board ends to joists that ensure lasting strength and stability. Whether you’re a DIY enthusiast or just starting out, you’ll learn practical tips that save you time and prevent costly mistakes.
Keep reading to master this essential skill and make sure your structure stands strong for years to come.
Credit: www.constructionspecifier.com
Choosing Fasteners
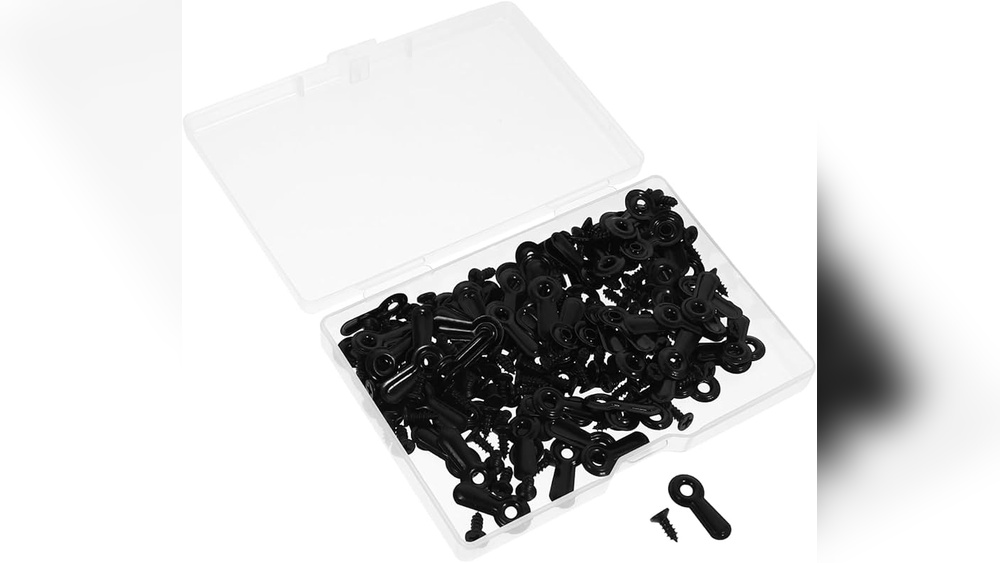
Choosing the right fasteners is key to securing board ends to a joist. The choice affects strength, durability, and ease of installation. The type, material, and size of fasteners must fit the wood and the environment. This section explains what to consider when selecting nails or screws, corrosion resistance, and the proper size of fasteners.
Nails Vs Screws
Nails drive in quickly and hold well under shear forces. They work best for deck boards that need some flexibility. Screws provide stronger holding power and resist pull-out better than nails. They reduce the chance of wood splitting. Screws are ideal for joists that carry heavy loads or for precise, long-lasting fastening.
Corrosion-resistant Options
Outdoor wood needs fasteners that resist rust and corrosion. Galvanized nails or screws have a protective zinc coating. Stainless steel fasteners offer the best corrosion resistance. They last longer in wet or salty environments, like decks or porches. Using corrosion-resistant fasteners prevents staining and wood damage over time.
Fastener Length And Diameter
Fasteners must be long enough to penetrate both the board end and the joist securely. The length should be at least three times the thickness of the board. A thicker diameter increases strength but may split the wood if too large. Choose a size that balances holding power without damaging the wood.
Credit: inteplastbuild.com
Positioning Board Ends
Positioning board ends correctly on joists is essential for a strong and lasting structure. Proper placement helps distribute weight evenly and prevents movement or damage. Each board end must fit securely to provide stability and safety.
Careful positioning also makes fastening easier and improves the overall finish of the project. Small adjustments in placement can make a big difference in durability and performance.
Aligning With Joist Center
Place the board end directly over the joist center. This alignment allows nails or screws to penetrate solid wood for a firm hold. Avoid placing board ends off-center, which can weaken the connection.
Center alignment also helps keep the board straight and reduces the risk of warping over time. Use a tape measure or square to check the board’s position before fastening.
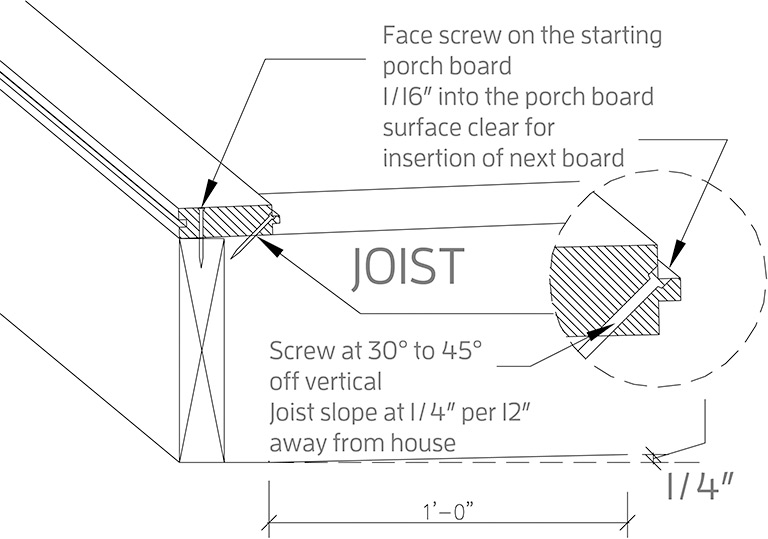
Spacing From Board Edges
Keep a small gap between the board end and the edge of the joist. This space prevents splitting when driving fasteners. About 1/4 inch is usually enough to protect the wood.
Maintain consistent spacing on all boards for a neat and uniform look. Proper spacing also makes it easier to insert nails or screws without damaging the board edges.
Butt Joint Techniques
Butt joints connect two board ends directly on the joist. Make sure both boards are flush and level for a tight joint. Uneven ends can cause gaps and weaken the structure.
Use nails or screws at a slight angle to increase holding power. Reinforce the joint with construction adhesive or metal plates if extra strength is needed. Proper butt joints create a smooth surface and strong connection.
Fastening Techniques
Fastening board ends to joists requires careful choice of technique to ensure stability. Proper fastening prevents movement and keeps structures strong. Several methods exist, each with specific uses and benefits. Understanding these helps in selecting the best option for your project.
Face Nailing
Face nailing drives nails straight through the board end into the joist. This method is quick and easy to perform with a hammer or nail gun. It works well for thinner boards and light loads. Nails must be long enough to penetrate the joist deeply for a firm hold. Avoid splitting the wood by pre-drilling holes if needed.
Toe Nailing At An Angle
Toe nailing means driving nails at an angle through the board end into the joist. This technique increases the holding power by creating a diagonal grip. It is useful when face nailing is not possible or when extra strength is needed. Careful alignment is essential to avoid wood splitting. Toe nails should be driven evenly on both sides for balance.
Using Joist Hangers
Joist hangers are metal brackets designed to hold board ends securely to joists. They offer strong support and resist twisting or pulling forces. Attach hangers to the joist with nails or screws, then fit the board end inside the hanger. This method is ideal for heavy loads and longer spans. Always use hangers rated for your specific joist size and load requirements.
Joist Hanger Installation
Installing joist hangers is a key step in fastening board ends to joists. These metal brackets hold the joist securely to the supporting beam. Proper installation helps maintain the structure’s strength and safety. Following the right process ensures the joist sits firmly without movement or sagging.
Selecting Appropriate Hangers
Choose hangers that fit the joist size and type. Different joists need specific hangers for a strong hold. Check the weight and load requirements to match the hanger’s capacity. Use galvanized or stainless steel hangers outdoors to prevent rust.
Securing With Nails Or Screws
Use nails or screws designed for joist hangers. Nails should be galvanized and of correct length. Screws provide a tighter fit but must be approved for structural use. Drive fasteners straight into the hanger holes to avoid weakening the metal.
Ensuring Flush Fit
Make sure the joist sits flush inside the hanger. A tight fit prevents shifting and squeaking. Tap the joist gently with a hammer to position it correctly. Double-check that the hanger is flush with the supporting beam before fastening fully.
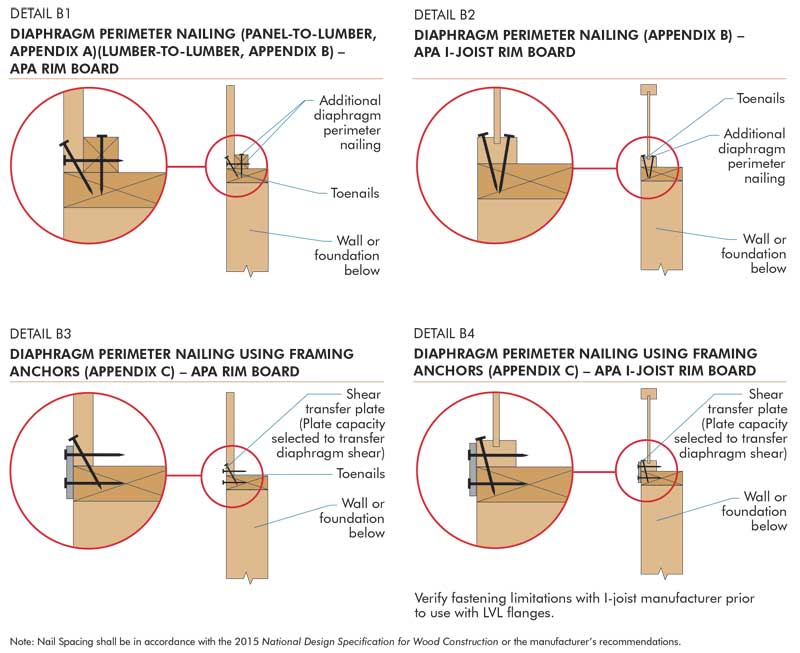
Reinforcement Methods
Reinforcing the connection between board ends and joists boosts structural strength. Proper reinforcement prevents movement and extends the lifespan of the floor or deck. Several methods exist to ensure a secure, lasting bond. Each method suits different project needs and materials.
Sister Joists For Added Support
Sister joists involve attaching a new joist alongside the existing one. This doubles the support at the board ends. Use strong screws or nails to fasten the sister joist tightly. This method spreads the load and reduces bending or sagging. It works well for damaged or weak joists that need extra strength.
Metal Mending Plates
Metal mending plates are flat, sturdy strips that connect joist ends. Place the plate over the joint where two joists meet. Secure it with nails or screws on both sides. These plates provide a solid link and resist twisting. They are easy to install and improve joint stability significantly.
Blocking Between Joists
Blocking means installing short pieces of wood between joists. These blocks fit tightly between joists near the board ends. Nail or screw the blocks in place to hold joists firmly. Blocking limits joist movement and helps distribute weight evenly. It also enhances the overall frame rigidity.

Credit: learninglab.rmit.edu.au
Common Mistakes To Avoid
Proper maintenance keeps board ends securely fastened to joists. It also extends the life of your deck or floor. Regular checks and timely repairs prevent bigger problems. Follow these simple steps to maintain your board ends well.
Checking For Fastener Loosening
Inspect fasteners like nails or screws often. Look for signs of rust or movement. Loose fasteners reduce structural strength and cause squeaks. Tighten or replace any loose or damaged fasteners immediately. Use a screwdriver or drill for screws and a hammer for nails.
Replacing Damaged Boards
Damaged boards weaken the entire structure. Check for cracks, splits, or rot near board ends. Remove boards that show serious damage. Replace them with new, treated wood for durability. Secure new boards properly to joists with appropriate fasteners.
Preventing Moisture Damage
Moisture causes wood to swell, rot, and weaken fasteners. Ensure good ventilation around joists and boards. Apply water-resistant sealant to board ends and joist connections. Clean debris regularly to avoid trapped moisture. Keep your wood dry to maintain strong fastening.
Frequently Asked Questions
How Should Board Ends Be Fastened To A Joist Qui?
Fasten board ends to joists using nails or screws driven at an angle near the board’s edge. Ensure tight, flush contact.
How To Join Joists End To End?
Join joists end to end by aligning them flush, applying construction adhesive, and fastening with screws or nails through a metal splice plate or plywood gusset on both sides.
Is It Better To Nail Or Screw Joist Hangers?
Screwing joist hangers creates a stronger, longer-lasting connection. Nailing is faster and budget-friendly but less secure. Use screws for durability.
What Is The 3 4 5 Rule For Decks?
The 3-4-5 rule for decks ensures square corners by measuring 3, 4, and 5 feet along sides and diagonal. It verifies right angles.
Conclusion
Fastening board ends to joists needs care and the right method. Use nails or screws driven at an angle for a strong hold. Ensure the board end sits flush and level on the joist. Avoid gaps to prevent movement and squeaking.
Joist hangers can add extra support for heavy loads. Proper fastening keeps the structure safe and durable over time. Always check local building codes for specific fastening rules. With the right technique, your deck or floor will stay solid and stable.
Simple steps create lasting strength and safety.