Removing fasteners from siding can feel tricky, especially if you want to avoid damaging your home’s exterior. But don’t worry—you’re about to learn simple, effective steps that make this task much easier.
Whether you’re fixing a loose panel or replacing old siding, knowing the right way to remove fasteners saves you time and frustration. Keep reading, and you’ll discover easy tips that help you get the job done quickly and safely. Your siding will look great, and you’ll feel confident handling repairs on your own.
Types Of Siding Fasteners
Siding fasteners hold siding panels in place. Different siding types use various fasteners. Knowing the types helps remove them safely. Each fastener type needs a specific tool and method for removal.
Nails
Nails are the most common siding fasteners. They are easy to drive into wood and other materials. Nails come in different sizes and materials. Removing nails usually needs a claw hammer or pry bar. Be careful not to damage the siding during removal.
Screws
Screws provide a stronger hold than nails. They often hold vinyl or metal siding. A screwdriver or power drill removes screws quickly. Screws leave smaller holes than nails. They are less likely to loosen over time.
Staples
Staples attach thin siding materials or insulation. They are fast and simple to install. Removing staples requires pliers or a staple remover. Staples can rust, making removal harder. Handle with care to avoid tearing siding.
Clips And Brackets
Clips and brackets secure siding without nails or screws. They allow easy siding replacement. Removal may need special tools or gentle prying. These fasteners protect siding from damage. They work well with certain vinyl and metal sidings.

Credit: www.youtube.com
Tools Needed For Removal
Removing fasteners from siding requires the right tools. Using proper tools helps protect your siding and makes the job easier. Each tool works best for certain types of fasteners. Knowing which one to use saves time and effort.
Pry Bar And Hammer
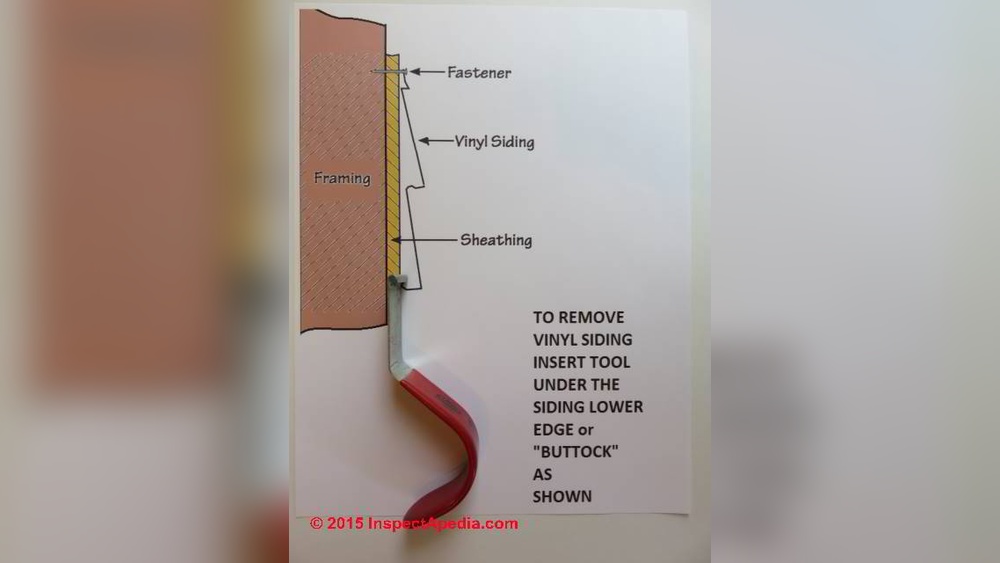
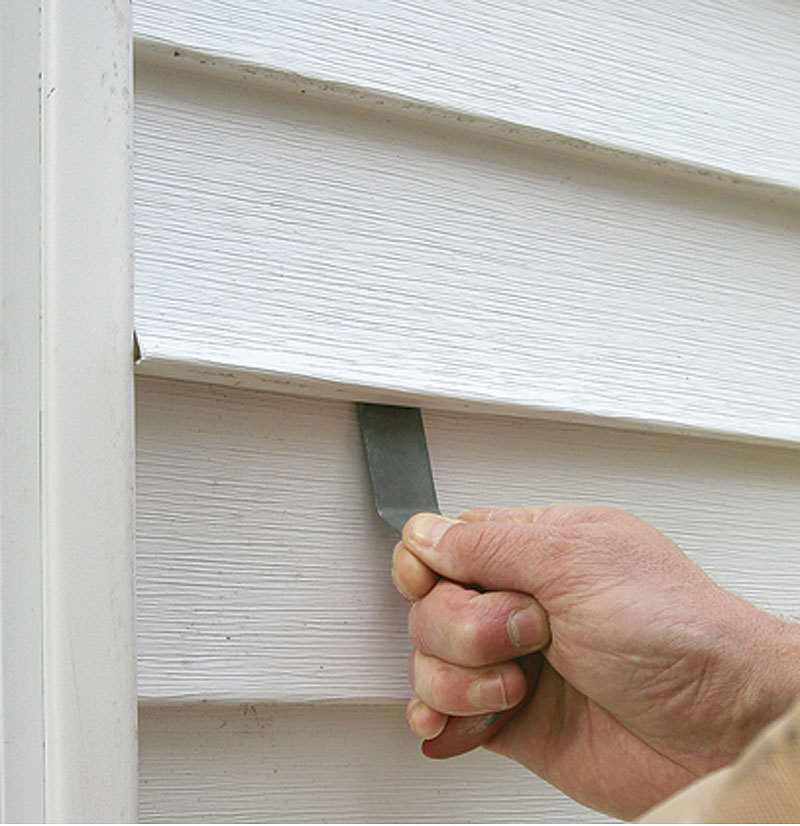
A pry bar and hammer work well for nails and staples. The pry bar slides under the fastener head. Use the hammer to tap the pry bar gently. Pull the fastener out without damaging the siding. These tools give good leverage and control.
Screwdriver And Drill
Screwdrivers and drills remove screws quickly. Choose the right screwdriver bit for the screw head. A drill with a screwdriver bit speeds up removal. Turn counterclockwise to loosen and remove screws. This method keeps the siding intact.
Pliers And Wrenches
Pliers and wrenches grip fasteners that are stuck or rusted. Use locking pliers to hold the fastener tight. Wrenches turn bolts and nuts easily. These tools help remove stubborn fasteners without breaking them.
Specialty Fastener Removers
Specialty fastener removers work on unique or hidden fasteners. Examples include clip removers or trim removal tools. These tools minimize damage to siding and trim. They are designed for specific siding fasteners for safe removal.
Preparing The Work Area
Preparing the work area is an important first step before removing fasteners from siding. It helps ensure the job goes smoothly and safely. A clean and organized space allows better access to the fasteners and protects the siding from damage. Taking time to prepare also reduces risks of accidents or mistakes during the process.
Clearing Obstacles
Remove any furniture, plants, or tools near the siding. Clear the area around the work zone. This prevents tripping hazards and gives you enough room to move. Keep the ground free of debris and clutter. It helps you focus and avoid distractions while working.
Protecting The Siding Surface
Cover the siding near the fasteners with a soft cloth or plastic sheet. This protects it from scratches or dents during removal. Use painter’s tape to hold protective material in place. Avoid using harsh chemicals that may damage the siding surface. Gentle protection preserves the siding’s look and quality.
Safety Precautions
Wear safety glasses to protect your eyes from flying debris. Use gloves to guard your hands from sharp edges or tools. Check that your ladder is stable if you work at height. Keep a first aid kit nearby in case of minor injuries. Follow these steps to stay safe and avoid accidents during fastener removal.
Removing Nails Without Damage
Removing nails from siding without causing damage takes care and the right tools. Nails hold siding firmly, so pulling them out too fast can crack or dent the material. Gentle techniques protect your siding and keep it looking good after removal. Use these tips to pull nails cleanly and safely.
Using A Pry Bar Correctly
Choose a small pry bar for better control. Slide the flat end gently under the nail head. Pull back slowly to lift the nail bit by bit. Avoid forcing the bar too hard to stop bending or breaking the siding. Use steady pressure. Move the pry bar around the nail if needed to loosen it evenly.
Leveraging With A Block
Place a wood block under the pry bar’s fulcrum point. This spreads the force over a larger area. The block protects siding from dents and scratches. Press the pry bar down on the block and lift the nail carefully. The block acts as a cushion and stops damage during removal. This method works well with soft or thin siding materials.
Dealing With Rusted Or Stuck Nails
Rust makes nails hard to remove. Spray a bit of penetrating oil on the nail. Let it sit for several minutes to loosen rust. Wiggle the nail gently with pliers before using the pry bar. If the nail still won’t budge, try tapping it back slightly, then pull it out. Patience and gentle moves prevent siding damage in tough cases.
Removing Screws Safely
Removing screws from siding requires care to avoid damage. Using the right tools and techniques helps protect the siding and ensures safety. Follow these tips to remove screws safely and easily.
Choosing The Right Screwdriver
Select a screwdriver that fits the screw head perfectly. A wrong size can strip the screw or slip out. Use a screwdriver with a comfortable handle for better grip. Manual screwdrivers give more control than power tools.
Dealing With Stripped Screws
Stripped screws lose their grip, making removal tricky. Use a rubber band over the screw head for extra grip. Press the screwdriver firmly into the screw while turning slowly. Avoid forcing the screw, as this can damage the siding.
Using Extractor Tools
Screw extractors are designed for stuck or damaged screws. Choose an extractor kit with various sizes. Drill a small hole in the screw head, then insert the extractor. Turn it counterclockwise to remove the screw without harming the siding.

Credit: www.youtube.com
Handling Staples And Clips
Handling staples and clips on siding requires care and the right approach. These fasteners hold siding panels firmly. Removing them without damage keeps siding reusable and neat. Use gentle tools and steady hands for best results.
Pulling Out Staples Gently
Staples are small but strong. Use pliers or a staple remover. Grip the staple close to the siding surface. Pull slowly and straight out. Avoid twisting or bending to stop damage. If the staple resists, wiggle it slightly. Work on one staple at a time. Keep siding steady during the process.
Releasing Clips Without Bending
Clips hold siding panels tight. Use a flat tool like a putty knife. Slide it under the clip edge carefully. Lift gently to release the clip’s grip. Do not force or bend the clip. Bending can break or weaken it. Take time and work each clip slowly. This keeps the siding and clips intact.
Avoiding Common Mistakes
Removing fasteners from siding can be tricky. Many people make simple mistakes that cause damage or extra work. Knowing what to avoid helps keep your siding safe and the job easier.
Here are common errors to watch for. Avoid these to protect your siding and tools.
Applying Too Much Force
Using too much force can crack or break siding panels. It can also bend or strip fasteners. Pull gently and use the right tool to loosen fasteners. Let the tool do the work, not your strength.
Ignoring Siding Material Type
Different siding types need different tools and methods. Wood siding requires care to avoid splitting. Vinyl siding is more fragile and can crack easily. Metal siding might need special fastener removers. Know your material before you start.
Skipping Protective Measures
Not protecting your siding can cause scratches and dents. Use a soft cloth or tape around the work area. Wear gloves to protect your hands. Protecting both siding and yourself makes the job safer and cleaner.
Credit: www.finehomebuilding.com
Repairing Minor Damage
Minor damage to siding is common after removing fasteners. Small holes and cracks can affect the look and durability of your siding. Fixing these issues quickly helps protect your home from water and pests. Simple repairs can keep your siding strong and looking good.
Filling Holes And Cracks
Start by cleaning the damaged area. Remove dirt and loose siding pieces. Use a putty knife to apply exterior-grade filler. Press the filler into holes and cracks. Smooth the surface to match the siding. Let it dry completely before moving on.
Touching Up Paint
Choose paint that matches your siding color. Use a small brush to apply paint over the repaired spots. Paint in thin layers for even coverage. Allow each layer to dry before adding another. This protects the filler and blends repairs with the siding.
Replacing Damaged Sections
Some damage may be too large for fillers. In this case, remove the damaged siding piece carefully. Cut a replacement piece to the same size and shape. Secure it in place with new fasteners. Seal edges with caulk to prevent leaks.
Tips For Fastener Replacement
Replacing fasteners on siding needs care and attention. Proper replacement keeps siding strong and looks neat. Follow simple tips to pick the right fasteners and install them well. Protect the siding from damage during the process.
Selecting Appropriate Fasteners
Choose fasteners that match the siding material. Use rust-resistant nails or screws to prevent corrosion. The length should be enough to hold the siding firmly. Avoid fasteners that are too long or too short. Match fastener type to siding type for best results.
Ensuring Proper Installation
Drive fasteners straight and flush with the siding surface. Do not over-tighten screws or hammer nails too hard. Leave a small gap for siding expansion and contraction. Use a drill or hammer with steady force. Check fasteners regularly for looseness or damage.
Maintaining Siding Integrity
Replace damaged fasteners quickly to avoid siding warping. Seal around fasteners to keep water out. Avoid placing fasteners too close to siding edges. Keep siding clean and dry during replacement. Proper care extends siding life and appearance.
Frequently Asked Questions
What Tools Are Best For Removing Siding Fasteners?
The best tools include a pry bar, pliers, and a screwdriver. These help gently lift or unscrew fasteners without damaging siding. Using the right tool ensures safe and efficient removal of nails, screws, or clips.
How To Avoid Siding Damage When Removing Fasteners?
Remove fasteners slowly and use protective padding like a cloth under your tools. Avoid prying too hard or bending siding edges. Proper technique prevents cracks, dents, or holes in the siding material.
Can I Reuse Fasteners Removed From Siding?
Yes, you can reuse fasteners if they are undamaged and clean. Inspect them for rust, bends, or wear before reuse. Reusing helps save costs and maintains siding integrity during repairs or replacements.
What Is The Safest Way To Remove Hidden Siding Fasteners?
Use a specialized siding removal tool or a flat pry bar. Carefully lift the siding panel to expose hidden fasteners. Work gently to prevent breaking the siding or the fasteners.
Conclusion
Removing fasteners from siding can be simple with the right tools. Use care to avoid damage to your siding. Take your time and work gently. Check each fastener type before removal. This helps you choose the best method. Clean the area after removing fasteners.
Keep safety in mind throughout the process. Small steps lead to better results. Stay patient and careful for a smooth job. Your siding will look great and stay secure.