Are your brake lights not working properly? It could be time to replace your brake light switch.
Installing a new brake light switch might sound tricky, but with the right steps, you can do it yourself and save time and money. In this guide, you’ll find simple, clear instructions that anyone can follow. By the end, your brake lights will be working perfectly again—keeping you safe and legal on the road.
Ready to get started? Let’s dive in!
Tools And Materials Needed
Preparing the right tools and materials is key to installing a brake light switch. Having everything ready saves time and avoids frustration. This list covers all essentials for a smooth process.
Basic Hand Tools
You need simple hand tools like screwdrivers and wrenches. A Phillips screwdriver fits most screws. A small adjustable wrench helps loosen bolts. These tools let you access and remove old parts.
Replacement Brake Light Switch
Buy a brake light switch that matches your car model. Using the correct part ensures proper function. Check your vehicle’s manual or ask at an auto parts store.
Multimeter Or Test Light
A multimeter or test light checks electrical connections. These tools confirm if the brake light switch works. They detect voltage and continuity in the circuit.
Safety Equipment
Wear gloves to protect your hands. Safety glasses shield your eyes from dirt or debris. These simple items keep you safe during installation.
Additional Supplies
Keep electrical tape and zip ties handy. Tape secures wiring connections. Zip ties organize cables to prevent damage or loose wires.
Locate The Brake Light Switch
Locating the brake light switch is the first step to install it properly. This small part controls the brake lights. It sends a signal when you press the brake pedal. Finding it can save time and avoid mistakes.
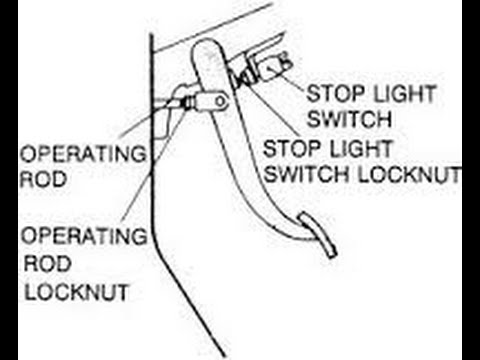
The brake light switch is usually near the brake pedal. It connects to the pedal arm. You might see a small button or plunger touching the pedal.
Check Under The Dashboard
Look under the dashboard on the driver’s side. The switch is often mounted there. Use a flashlight to see better. The area can be dark and crowded.
Identify The Brake Pedal Arm
Focus on the brake pedal arm. The switch is attached to it or very close. It activates when the pedal moves.
Look For Electrical Wiring
Find a small device with wires connected. The brake light switch has wiring harness attached. Follow the wires if unsure.
Consult Your Vehicle Manual
Your vehicle manual shows the exact location. It has diagrams and pictures. This helps avoid confusion and speeds up the process.
Disconnect The Battery
Disconnecting the battery is an important first step before installing a brake light switch. It helps protect you from electric shock. It also prevents damage to the vehicle’s electrical system.
Always make sure the car is off before starting. This step keeps the work area safe. It stops the risk of short circuits or sparks during installation.
Locate The Battery
Open the car’s hood to find the battery. Most car batteries sit near the front. Look for a rectangular box with two cables attached.
Use The Right Tools
Get a wrench or socket that fits the battery terminals. This tool helps loosen the nuts on the battery cables. Avoid using pliers or other tools that may cause damage.
Disconnect The Negative Terminal First
Always remove the negative cable first. It usually has a black cover or a minus (-) sign. Loosen the nut and pull the cable off the terminal.
Disconnect The Positive Terminal
Next, remove the positive cable. It has a red cover or a plus (+) sign. Loosen the nut and carefully lift the cable away from the battery.
Secure The Cables Away From The Battery
Keep the cables away from the battery terminals. This prevents accidental contact and sparks. Use a cloth or wrap to hold cables safely aside.
Credit: www.youtube.com
Remove The Old Brake Light Switch
Removing the old brake light switch is the first step in replacing it. This part controls your brake lights and signals to other drivers. A faulty switch can cause brake lights to fail. Taking out the old switch carefully is important to avoid damage to wires or connectors.
Follow these steps to remove the old brake light switch safely. Keep tools ready and work in a well-lit area.
Find the brake light switch near the brake pedal. It usually sits on the brake pedal arm or mounting bracket. Look for a small plastic or metal piece connected to wires. This is the switch you need to remove.
Always disconnect the car battery before working on electrical parts. This prevents short circuits or shocks. Use a wrench to remove the negative battery cable. Make sure the car is off and keys are out.
Unplug The Electrical Connector
Gently press the tab on the switch’s electrical connector. Pull the connector straight out to disconnect it. Avoid pulling on the wires to stop damage. If stuck, wiggle the connector lightly to loosen it.
Remove The Brake Light Switch
Check how the switch is attached. Some switches twist off, while others have clips or screws. Use your hands or a small wrench to loosen it. Turn counterclockwise if it is a twist type. Remove it carefully from the mounting bracket.
Install The New Brake Light Switch
Installing the new brake light switch is a simple task. It ensures your brake lights work correctly. This step is important for safety on the road. Follow clear steps to install the switch properly.
Locate The Brake Light Switch Mounting Point
Find the spot where the old switch was attached. It is usually near the brake pedal arm. Clean the area to remove dirt or dust. This helps the new switch fit well.
Connect The Electrical Connector
Attach the electrical plug to the new brake light switch. Push it in until you hear a click. This ensures a secure connection. Avoid forcing it to prevent damage.
Secure The Brake Light Switch In Place
Insert the switch into its mounting bracket. Tighten any screws or clips to hold it firmly. Do not overtighten, as it can cause damage. The switch should not move once fixed.
Adjust The Switch Position
Make sure the switch activates when the brake pedal moves. Adjust its position by sliding it slightly if needed. Test by pressing the pedal and watching the brake lights. Proper alignment is key.
Reconnect The Battery
After installing the brake light switch, reconnecting the battery is the next step. This action restores power to your vehicle’s electrical system. It allows you to test if the new switch works correctly. Always handle the battery carefully to avoid sparks or damage.
Prepare To Reconnect The Battery
Make sure all tools are removed from the engine area. Check that the brake light switch is securely installed. Wear gloves and eye protection for safety. Confirm the ignition is off before touching the battery terminals.
Reconnect The Negative Terminal
Attach the negative (black) cable to the battery’s negative terminal first. Tighten the clamp firmly but do not overtighten. This step reduces the risk of sparks during reconnection. Ensure the cable sits securely on the terminal.
Reconnect The Positive Terminal
Next, connect the positive (red) cable to the battery’s positive terminal. Secure the clamp tightly to prevent loose connections. A solid connection ensures proper power flow to the brake light switch.
Check The Brake Lights
Turn on the ignition without starting the engine. Press the brake pedal and observe the brake lights. They should illuminate clearly. If the lights do not work, recheck the switch installation and battery connections.
Test The Brake Light Switch
Testing the brake light switch is key to ensure your brake lights work properly. This step checks if the switch activates the lights when you press the brake pedal. A good test saves you from safety issues and costly repairs later.
Testing is simple and does not need special tools. It helps confirm the switch is installed correctly and functions as it should. Follow these steps carefully for a reliable brake light check.
Check The Brake Lights Visually
Have someone press the brake pedal while you watch the rear brake lights. The lights must turn on immediately when the pedal is pressed. If the lights stay off, the switch may be faulty or misaligned.
Use A Multimeter To Test Continuity
Disconnect the brake light switch from the wiring. Set the multimeter to test continuity. Press the brake pedal and check if the switch allows electric flow. No flow means the switch is defective and needs replacement.
Adjust The Switch Position
If the brake lights do not activate properly, adjust the switch position. Loosen the mounting nut and move the switch slightly. Tighten it again and retest until the lights work correctly.
Listen For The Click Sound
Press the brake pedal slowly and listen near the switch. A soft click means the switch is triggering. No click might indicate a mechanical problem inside the switch.
Test With The Engine On
Start the car and press the brake pedal. Confirm the brake lights turn on with the engine running. This ensures the switch works under normal driving conditions.
Credit: www.oznium.com
Troubleshooting Common Issues
Troubleshooting common issues with brake light switches helps fix problems quickly. It ensures your brake lights work correctly for safety. Some issues are easy to spot and solve. Others need a careful check to find the cause.
Understanding common problems saves time and effort. This guide shows simple steps to identify and fix brake light switch issues. It helps keep your vehicle safe on the road.
Checking The Brake Light Switch Connection
Start by inspecting the brake light switch connection. Loose or dirty connectors can stop the lights from working. Remove dirt and tighten the connection. Make sure the wires are not damaged or worn out.
Testing The Brake Light Switch
Use a multimeter to test the brake light switch. It helps check if the switch is working properly. Place the multimeter probes on the switch terminals. Press the brake pedal and watch for a change in the reading. No change means the switch may be faulty.
Adjusting The Brake Light Switch Position
Sometimes the switch is out of position. It may not activate the brake lights correctly. Adjust the switch so it fits well against the brake pedal. The lights should turn on when you press the pedal. Small movements can fix this issue.
Replacing A Faulty Brake Light Switch
If the switch is broken, replacement is necessary. Remove the old switch carefully. Install the new switch in the same spot. Connect the wires properly. Test the brake lights to confirm the fix.

Credit: www.youtube.com
Frequently Asked Questions
What Tools Are Needed To Install A Brake Light Switch?
You need a wrench, screwdriver, and the replacement brake light switch. A vehicle manual helps identify the switch location. Safety gloves are recommended for protection.
How Long Does It Take To Install A Brake Light Switch?
Installation typically takes 15 to 30 minutes. Time depends on vehicle model and your experience. Following step-by-step instructions speeds up the process.
Can I Install A Brake Light Switch Myself?
Yes, with basic mechanical skills and proper tools, you can install it. Follow the vehicle manual carefully to avoid errors. If unsure, consult a professional mechanic.
How Do I Know If The Brake Light Switch Is Faulty?
Faulty switches cause brake lights not to illuminate or stay on constantly. You may also experience cruise control issues. Testing with a multimeter confirms switch functionality.
Conclusion
Installing a brake light switch is simple and important for safety. Follow each step carefully to avoid mistakes. Double-check the connections before finishing. Test the brake lights to confirm they work right. A working brake light switch helps prevent accidents.
Regular checks keep your car safe on the road. Take your time and stay patient throughout the process. With practice, installation becomes easier and quicker. Keep this guide handy for future repairs or replacements. Safety first, always.