Have you ever wanted to control one light from two different switches? Maybe you have a long hallway or a large room where flipping a single switch just isn’t convenient.
Connecting two light switches to the same light can solve this problem easily—but only if you know the right steps. You’ll discover a simple, clear guide to help you connect two light switches safely and effectively. By the end, you’ll have the confidence to take on this common home project yourself, saving time and money.
Ready to make your lighting work smarter for you? Let’s get started!

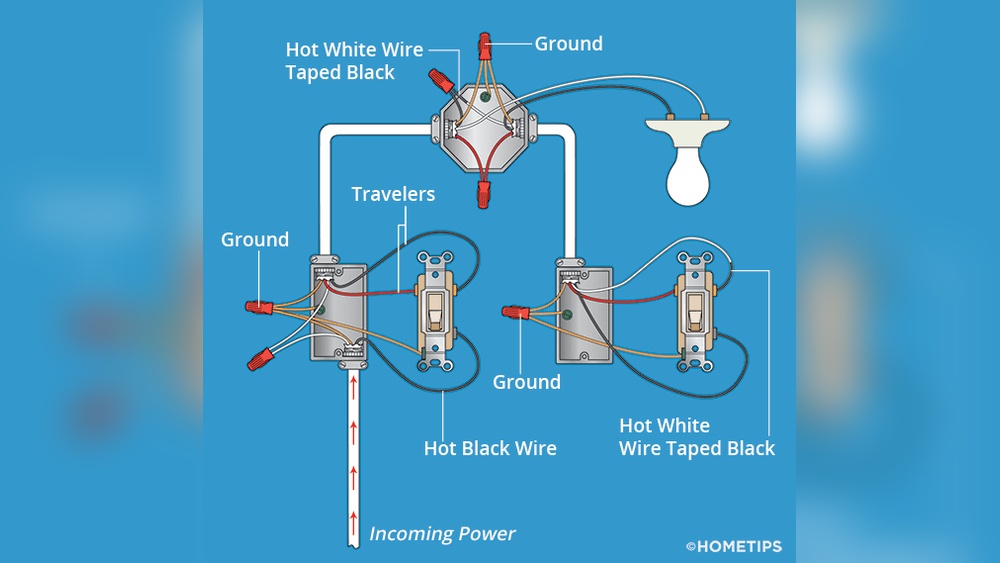
Credit: diy.stackexchange.com
Tools And Materials Needed
Connecting two light switches requires specific tools and materials. Having the right items helps complete the job safely and efficiently. Prepare everything before starting to avoid interruptions.
Each tool has a clear purpose. Materials ensure your wiring is correct and secure. Here is a list of what you need for this task.
Basic Hand Tools
You need a screwdriver set with flathead and Phillips tips. Wire strippers are essential to remove insulation safely. A pair of needle-nose pliers helps bend and hold wires.
Electrical Testing Tools
A voltage tester checks if wires carry current. It ensures safety by confirming power is off. A multimeter measures voltage and continuity if needed.
Materials For Wiring
Use electrical wires matching your home’s circuit requirements. Wire nuts connect wires securely. Electrical tape insulates exposed connections to prevent shorts.
Switches And Mounting Hardware
Two compatible light switches are necessary. Choose switches that fit the current and load of your lights. Mounting screws hold switches firmly in place.
Safety Equipment
Wear insulated gloves to protect against shocks. Safety glasses protect your eyes from sparks or debris. A flashlight helps when working in dark areas.

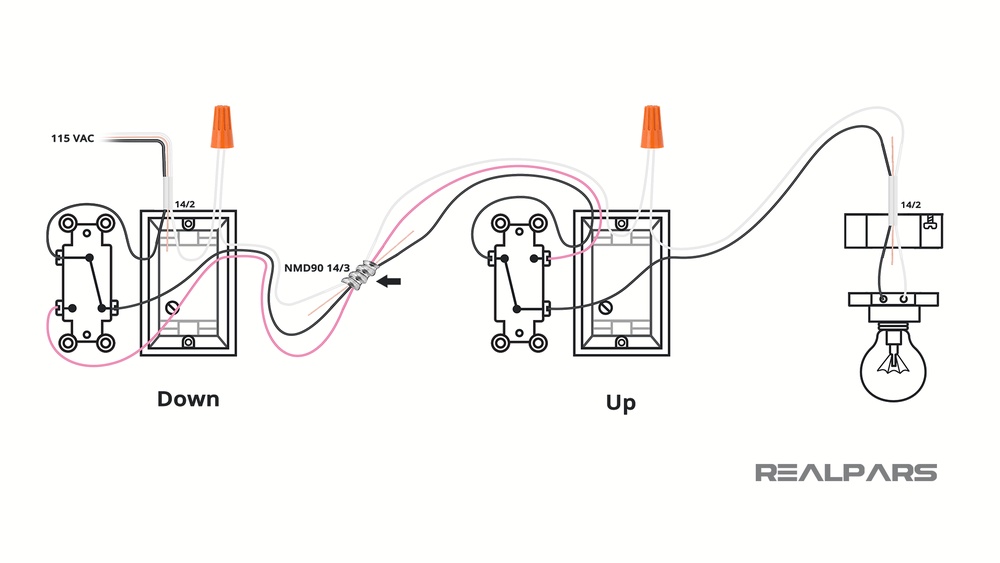
Credit: www.realpars.com
Safety Precautions
Safety is the top priority when connecting two light switches. Electricity can be very dangerous. Taking the right steps keeps you safe and prevents accidents. Follow these safety rules before starting any electrical work.
Turn Off Power At The Circuit Breaker
Switch off the power supply from the main circuit breaker. Never rely only on the wall switch being off. Use a voltage tester to confirm no electricity flows to the wires. This step avoids electric shocks during work.
Use Proper Tools And Equipment
Work with insulated tools made for electrical jobs. Wear rubber-soled shoes to reduce shock risk. Keep your workspace dry and clear of clutter. Good tools and conditions help prevent accidents.
Wear Safety Gear
Always wear safety goggles to protect your eyes. Use gloves designed for electrical work. Avoid loose clothing or jewelry that can catch on wires. Safety gear shields you from sparks or sharp objects.
Check For Damaged Wires
Inspect all wires for cracks or frays before connecting. Replace any damaged wires to avoid short circuits or fires. Safe wiring is essential for a secure connection.
Understand Wiring Codes And Instructions
Follow local electrical codes for wiring light switches. Read all instructions carefully before starting. Proper knowledge reduces mistakes and improves safety.
Types Of Light Switches
Understanding the types of light switches is key to connecting two switches properly. Different switches serve different functions in your home lighting. Knowing their differences helps avoid mistakes and ensures safety.
Light switches come in many styles. The most common are single-pole and three-way switches. Each has unique wiring and uses. Choosing the right type is important for your project.
Single-pole Vs. Three-way
Single-pole switches control one light from one place. They have two terminals and a simple on/off function. These switches are easy to install and common in many rooms.
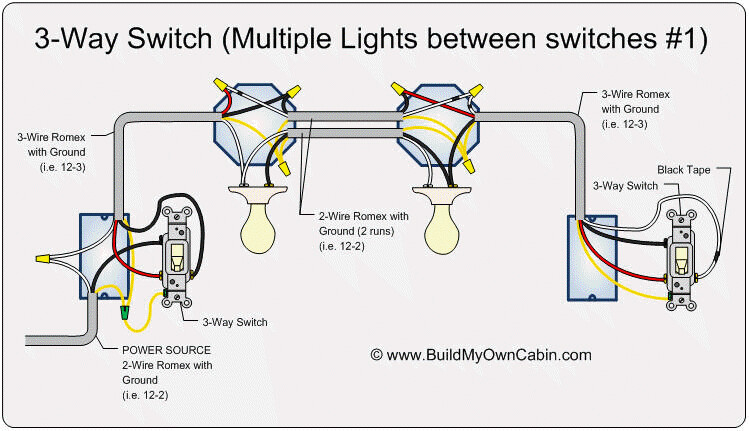
Three-way switches control one light from two places. They have three terminals and allow toggling the light on or off from either switch. This setup is useful for hallways or large rooms.
Knowing the difference helps you pick the right switch. You cannot replace a three-way switch with a single-pole one without changing wiring.
Switch Compatibility
Not all switches work together. Single-pole switches cannot control lights with three-way wiring. Mixing switch types can cause wiring issues or unsafe conditions.
Choose switches designed for your wiring setup. Check product labels to ensure compatibility. Using the correct switches makes installation easier and safer.
Proper switch compatibility also ensures smooth operation. The light will turn on and off reliably from both switches. This improves convenience and user experience.
Identifying Wires
Identifying wires is the first step in connecting two light switches safely. Each wire has a specific role in the electrical circuit. Knowing which wire is which helps avoid mistakes and ensures proper installation.
Live, Neutral, And Ground Wires
The live wire carries electricity from the power source to the switch. It usually has a black or red color. The neutral wire completes the circuit by carrying electricity back to the power source. It is often white or blue. The ground wire protects against electrical shocks. It is typically green or bare copper. Identifying these wires correctly is important for safety.
Testing Wire Voltage
Use a voltage tester to check if a wire is live. Turn off the main power before touching wires. Then, turn the power on and carefully test each wire. The tester will light up or beep if the wire has voltage. This step confirms which wire carries current. Testing wires reduces the risk of electric shock during installation.
Wiring Two Switches Together
Wiring two switches together allows control of one light from two different places. This setup is common in hallways and large rooms. It requires careful wiring to ensure both switches work correctly and safely. Follow the steps below to wire two switches properly.
Turning Off Power
Start by turning off power at the main circuit breaker. This step protects you from electric shock. Use a voltage tester to confirm the power is off. Never touch wires without ensuring no electricity flows through them.
Connecting The Traveler Wires
Locate the traveler wires, usually two wires connecting both switches. Attach these traveler wires to the traveler terminals on each switch. These terminals are often marked or colored differently. Secure the wires tightly to avoid loose connections.
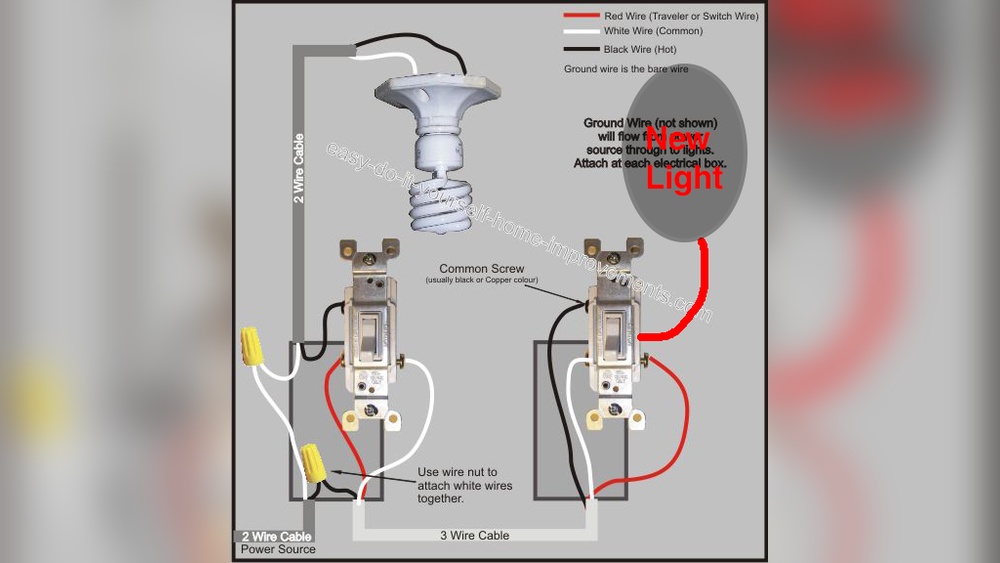
Wiring The Common Terminal
Identify the common terminal on each switch. On the first switch, connect the power source wire to the common terminal. On the second switch, connect the wire leading to the light fixture to its common terminal. This wiring completes the circuit for both switches to control the light.
Mounting And Securing Switches
Mounting and securing light switches is a key step in any electrical project. Proper installation ensures safety and a neat finish. It also helps the switches work correctly over time.
Careful handling during mounting prevents damage to the wiring and switch parts. Use the right tools and follow instructions. This keeps everything tight and stable.
Preparing The Wall Box
Start by checking the wall box where the switch will go. Make sure it is clean and free of debris. The box must be deep enough to hold the switch and wires safely. Tighten any loose screws or replace damaged boxes before proceeding.
Attaching The Switch To The Box
Hold the switch inside the box. Align the screw holes on the switch with those on the box. Use a screwdriver to tighten the mounting screws. Do not over-tighten, as this can crack the switch or box. The switch should sit flush and not wobble.
Securing The Faceplate
Place the faceplate over the mounted switch. Align it carefully with the screw holes. Insert the faceplate screws and tighten them evenly. This covers the box and switch, providing a clean look. Check that the faceplate is secure but not too tight to avoid cracking.
Testing The Setup
Testing the setup is a crucial step after connecting two light switches. It ensures the wiring is correct and the switches control the light as expected. This process helps catch any errors before finalizing the installation.
Restoring Power
Turn the main power back on at the circuit breaker. Make sure the switches are in the off position before restoring power. This prevents sudden sparks or damage. Use a voltage tester to confirm the power is back on safely.
Checking Functionality
Test each switch by turning it on and off several times. Both switches should control the light independently. Check if the light turns on from either switch and turns off from the other. If the light does not respond correctly, recheck your wiring connections.
Common Troubleshooting Tips
Troubles can happen while connecting two light switches. These problems may stop the switches from working right. Knowing how to fix common issues helps save time and effort. It also keeps the wiring safe and secure.
Below are easy tips to check and fix common problems. Follow them step by step for better results.
Check The Power Supply
Ensure the power is off before touching any wires. Use a tester to confirm no electricity flows. Power issues can cause switches not to work.
Verify Wire Connections
Loose or wrong wire connections stop switches from functioning. Match each wire to the correct terminal. Tighten screws to secure wires firmly.
Inspect The Switches
Switches can wear out or break. Test each switch with a multimeter. Replace any switch that shows no continuity.
Look For Damaged Wires
Wires can get cut or frayed. Check all wires for damage or burns. Replace damaged wires to avoid shorts and hazards.
Test The Light Fixture
The problem may be in the light, not the switch. Test the bulb and fixture with a different power source. Fix or replace faulty lights.
Ensure Proper Grounding
Ground wires keep the system safe from shocks. Confirm all ground wires connect properly. Poor grounding can cause switches to fail or spark.
Credit: community.inovelli.com
Frequently Asked Questions
How Do You Wire Two Light Switches Together?
To wire two light switches together, use a three-way switch setup. Connect the traveler wires between the switches. Ensure the power source connects to the common terminal. This allows control of one light from two locations safely and efficiently.
Can I Connect Two Light Switches To One Light?
Yes, you can connect two light switches to one light using three-way switches. This wiring lets you control the same light from two different spots. Proper wiring and safety precautions are essential to avoid electrical hazards.
What Tools Are Needed To Connect Two Light Switches?
You need a screwdriver, wire stripper, voltage tester, electrical tape, and wire nuts. These tools help safely connect and secure wires. Always turn off power before starting any electrical work to ensure safety.
Is It Safe To Connect Two Light Switches Myself?
It can be safe if you understand wiring and follow safety guidelines. Turn off power at the breaker box before starting. If unsure, consult a licensed electrician to avoid risks and ensure code compliance.
Conclusion
Connecting two light switches can be simple with the right steps. Always turn off power before starting work. Use the correct wires and tools for safety. Test the switches to ensure they work properly. Taking time and following instructions helps avoid mistakes.
This project saves money and adds convenience to your home. Practice patience and double-check connections for best results. Now, you can control lights from two places easily. Simple and useful.