Are you unsure if your light switch is working properly? Testing it yourself can save you time and money before calling an electrician.
With just a simple tool called a multimeter, you can quickly check if your switch is functioning or if it needs to be replaced. In this guide, you’ll learn easy steps to test your light switch safely and accurately. Keep reading, and by the end, you’ll have the confidence to handle this common household task on your own.
Tools Needed
Testing a light switch with a multimeter requires some basic tools. Having the right equipment makes the process safe and simple. You do not need many items, but each one is important. Prepare your tools before starting the test.
Multimeter Types
Choose a multimeter that suits your needs. There are digital and analog types. Digital multimeters show clear numbers and are easy to read. Analog meters have a needle and dial but can be harder to understand. For light switch testing, a digital multimeter is best. It measures voltage, resistance, and continuity accurately. Check that your multimeter can test these functions.
Safety Gear
Safety gear protects you from electric shocks. Wear insulated gloves to avoid contact with live wires. Use safety glasses to protect your eyes from sparks or debris. Make sure your shoes have rubber soles to insulate you from the ground. Always turn off the power before testing. Safety gear keeps you safe during the whole process.
Preparing For The Test
Preparing to test a light switch with a multimeter is important for safety and accuracy. Proper preparation helps avoid electrical shocks and ensures clear readings. Follow these steps carefully before starting the test.
Turn Off Power
First, turn off the power to the light switch. Locate the circuit breaker that controls the switch and switch it off. This stops electricity from flowing to the switch. Confirm the power is off by trying to turn on the light or using a voltage tester. Never touch wires with power on. Safety comes first.
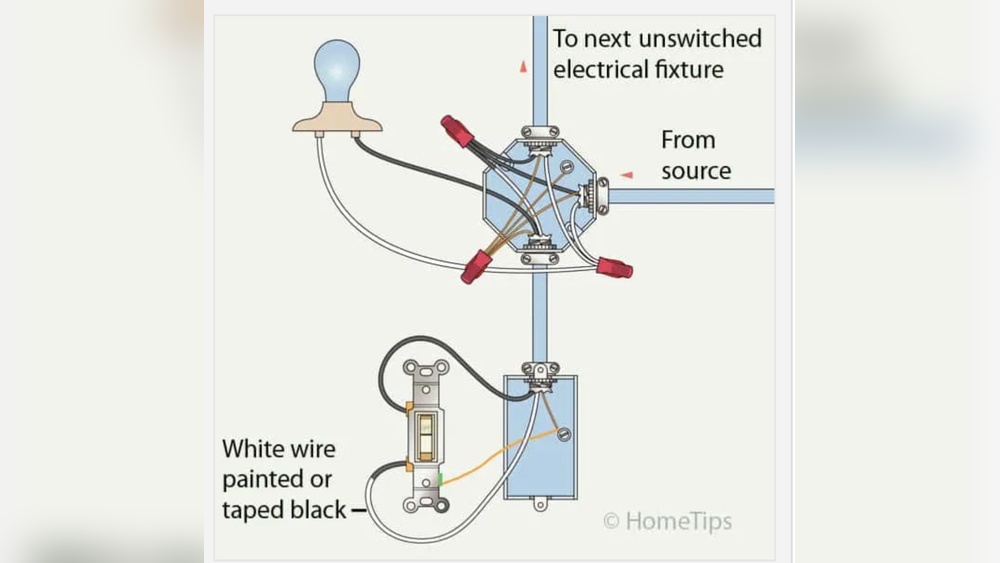
Remove Switch Cover
Next, remove the switch cover plate. Use a screwdriver to take out the screws holding the cover in place. Gently pull the cover away from the wall. This exposes the switch and wires behind it. Be careful not to damage the wires or the wall. Now, the switch is ready for testing with your multimeter.
Setting Up The Multimeter
Setting up your multimeter correctly is the first step to test a light switch safely and accurately. The multimeter needs to be ready to measure the right electrical values. Proper setup helps avoid mistakes and protects you from electric shock.
This section explains how to prepare your multimeter before testing the light switch. Follow each step carefully to ensure accurate readings.
Select The Correct Mode
Turn the dial on your multimeter to the right mode. For testing a light switch, choose the continuity or resistance mode. Continuity mode checks if electricity flows through the switch. Resistance mode measures how much the switch resists the flow of electricity.
Look for a symbol that looks like a sound wave or a resistor. Setting the wrong mode can give false results or damage the device.
Calibrate The Device
Calibrate your multimeter to get accurate readings. Most digital multimeters need little calibration. Before testing, touch the two test leads together. The display should show zero or a small number.
If it does not, adjust the calibration knob or button. Proper calibration ensures your measurements are correct and trustworthy. Always check calibration before each test session.

Credit: www.youtube.com
Testing The Switch
Testing the switch is an important step to find electrical problems. A multimeter helps check if the switch works well. It measures different electrical values. These checks show if the switch is good or broken. Follow these simple steps to test your light switch.
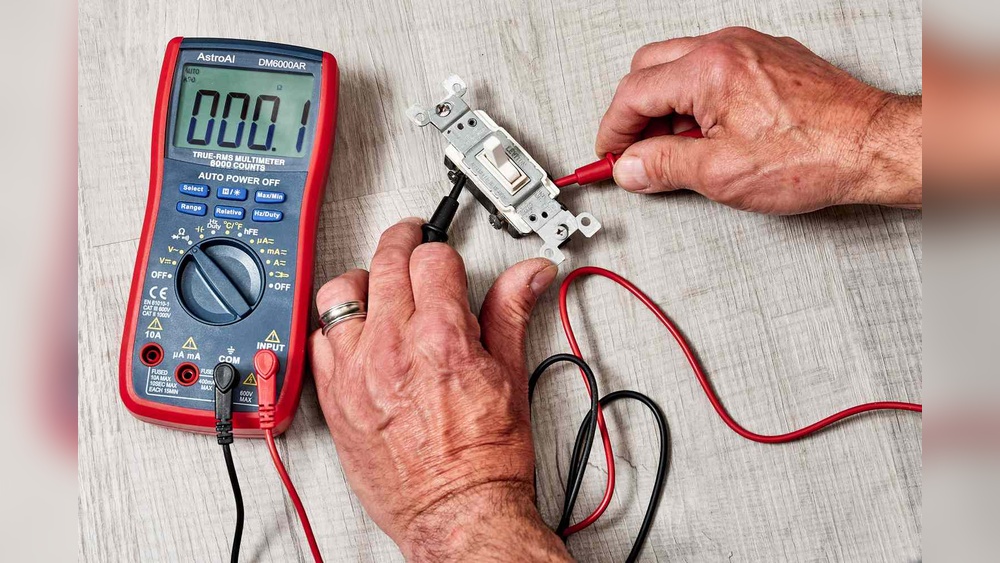
Check For Continuity
Set your multimeter to the continuity mode. Touch the probes to the switch terminals. If the switch is on, the meter beeps or shows zero. No sound or a high reading means no continuity. This means the switch might be faulty or off. Test it in both positions to be sure.
Measure Voltage
Turn the switch on and set the multimeter to voltage mode. Place the probes on the switch terminals carefully. A good switch shows voltage close to your power source. No voltage means the switch or wiring could be bad. Always be careful to avoid electric shock.
Test Resistance
Switch off the power before testing resistance. Set the multimeter to measure ohms. Touch the probes to the switch terminals. A low resistance means the switch works well. High or infinite resistance shows a problem inside. Check both switch positions for accurate results.
Interpreting Results
Interpreting the results from your multimeter is an important step in testing a light switch. It tells you if the switch works correctly or if it needs fixing. The readings show how electricity flows through the switch, helping you understand its condition.
Reading the multimeter correctly can save time and avoid mistakes. Knowing what normal and abnormal readings look like helps you decide the next steps. Here are the key points to check when interpreting your results.
Normal Readings
A normal reading means the switch allows electricity to pass when it is ON. The multimeter should show very low resistance, close to zero ohms. This means the circuit is complete and electricity flows freely.
When the switch is OFF, the multimeter should show high resistance or no continuity. This means the circuit is open and electricity is blocked, which is how the switch controls the light.
Signs Of Faulty Switch
High resistance when the switch is ON is a sign of a problem. This suggests the switch is not allowing electricity to flow properly. It may cause the light to flicker or not turn on at all.
Continuity when the switch is OFF also indicates a fault. The switch might be stuck or damaged, causing power to flow even when it should be off. This can be unsafe and needs repair or replacement.
Troubleshooting Tips
Troubleshooting a light switch with a multimeter helps find electrical problems fast. Testing shows if the switch works or needs fixing. Knowing common issues and when to replace the switch saves time and effort.
Common Issues
Loose wires often cause a switch to stop working. Check wires for tight connections before testing with a multimeter.
A faulty switch can show no continuity when tested. This means electricity does not flow through the switch properly.
Burn marks or a burnt smell near the switch can indicate damage. Such damage usually means the switch is unsafe to use.
Sometimes, the problem is with the circuit breaker or fuse, not the switch. Test these parts if the switch looks fine but the light stays off.
When To Replace The Switch
Replace the switch if the multimeter shows no continuity when on. This means the switch is broken inside.
Switched lights that flicker or do not turn on consistently need a new switch. Flickering can mean worn contacts inside the switch.
Switches with visible damage or burning signs must be replaced immediately. Using damaged switches can cause electrical hazards.
Old switches may fail over time. If testing reveals weak or inconsistent results, install a new switch for safety.
Safety Precautions
Testing a light switch with a multimeter requires care. Safety is the top priority. Understanding safety steps protects you from harm. This section explains key safety precautions.
Avoiding Electric Shock
Always turn off the power at the circuit breaker. Double-check that the power is off using the multimeter. Never touch exposed wires with bare hands. Use insulated gloves for extra protection. Keep your hands dry and stand on a dry surface. Avoid working in wet or damp areas. Stay alert and focused to prevent accidents.
Proper Tool Handling
Use a multimeter that is rated for household electrical work. Check the multimeter’s probes for damage before starting. Hold probes by the insulated handles only. Do not apply too much force on the switch or wires. Store your tools safely after use. Follow the multimeter’s instructions carefully. Clean the tools after testing to maintain safety.
:max_bytes(150000):strip_icc()/testing-single-pole-switches-1152811-03-8b89394a236d499ebee520df31a0ce27.jpg)
Credit: www.thespruce.com

Credit: www.youtube.com
Frequently Asked Questions
How Do I Test A Light Switch With A Multimeter?
Set the multimeter to continuity mode. Remove the switch cover, disconnect wires, and touch probes to terminals. If the multimeter beeps or shows zero resistance, the switch works. No beep means the switch is faulty.
What Multimeter Setting Is Best For Testing Switches?
Use the continuity or resistance (ohms) setting. Continuity mode is preferred as it beeps for closed circuits. Resistance mode shows low values for good switches. Avoid voltage settings when testing switch continuity.
Can I Test A Light Switch Without Removing It?
No, always turn off power and remove the switch before testing. Testing with power on risks shock and inaccurate readings. Disconnect wires for safe, accurate multimeter testing.
Why Does My Multimeter Show No Reading On The Switch?
A no-reading result means the switch is open or faulty. Ensure power is off and probes contact terminals correctly. If still no reading, replace the switch as it may be defective.
Conclusion
Testing a light switch with a multimeter is simple and safe. Always turn off the power before starting any test. Use the multimeter to check for continuity and voltage carefully. Understanding these steps helps spot issues quickly. Regular checks can prevent bigger electrical problems later.
Take your time and follow each step clearly. This skill saves money and avoids unnecessary repairs. Practice makes it easier and builds confidence. Keep your home’s electrical system working well with these easy tests.