Have you ever wished your lights could turn off automatically, saving you time and energy? Installing a timer on your light switch is a simple way to make your home smarter and more efficient.
Whether you want to keep your lights on for a set period or have them turn off when you forget, this guide will walk you through every step. By the end, you’ll know exactly how to add a timer to your light switch — no confusing jargon, just clear instructions you can follow right now.
Ready to take control of your lighting? Let’s get started!

Credit: mydome.co.uk
Choosing The Right Timer Switch
Choosing the right timer switch is important for a smooth installation and proper function. A good timer switch saves energy and adds convenience. It helps control your lights automatically. Picking the right one depends on your needs and home setup.
Types Of Timer Switches
There are several types of timer switches available. Mechanical timers use a dial to set time. They are simple and cost-effective. Digital timers offer precise control and multiple settings. Some have remote control options for ease. Occupancy sensors turn lights on or off based on motion. Choose a type that fits your lifestyle and budget.
Features To Consider
Look for easy-to-use controls. Clear display screens help with setting timers. Adjustable time intervals let you customize light operation. Some timers have battery backup for power outages. Consider whether you want a manual override switch. Silent operation can be important for bedrooms. Choose features that match your daily routine.
Compatibility With Your Wiring
Check your home wiring before buying a timer switch. Some switches need a neutral wire for power. Older homes may lack this wire. Confirm the voltage and amperage ratings match your circuit. Make sure the switch fits your wall box size. Incorrect compatibility can cause installation problems or damage. Consult an electrician if unsure about wiring.
Tools And Materials Needed
Installing a timer on a light switch is a simple project. Having the right tools and materials makes the job easier. Prepare all items before starting. This section covers the essentials you will need.
Essential Tools
Start with a screwdriver set. Both flathead and Phillips types are useful. A voltage tester is critical for safety. It helps check if wires are live. Wire strippers make removing insulation easy. Pliers assist with twisting wires together. A drill may be needed for mounting the timer.
Safety Gear
Safety is important. Wear insulated gloves to protect against shocks. Safety goggles shield your eyes from dust and debris. Use a face mask if dust or particles are present. Proper footwear reduces the risk of slipping or injury. Keep a first aid kit nearby just in case.
Additional Supplies
Gather wire nuts to connect wires securely. Electrical tape helps insulate exposed wire ends. A timer switch compatible with your circuit is necessary. Have a flashlight or work light to see clearly. Keep a small container for screws and small parts.
Preparing For Installation
Preparing for installation is the first step to a successful timer switch setup. It involves ensuring safety and checking your current switch and wiring. Taking time here makes the process smooth and safe.
Turning Off Power Safely
Start by turning off the power to the light switch. Find the correct circuit breaker in your electrical panel. Switch it off to cut power completely. Use a voltage tester to confirm no electricity flows to the switch. This step prevents electric shocks and accidents.
Removing The Existing Switch
Remove the switch cover plate using a screwdriver. Unscrew the existing switch from the wall box. Gently pull the switch out to expose the wires. Keep the wires intact and note their positions. Take a photo for reference if needed.
Inspecting Wiring
Check the wires for damage or wear. Look for loose or frayed wires. Make sure the wires match the timer switch instructions. Confirm you have the right wires: usually live, neutral, and ground. Proper wiring is essential for the timer to work correctly.
Installing The Timer Switch
Installing the timer switch is a key step to control your lights efficiently. It allows you to set times for the lights to turn on or off automatically. This saves energy and adds convenience to your home. Follow these clear steps to install the timer switch safely and correctly.
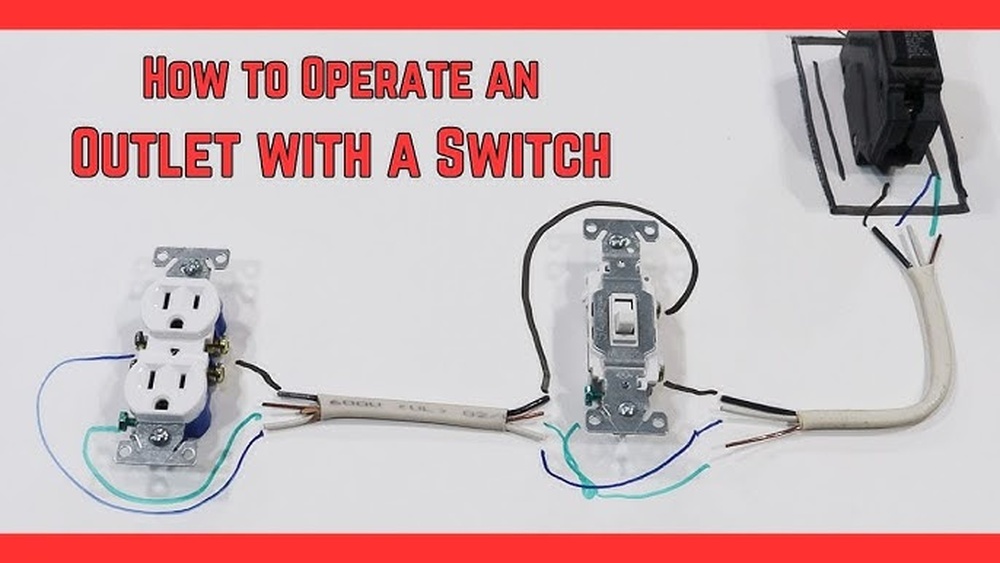
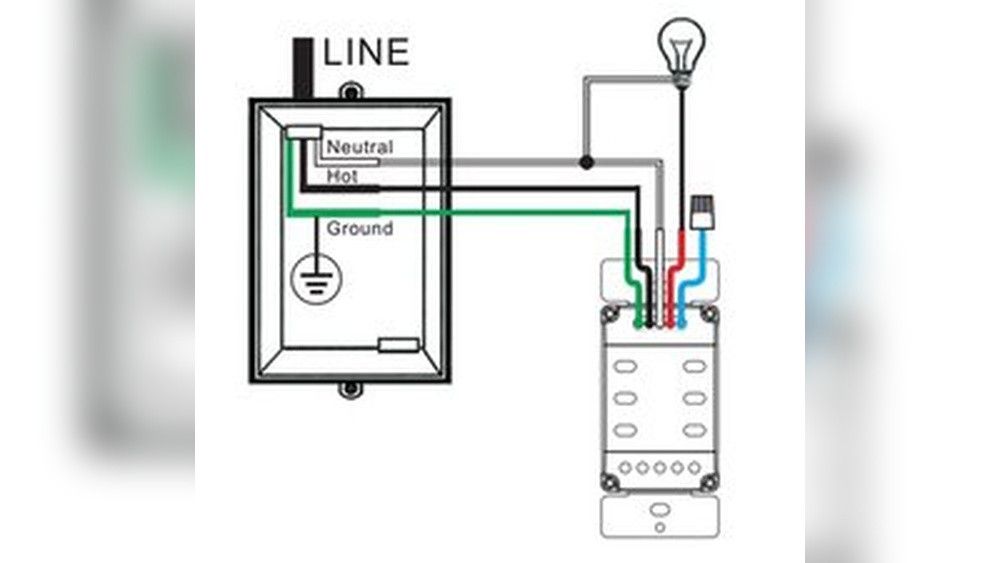
Connecting Wires Correctly
Turn off the power at the breaker before starting. Use a voltage tester to confirm the power is off. Match the wires from the timer switch to the wires in the wall. Usually, black wires connect to black, white to white, and green or copper to ground. Use wire nuts to secure the connections tightly. Make sure no bare wire is exposed.
Securing The Timer Switch
Push the connected wires gently back into the electrical box. Align the timer switch with the mounting holes on the box. Use screws to attach the switch firmly. Do not overtighten screws to avoid damaging the switch. The switch should sit flush with the wall.
Reattaching The Faceplate
Place the faceplate over the timer switch carefully. Screw the faceplate into place using the provided screws. Ensure the faceplate fits snugly without gaps. Restore power at the breaker and test the timer switch. Confirm it controls the light as expected.
Setting Up The Timer
Setting up the timer on your light switch is the next step after installation. This process lets you control when your lights turn on and off automatically. Proper setup saves energy and adds convenience. Follow clear steps to program your timer correctly for best results.
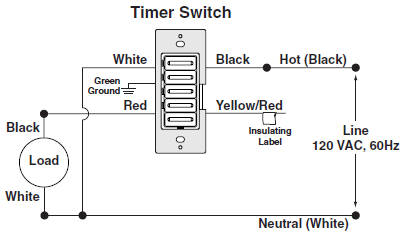
Programming Basic Functions
Start by setting the current time on the timer. Use the buttons on the device to adjust hours and minutes. Next, set the on and off times according to your schedule. Many timers allow multiple on/off cycles per day. Make sure to confirm your settings before moving on.
Adjusting Advanced Settings
Explore options like countdown mode or random on/off functions. Countdown mode turns the light off after a set time. Random mode makes lights turn on and off at different times. These features add security by simulating presence. Adjust settings carefully to fit your needs.
Testing The Timer
Test the timer by manually switching it to the auto mode. Watch if the lights turn on and off at programmed times. Check all functions to ensure they work smoothly. If something is wrong, review your settings and correct them. Testing helps avoid future problems and frustration.
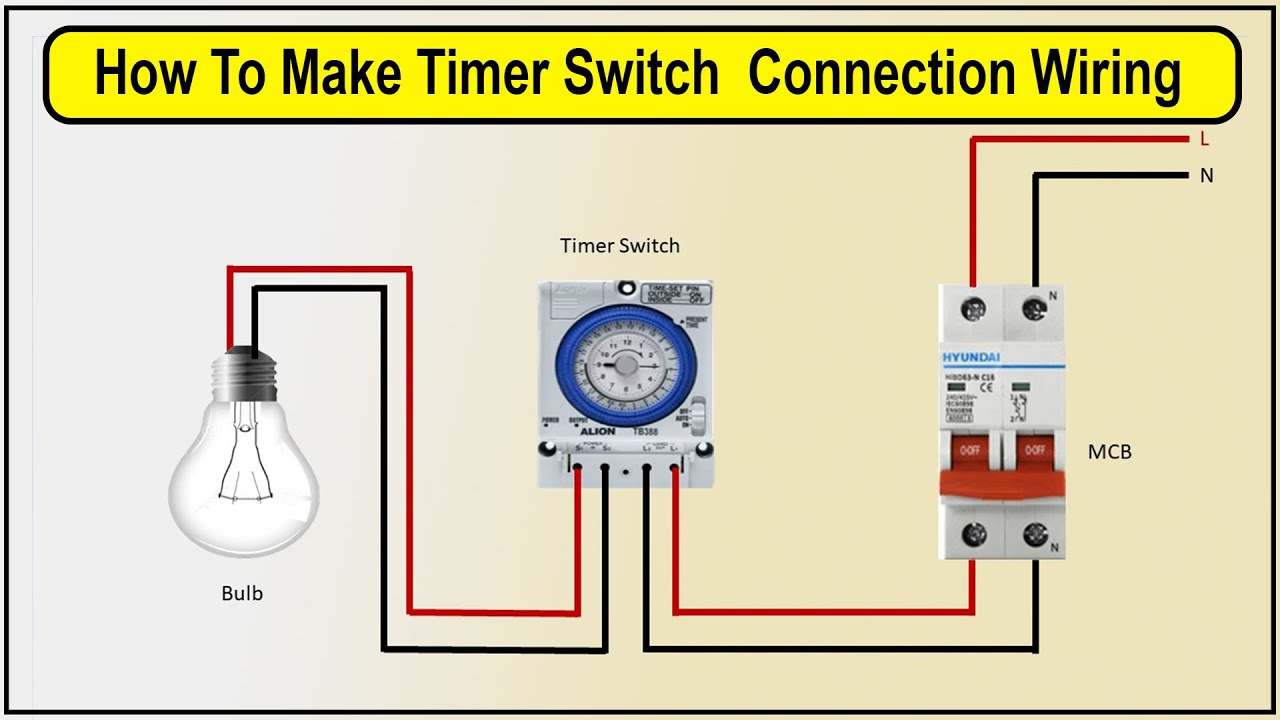
Credit: www.youtube.com
Troubleshooting Common Issues
Troubleshooting common issues helps keep your timer switch working well. Problems can stop the timer from turning on or cause flickering lights. Resetting the timer often fixes many errors fast. Follow these tips to solve common problems easily.
Timer Not Turning On
Check the power supply first. Make sure the circuit breaker is on. Confirm wires are connected tightly to the timer terminals. Loose wires can stop the timer from powering up. Look for any blown fuses in the switch box. Replace if needed. Test the timer by pressing the manual override button. If still off, the timer may be faulty and need replacement.
Flickering Lights
Flickering lights often mean a loose wire or bad connection. Turn off the power before inspecting wires. Tighten any loose connections in the switch box. Replace old or damaged wires. Some timers may not work well with certain bulbs. Try switching to LED or incandescent bulbs. If flickering persists, test the timer on another circuit to isolate the problem.
Resetting The Timer
Resetting clears errors and restores default settings. Locate the reset button on the timer. Press and hold it for about 5 seconds. Release the button and wait for the timer to reboot. Set the current time and program again after resetting. If no reset button, turn off power to the timer for 1 minute, then turn it back on. This acts as a manual reset.
Safety Tips And Maintenance
Installing a timer on a light switch makes life easier and saves energy. Safety and maintenance are key to keep the timer working well and protect your home. Simple steps help avoid problems and extend the timer’s life.
Regular Inspections
Check the timer and switch often for any signs of damage or wear. Look for loose wires, cracks, or discoloration. Test the timer to see if it turns the light on and off properly. Fix small issues quickly to stop bigger problems.
Avoiding Electrical Hazards
Always turn off power at the breaker before touching the switch or timer. Use tools with insulated handles. Never work with wet hands or in damp areas. Follow the timer’s instructions carefully to avoid shocks or fires.
Extending Timer Lifespan
Keep the timer clean and free from dust. Avoid forcing the buttons or dials. Use the timer within the recommended voltage and load limits. Replace the timer if it shows signs of failure to prevent damage to your electrical system.
Credit: mydome.co.uk
Frequently Asked Questions
How Do I Install A Timer On A Light Switch?
Turn off power at the breaker. Remove the switch cover and disconnect wires. Connect the timer switch wires accordingly. Secure the timer switch and replace the cover. Turn power back on and test the timer.
Can I Install A Timer Switch Myself Safely?
Yes, if you follow safety precautions. Turn off the breaker, use a voltage tester, and read the instructions carefully. If unsure, consult a professional electrician to avoid hazards.
What Types Of Timers Work With Light Switches?
Mechanical timers, digital timers, and smart timers all work. Choose based on your preference for features and ease of use. Ensure compatibility with your home’s wiring and light fixtures.
Will A Timer Switch Save Electricity?
Yes, timers reduce electricity use by automatically turning lights off. They help avoid lights being left on unnecessarily, lowering energy bills and extending bulb life.
Conclusion
Installing a timer on your light switch saves energy and adds convenience. The steps are simple and clear. Always turn off the power before starting. Use the right tools for safety. Double-check your connections to avoid problems. A timer helps control lighting without waste.
Enjoy the ease of automatic light control. Small effort, big benefits. Give it a try and see the difference.