Are you tired of dealing with a faulty light switch or ready to upgrade your home lighting? Switching out a light switch might seem tricky, but it’s easier than you think.
With just a few simple steps, you can save money and gain confidence by handling this small home improvement yourself. In this guide, you’ll learn exactly what to do—safely and quickly—so you can get your lights working perfectly again. Keep reading, and by the end, you’ll know how to switch out a light switch like a pro.

Credit: blueskysparky.com
Tools And Materials Needed
Switching out a light switch is a simple task with the right tools and materials. Having everything ready makes the job faster and safer. Prepare all items before you start to avoid interruptions.
Essential Tools
You need a screwdriver, usually flathead and Phillips. A voltage tester is crucial to check power is off. Wire strippers help remove insulation from wires. Needle-nose pliers make handling wires easier. A flashlight can help in dark spaces.
Selecting The Right Switch
Choose a switch that matches your old one in size and type. Single-pole switches control one light from one spot. Three-way switches control lights from two locations. Check the switch rating to match your home’s voltage and current.
Safety Gear
Wear insulated gloves to protect from electric shocks. Safety glasses keep debris out of your eyes. Use rubber-soled shoes for extra protection. Turn off power at the circuit breaker before starting any work.

Credit: www.youtube.com
Preparing For The Switch
Preparing to switch out a light switch is important for safety and ease. Take time to get ready before starting the work. Proper preparation makes the process smooth and prevents accidents.
Turning Off Power
Start by turning off the power at the circuit breaker. This stops electricity from flowing to the switch. Never work on a live circuit. Double-check the correct breaker controls the switch you want to replace.
Testing The Circuit
Use a voltage tester to confirm the power is off. Touch the tester to the switch wires. No light or sound from the tester means no electricity. This step is crucial for your safety.
Clearing The Work Area
Remove any objects near the switch. Clear the space for easy access and movement. A tidy area helps prevent accidents and keeps tools within reach. Good lighting also improves visibility while working.
Removing The Old Switch
Removing the old light switch is the first step in replacing it safely. It requires care and attention to avoid any electrical hazards. Follow each step carefully to ensure the process goes smoothly.
Turn off the power at the breaker before starting. Double-check that the switch is not live by testing it with a voltage tester. Safety first.
Unscrewing The Cover Plate
Start by locating the screws on the switch cover plate. Use a screwdriver to remove them. Keep the screws in a safe place for later use. Gently pull the cover plate away from the wall. This exposes the switch and wires inside.
Detaching The Switch
Next, unscrew the screws holding the switch to the electrical box. Carefully pull the switch out, exposing the wires. Avoid touching the wires directly. Keep the switch steady to prevent damage to the wires.
Labeling The Wires
Before disconnecting any wires, label each one with tape or a marker. Note which wire connects to each terminal on the switch. This helps during installation of the new switch. Clear labels make the process easier and prevent errors.

Credit: www.dummies.com
Installing The New Switch
Installing the new light switch is the key step after removing the old one. This part requires careful handling to ensure safety and proper function. Follow each step slowly to avoid mistakes and make the switch work correctly.
Connecting The Wires
Match each wire to the correct terminal on the new switch. Usually, black or red wires connect to brass screws. The white wire goes to the silver screw if present. Tighten the screws firmly to hold the wires in place. Make sure no wire strands stick out. Use wire nuts if needed to join wires safely.
Securing The Switch
Push the wires gently back into the electrical box. Align the switch so the screw holes match the box holes. Use the screws to fix the switch tightly to the box. Avoid over-tightening, which can crack the switch. The switch should sit flat and not wiggle.
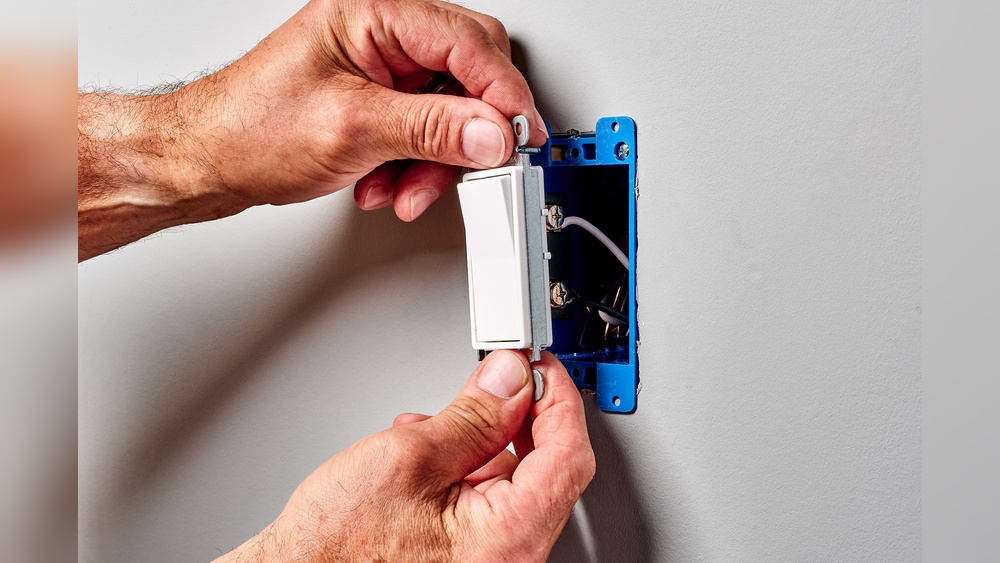
Reattaching The Cover Plate
Place the cover plate over the switch carefully. Align the screw holes on the plate and switch. Insert the screws and tighten them until the plate is flush with the wall. Do not force the screws too much. The cover plate protects the wiring and gives a finished look.
Testing The New Installation
Testing the new installation is an important step after switching out a light switch. It ensures the switch works safely and properly. This process helps you avoid electrical problems and potential hazards.
Follow these simple steps to confirm your new switch functions well. Take your time and do not rush. Safety is the priority when working with electricity.
Restoring Power
Turn the power back on at the circuit breaker. Make sure the breaker is fully switched on. Do not touch wires while the power is on. Use a voltage tester if needed to check the wires.
Checking Functionality
Flip the new switch up and down. Notice if the light turns on and off correctly. Test all switches in the same circuit if applicable. Listen for any unusual sounds from the switch. Confirm the switch feels firm and does not wobble.
Troubleshooting Tips
If the light does not turn on, turn off the power again. Check all wire connections for tightness. Look for any loose or damaged wires. Confirm the switch is installed in the correct position. Replace the switch if it seems faulty. Call a professional if problems continue.
Upgrading Tips And Tricks
Upgrading your light switch can improve your home’s functionality and style. Simple changes can make a big difference in daily life. This section shares practical tips for upgrading your switches safely and smartly.
Choosing Smart Switches
Smart switches offer control from your phone or voice assistant. They help you manage lights without moving. Choose models that fit your wiring and device needs. Look for easy installation and good reviews.
Improving Aesthetics
Switch covers come in many designs and colors. Pick styles that match your room’s decor. Consider sleek, modern finishes or classic looks. A well-chosen switch can boost your room’s appeal.
Energy Efficiency Ideas
Use switches with timers or motion sensors. These save energy by turning off lights automatically. LED-compatible switches also reduce power use. Small changes lower your energy bills and help the environment.
Frequently Asked Questions
How Do I Safely Turn Off Power Before Switching A Light Switch?
Always turn off the circuit breaker for the light switch’s circuit. Use a voltage tester to confirm no power is present before starting work. This prevents electrical shocks and ensures your safety during the switch replacement process.
What Tools Do I Need To Switch Out A Light Switch?
You need a flathead screwdriver, Phillips screwdriver, voltage tester, wire stripper, and electrical tape. These tools help remove the old switch and install the new one safely and effectively.
How Can I Identify The Wires On A Light Switch?
Typically, black or red wires are hot, white is neutral, and green or bare copper is ground. Use a voltage tester to confirm wire functions before disconnecting to avoid wiring mistakes.
Can I Replace A Light Switch Without Professional Help?
Yes, if you follow safety precautions and have basic electrical knowledge. Always turn off power and test wires before handling. If unsure, consult a professional electrician to avoid hazards.
Conclusion
Switching out a light switch can save money and improve your home’s look. Always turn off power before starting to stay safe. Follow each step carefully to avoid mistakes. Take your time and double-check your work. A simple task, but done right, it feels great.
Now, you can enjoy your new light switch with confidence.