Have you ever wished your lights could turn on or off automatically without you having to lift a finger? Installing a timer light switch can make that happen, saving you money on energy bills and adding convenience to your daily routine.
If you’re worried it might be complicated, don’t be. In this guide, you’ll learn exactly how to install a timer light switch step-by-step, even if you have little to no experience with electrical work. By the end, you’ll have the confidence to upgrade your home lighting and enjoy hands-free control every day.
Let’s get started!

Credit: www.youtube.com
Tools And Materials Needed
Installing a timer light switch needs the right tools and materials. Having everything ready makes the job easier and safer. You will avoid delays and frustration by preparing ahead.
Use tools that are in good condition. Choose materials that fit your home’s wiring and switch type. Safety gear is important too. Protect yourself while working with electricity.
Tools Required For Installing A Timer Light Switch
- Screwdrivers (flathead and Phillips)
- Wire strippers
- Voltage tester
- Needle-nose pliers
- Electrical tape
- Utility knife
Materials Needed For The Installation
- Timer light switch compatible with your system
- Wire connectors (wire nuts)
- Replacement screws (if needed)
- Wall plate for the switch
- Electrical box (if current one is damaged)
Safety Equipment To Have On Hand
- Insulated gloves
- Safety goggles
- Non-contact voltage detector
- Work light or flashlight
Safety Precautions
Safety is the top priority when installing a timer light switch. Electricity can be dangerous. Taking the right precautions protects you and your home. Follow these important steps to stay safe during installation.
Turn Off The Power
Always switch off the power at the circuit breaker. Do not rely only on the wall switch. Use a voltage tester to check if the wires are dead. This prevents electric shocks.
Use Proper Tools
Choose insulated tools made for electrical work. Avoid metal tools without insulation. This lowers the risk of accidental contact with live wires.
Wear Safety Gear
Wear rubber-soled shoes and gloves for extra protection. Avoid loose clothing that can catch on wires. Safety glasses protect your eyes from sparks.
Read The Instructions
Study the timer switch manual before starting. Understand the wiring diagram and connection points. Follow the manufacturer’s steps exactly to avoid mistakes.
Work In A Dry Area
Make sure your hands and the workspace are dry. Water and electricity do not mix well. This reduces the chance of slips or shocks.
Choosing The Right Timer Switch
Choosing the right timer switch is important for a smooth installation and proper function. Timer switches come in various types and features. Picking one that fits your needs helps save energy and adds convenience.
Understanding your options makes the selection easier. Focus on the type, compatibility, and features of the switch.
Types Of Timer Switches
Mechanical timers use a dial to set on/off times. They are simple and cost-effective. Digital timers offer precise control and multiple settings. Some digital models have touchscreens for easier programming. Choose a type that suits your comfort level and budget.
Compatibility With Your Electrical System
Check the voltage and load capacity of the timer switch. Make sure it matches your home’s wiring and the devices you want to control. Some timers work only with specific bulb types like LED or incandescent. Confirm compatibility to avoid damage or poor performance.
Features To Consider
Look for features such as random mode, countdown timer, or multiple on/off settings. A backup battery keeps the timer working during power outages. Some switches allow remote control via smartphone apps. Pick features that add convenience without complicating use.
Turning Off Power
Turning off power is the first and most important step before installing a timer light switch. It keeps you safe from electric shocks and prevents damage to your wiring. Always treat electricity with respect.
Make sure you have the right tools, like a voltage tester, to confirm the power is off. Safety is key. Never skip this step.
Locate The Circuit Breaker
Find your home’s circuit breaker panel. It is usually in the basement, garage, or a utility room. Look for the breaker that controls the light switch you want to replace.
Switch Off The Correct Breaker
Flip the breaker switch to the OFF position. This stops electricity from flowing to the switch. Double-check by turning the light switch on to see if the light goes off.
Test For Power
Use a voltage tester on the wires inside the switch box. The tester will show if any electricity is still running through the wires. If the tester shows no power, it is safe to continue.
Double Check Before Proceeding
Do not rush. Check the power twice. Safety comes first. If unsure, ask for help from a qualified electrician.
Removing The Existing Switch
Removing the existing switch is the first step in installing a timer light switch. This part requires care and attention. Safety is the top priority. Always turn off the power at the breaker box before starting.
Next, gather the tools needed. A screwdriver and a voltage tester are essential. These will help you remove the switch safely and check for electricity.
Turn Off The Power
Locate the circuit breaker for the switch. Flip the switch to the off position. Double-check by testing the switch with a voltage tester. No power means it is safe to continue.
Remove The Switch Cover Plate
Use a screwdriver to remove the screws holding the cover plate. Keep the screws safe for later use. Gently pull off the cover plate to expose the switch and wiring.
Unscrew The Old Switch
Remove the screws holding the switch to the electrical box. Pull the switch out carefully. Do not pull too hard to avoid damaging wires.
Test For Electricity
Use a voltage tester on the wires connected to the switch. Confirm no current is present. This step ensures your safety before touching wires.
Disconnect The Wires
Note the position of each wire. Loosen the terminal screws or remove wire nuts. Gently separate the wires from the old switch. Prepare the wires for the new timer switch.
Credit: mydome.co.uk
Wiring The Timer Switch
Wiring the timer switch is a key step in installing your new device. Proper wiring ensures the switch works safely and correctly. Follow clear steps to connect the wires without confusion. Take your time and check each connection carefully. This part may seem tricky, but it becomes easier with practice.
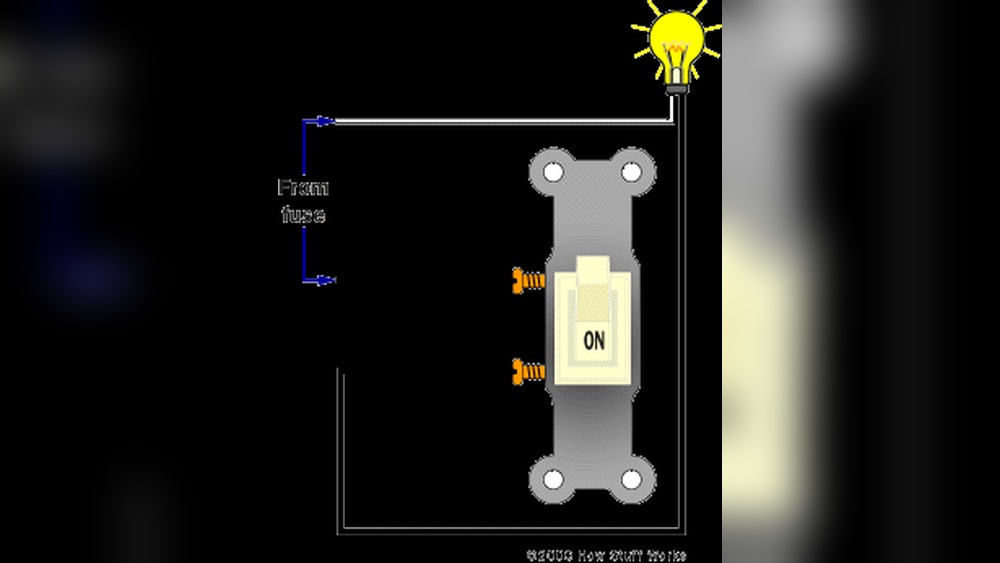
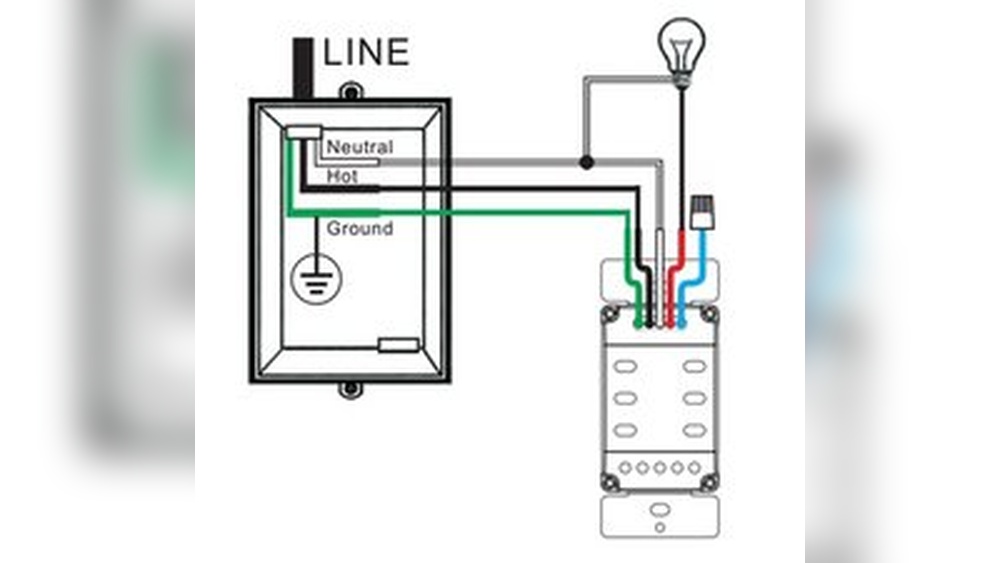
Identifying Wires
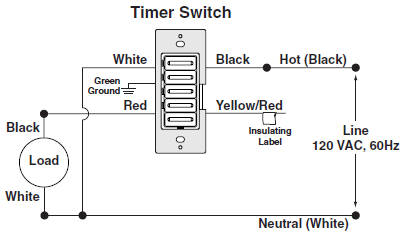
Turn off the power before touching any wires. Use a voltage tester to confirm no current flows. Find the black, white, and ground wires in the wall box. The black wire is usually the hot wire. The white wire is the neutral wire. The ground wire is often green or bare copper. Label each wire if needed. This helps avoid mistakes during connection.
Connecting Wires To Timer
Match the timer switch wires to the house wires by color. Connect black to black, white to white, and green to ground. Use wire nuts to twist wires together securely. Do not force wires into the switch terminal. Follow the timer switch’s instructions for any special wiring. Some switches may have extra wires for specific functions.
Securing Connections
Check each wire nut to ensure a tight fit. Tug gently on wires to test the strength of connections. Tuck wires neatly into the wall box to prevent damage. Attach the timer switch to the box with screws. Replace the switch cover plate. Turn the power back on and test the timer switch. Secure wiring keeps your installation safe and reliable.
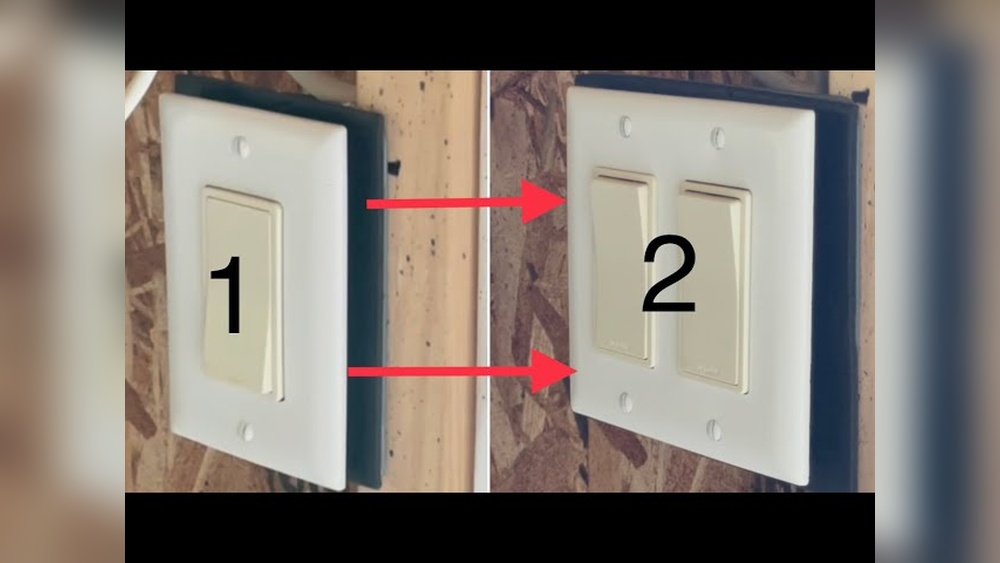
Mounting The Timer Switch
Mounting the timer switch is a key step in the installation process. It secures the device to your wall and connects it to your home’s electrical system. Proper mounting ensures the switch works safely and looks neat.
Follow these steps carefully to mount the timer switch correctly. Take your time and handle the switch gently to avoid damage.
Turn Off The Power
Always start by turning off the power at the circuit breaker. This stops electricity from flowing to the switch. Use a voltage tester to confirm no power is running to the wires. Safety first.
Attach The Timer Switch To The Wall Box
Align the timer switch with the wall box. Push the wires gently inside the box. Screw the switch into place using the screws that came with it. Make sure it fits snugly but do not overtighten.
Secure The Faceplate
Place the faceplate over the timer switch. Press it firmly to fit it flush against the wall. Use the small screws provided to fasten the faceplate. This step gives a clean and finished look.
Restoring Power And Testing
Restoring power and testing the timer light switch is the final step in the installation process. This step confirms the switch works correctly and safely. It ensures your timer controls the lights as expected.
After wiring, power must be turned back on at the breaker. Testing the switch helps catch wiring mistakes early. It also makes sure the timer settings function well.
Turning On The Circuit Breaker
Locate your home’s circuit breaker panel. Find the switch that controls the light circuit. Flip the breaker switch to the ON position. This action restores electricity to the timer switch.
Be careful and avoid touching any exposed wires. Use a flashlight if the area is dark. Always ensure the breaker is fully on before testing the switch.
Checking The Timer Light Switch Operation
Press the timer switch buttons to set your desired schedule. Watch the light to see if it responds correctly. The light should turn on and off at set times.
Use the manual override feature to test immediate light control. This confirms the switch can turn lights on or off directly. If the light does not respond, turn off power again and check wiring.
Verifying Safety And Final Adjustments
Listen for unusual sounds, like buzzing or clicking. These may indicate wiring or switch problems. If the switch feels hot after use, turn off power and inspect.
Make small adjustments to the timer settings as needed. Ensure the switch fits snugly in the wall box. Secure the cover plate to finish the installation.
Programming The Timer
Programming the timer light switch is key to saving energy and adding convenience. It allows you to control when your lights turn on and off automatically. Setting the right schedule fits your daily routine and needs. Let’s explore how to program the timer easily.
Setting On And Off Times
Begin by pressing the program button on your timer switch. Select the time you want the light to turn on. Use the hour and minute buttons to set it accurately. Next, set the off time in the same way. Double-check both times to avoid errors. Some models let you set multiple on/off cycles per day. Follow your device’s instructions to program these extra cycles.
Adjusting Settings
Adjust the timer settings to match your preferences. Choose 12-hour or 24-hour format if available. Set the current time correctly to ensure proper function. Some timers allow you to skip days or use different schedules for weekdays and weekends. Use these features to save more energy. Test the timer by manually switching it to check the programmed times.
Troubleshooting Tips
Troubleshooting a timer light switch can save time and prevent frustration. Small issues often cause the switch to not work properly. Knowing basic checks helps fix common problems quickly. This section shares easy tips for troubleshooting your timer light switch.
Check The Power Supply
Ensure the power is turned off before inspecting the switch. Use a voltage tester to confirm power at the wires. No power means the switch won’t work. Check the circuit breaker and reset it if needed.
Verify Wiring Connections
Loose or wrong wiring can stop the switch from working. Remove the switch cover and check if wires are tight. Match the wires to the instructions. Look for any damaged or frayed wires and replace them.
Test The Timer Settings
Incorrect timer settings may cause the lights to stay off or on. Double-check the programming steps in the manual. Reset the timer and try setting it again. Make sure the current time and desired on/off times are correct.
Inspect The Load Compatibility
Some timer switches do not work with certain bulbs or loads. Confirm that your bulbs match the switch’s requirements. LED bulbs need special compatible switches sometimes. Replace bulbs with recommended types for best results.
Reset The Timer Switch
Resetting can fix minor glitches in the switch. Turn off the power, remove the switch, and wait a few minutes. Put the switch back and power it on. Follow the manual to reset the switch to factory settings.

Credit: mydome.co.uk
Frequently Asked Questions
What Tools Do I Need To Install A Timer Light Switch?
You need a screwdriver, voltage tester, wire stripper, and electrical tape. These tools ensure a safe and proper installation of your timer switch.
Can I Install A Timer Light Switch Myself?
Yes, if you follow safety precautions and instructions carefully. Turn off power at the breaker before starting to avoid electrical shock.
How Do I Wire A Timer Light Switch Correctly?
Connect the timer switch wires to the corresponding house wires: line, load, neutral, and ground. Use wire nuts for secure connections.
What Types Of Timer Switches Are Best For Home Use?
Digital and mechanical timer switches suit home lighting needs. Digital timers offer more precise control and programming options.
Conclusion
Installing a timer light switch saves energy and adds convenience. The steps are simple and easy to follow. Make sure to turn off the power before starting. Use a tester to check wires for safety. Connect wires carefully according to the instructions.
Once installed, set the timer to your needs. Enjoy automatic control of your lights every day. This small change can improve your home’s comfort and save money. Take your time and work safely for the best results.