Are you tired of fumbling with separate switches for your fan and light? Imagine controlling both with one simple switch, making your space neater and more convenient.
Adding a fan switch to your existing light switch might sound tricky, but it’s easier than you think. In this guide, you’ll learn step-by-step how to do it safely and effectively. Keep reading, and soon you’ll enjoy seamless control over your fan and light without any hassle.
Credit: www.protoolreviews.com
Tools And Materials Needed
Adding a fan switch to a light switch requires some basic tools and materials. Preparing these items beforehand makes the job easier and safer. Each tool plays an important role in the process.
Gathering the right materials ensures a smooth installation. Using the correct parts helps avoid damage and saves time. Below are the essential tools and materials needed for this project.
Basic Electrical Tools
- Screwdriver (flathead and Phillips)
- Wire stripper
- Voltage tester
- Needle-nose pliers
Materials For Wiring
- Fan switch compatible with your fan
- Electrical wire (14 or 12 gauge)
- Wire nuts
- Electrical tape
- Wall plate for the switch
Safety Equipment
- Insulated gloves
- Safety glasses
- Flashlight or work light
Safety Precautions
Adding a fan switch to a light switch involves working with electricity. Safety is the most important part of the process. Taking the right precautions can prevent accidents and injuries.
Before starting, you must prepare your workspace and tools carefully. Know the risks and how to avoid them. Follow safety rules strictly to protect yourself and others.
Turn Off Power At The Circuit Breaker
Always switch off the power from the main circuit breaker. Do not rely on the wall switch alone. Use a voltage tester to confirm no electricity flows to the wires.
Use Proper Tools And Equipment
Choose insulated tools made for electrical work. Wear rubber-soled shoes and safety glasses. Keep your hands dry and avoid metal jewelry during work.
Understand Wiring And Switch Types
Learn how your home wiring works. Know the difference between single-pole and three-way switches. Use the correct switch that fits your fan and light setup.
Work In A Dry, Well-lit Area
Make sure the workspace is dry to avoid electric shock. Use a bright light source to see wires clearly. Avoid working in dim or wet conditions.
Label Wires Before Disconnecting
Mark each wire with tape or a marker before removal. This helps you connect wires correctly later. Wrong connections can cause shorts or damage.
Double-check Connections Before Restoring Power
Inspect all wire connections carefully before turning power back on. Tighten screws and secure wires inside the switch box. Loose wires can cause sparks or fires.
Turning Off Power
Turning off power is the first and most important step. It keeps you safe from electric shock. Always treat electricity with caution. Never start any electrical work without cutting the power first.
Before adding a fan switch to a light switch, ensure the power is completely off. This step protects you and your home. It helps prevent accidents and damage to wiring.
Locate The Circuit Breaker
Find your home’s main electrical panel. This is where all circuit breakers are. Look for the breaker that controls the room you will work in. It may be labeled with room names or numbers.
Switch Off The Correct Breaker
Flip the switch for the correct circuit breaker to the off position. This stops electricity flow to the light switch. Double-check by testing the light switch to see if power is off.
Use A Voltage Tester
Before touching wires, use a voltage tester. This tool confirms no electricity is present. Test all wires in the switch box. If the tester shows no power, it is safe to proceed.
Double Check Safety
Never assume the power is off. Always test again with the voltage tester. Safety is the top priority. Taking a few extra seconds can prevent serious injury.
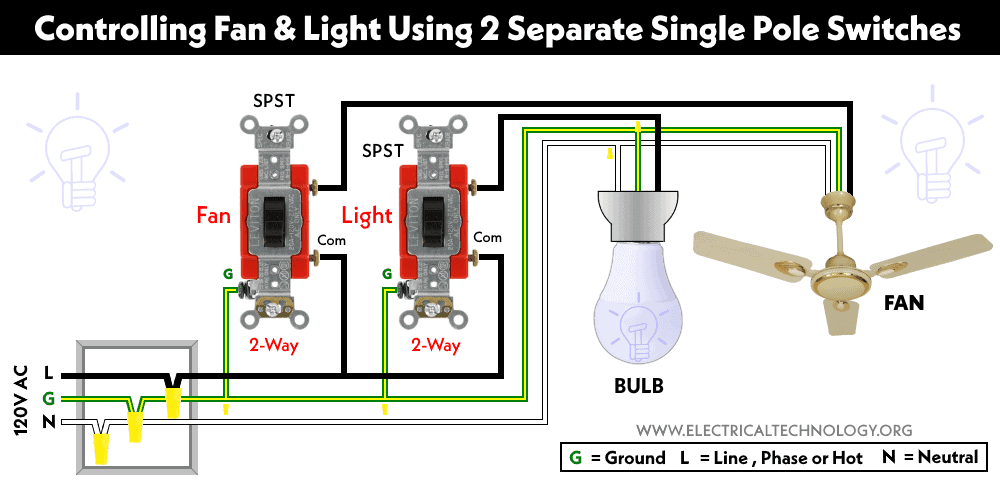
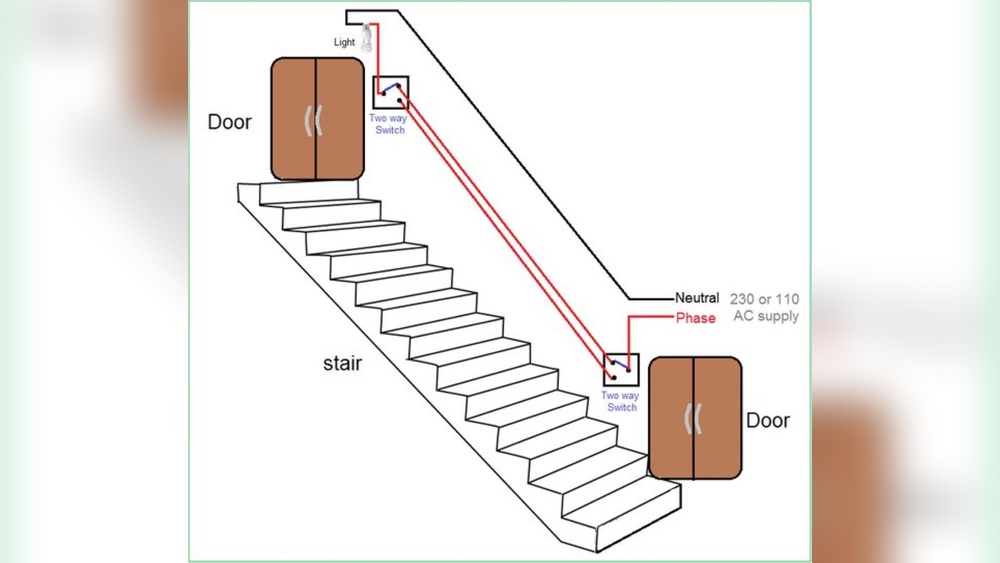
Credit: www.electricaltechnology.org
Removing The Existing Light Switch
Removing the existing light switch is the first step to add a fan switch. This process requires care and basic tools. Safety is the top priority. Always turn off the power at the circuit breaker before starting. Confirm the power is off by testing the switch with a voltage tester.
Next, gather the tools: a screwdriver, voltage tester, and wire stripper. These tools make the job easier and safer. Working slowly helps avoid mistakes and damage.
Turn Off Power At The Circuit Breaker
Find the correct breaker for the switch. Flip the breaker to the off position. Double-check power is off by flipping the light switch. Use a voltage tester on the switch wires for confirmation.
Remove The Switch Cover Plate
Use a screwdriver to unscrew the cover plate. Keep the screws in a safe place. Gently pull the cover plate off the wall. This exposes the switch and wiring.
Unscrew The Light Switch From The Wall Box
Locate the screws holding the switch in place. Unscrew them carefully. Pull the switch out slowly to see the wiring. Do not pull too hard; wires can break.
Identify And Disconnect The Wires
Note the position of each wire on the switch. Take a photo for reference. Loosen the screws holding the wires. Gently pull each wire off the switch terminals.
Identifying Wires
Identifying wires is the first step in adding a fan switch to a light switch. Knowing which wire does what keeps you safe and makes the job easier. Wires carry electricity, so handling them correctly is very important. This section helps you understand common wire types and their roles.
Understanding Wire Colors
Wire colors show their purpose. Black wires usually carry power. White wires often return power to the panel. Green or bare copper wires connect to ground. These colors help you spot each wire’s job quickly. Always double-check, as colors can vary in old homes.
Using A Voltage Tester
A voltage tester checks if wires have electricity. Touch the tester to each wire carefully. It shows if the wire is live or safe to touch. Test all wires before starting work. This step prevents electric shocks and mistakes.
Locating The Hot Wire
The hot wire supplies power to the switch. It is usually black. The voltage tester will light up on this wire. Identifying the hot wire helps connect your fan switch properly. Never guess; always verify with a tester.
Finding The Load And Neutral Wires
The load wire leads to the light or fan. It carries power out from the switch. The neutral wire returns power to the panel. It is usually white. Knowing these wires helps you connect the fan switch correctly. Check each wire with the tester before you connect.

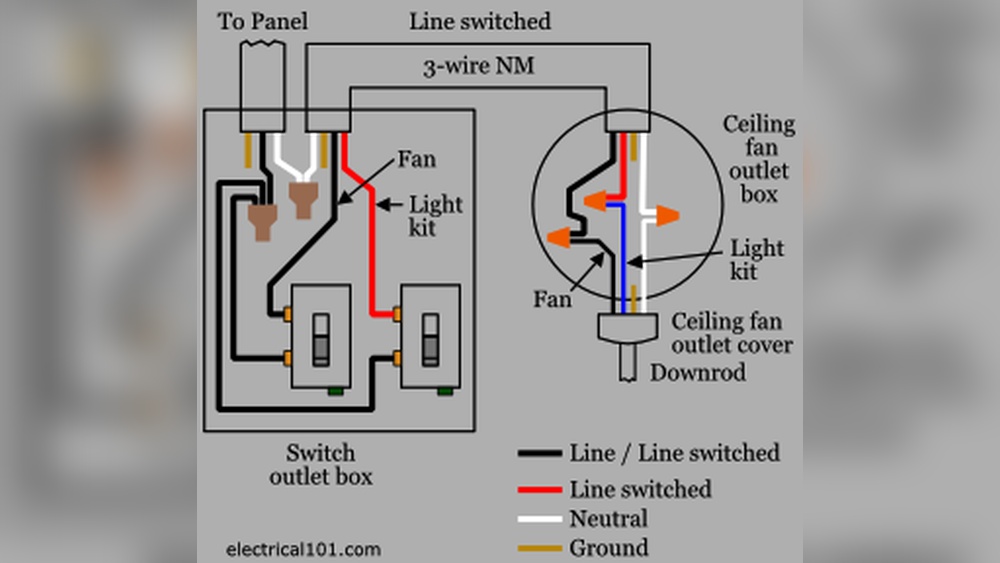
Credit: diy.stackexchange.com
Choosing The Right Fan Switch
Choosing the right fan switch is important for your home comfort and safety. The wrong switch can cause problems or not work well with your fan. You need to think about the type of fan and how you want to control it. This guide helps you pick the best fan switch for your needs.
Types Of Fan Switches
There are several types of fan switches. The most common are pull chain, slide, and rotary switches. Pull chain switches are built into the fan itself. Slide and rotary switches are usually wall-mounted. Each type offers different control options and ease of use.
Compatibility With Your Fan
Check your fan’s model before buying a switch. Some fans need special switches for speed control. Other fans work with basic on/off switches only. Using the right switch ensures your fan runs smoothly and lasts longer.
Voltage And Electrical Ratings
Every fan switch has a voltage rating. Match this rating to your home’s electrical system. Using a switch with the wrong voltage can cause damage or be unsafe. Always check the switch’s label for its voltage and current limits.
Installation Location And Style
Consider where you will place the switch. Wall switches should match your room’s style. Choose a switch that fits your wall box and decor. A well-chosen switch looks good and is easy to use.
Wiring The Fan Switch
Wiring the fan switch is a key step in adding control for your ceiling fan. It lets you operate the fan separately from the light. This section explains how to connect the wires safely and clearly. Follow each step carefully to avoid mistakes.
Before starting, turn off the power at the circuit breaker. Use a voltage tester to confirm the wires are not live. Safety first.
Identify The Wires In Your Switch Box
Locate the black (hot), white (neutral), and ground wires in the box. The black wire usually carries power. The white wire completes the circuit. The ground wire is for safety. Knowing these wires helps with correct connections.
Connect The Fan Switch To The Power Source
Attach the black power wire to the fan switch’s input terminal. This delivers electricity to the switch. Tighten the screw firmly but avoid damaging the wire. Loose connections cause problems.
Wire The Fan Load To The Switch
Connect the black wire leading to the fan motor to the switch’s output terminal. This allows the switch to control the fan. Make sure this wire is separate from the light’s wiring if they share a box.
Attach The Neutral And Ground Wires
Join all white (neutral) wires together with a wire nut. They do not connect to the switch. Connect all ground wires and attach them to the switch’s green screw. This ensures safety in your circuit.
Test Your Connections Before Closing
Turn the power back on and test the fan switch. The fan should turn on and off separately from the light. If it does not work, turn off the power and check your wiring again.
Installing The Switches In The Box
Installing the switches in the electrical box is an important step. It holds the switches securely and keeps wiring safe. Proper installation prevents loose connections and electrical hazards. Take your time to place each switch correctly.
Preparing The Electrical Box
Turn off power from the main breaker. Use a voltage tester to check wires. Make sure no current flows before starting. Remove the existing switch if needed. Clear any debris or old wire nuts inside the box.
Positioning The Fan And Light Switches
Place the switches side by side in the box. Align the screw holes with the box slots. The fan switch usually goes on top or left. Keep wires neat to avoid pinching when pushing switches in.
Connecting The Switches To Wires
Attach the wires to the correct switch terminals. Tighten screws firmly but do not overtighten. Check that no bare wire is exposed outside terminals. Use electrical tape around terminal screws for safety.
Securing The Switches In The Box
Push switches gently into the box. Make sure wires stay flat and organized. Screw the switches into the box tightly. Test for any movement or looseness. A secure switch feels solid and does not wiggle.
Testing The Installation
Testing the installation is a key step after adding a fan switch to a light switch. It ensures everything works safely and correctly. This step helps avoid electrical problems later. Take your time to check each part of the setup.
Turn On The Power
Start by turning the power back on at the circuit breaker. Do not skip this step. Make sure the switch box is ready to test. Use a voltage tester to confirm power is live. Safety first.
Check The Fan Switch Function
Flip the new fan switch on and off slowly. Listen for the fan motor to start and stop. The fan speed should change if your switch has speed control. If nothing happens, power or wiring may be wrong.
Test The Light Switch
Switch the light on and off to check it still works. The light should respond instantly to the switch. If the light does not turn on, recheck wiring connections. Both switches must work independently.
Inspect For Unusual Sounds Or Smells
Watch for buzzing, clicking, or burning smells. These signs mean a wiring or switch problem. Turn off the power immediately if you notice any issues. Fix problems before full use.
Use A Fan Remote Or Pull Chain
If your fan has a remote or pull chain, test these too. Make sure they still control the fan properly. Sometimes adding a switch can affect remote function. Confirm all controls work together well.
Troubleshooting Common Issues
Troubleshooting common issues helps fix problems fast. Adding a fan switch to a light switch can cause some hiccups. Knowing what to check saves time and effort. This section covers common problems and simple fixes.
Checking For Loose Connections
Loose wires often cause the switch to fail. Turn off power before touching wires. Use a screwdriver to tighten screws on terminals. Make sure wires are wrapped tightly around screws. Loose connections can cause flickering or no power.
Testing The Switch Functionality
Sometimes the switch itself is faulty. Use a multimeter to test switch continuity. Press the switch and check for changes in the meter. No change means the switch needs replacement. A working switch should show continuity when on.
Verifying Power Supply To The Switch
No power means the switch won’t work. Check the circuit breaker for any trips. Use a voltage tester to confirm power at the switch box. No power might need electrician help. Ensure power is off before testing.
Inspecting Fan And Light Wiring
Incorrect wiring can cause the fan or light to fail. Match fan wires with switch wires as per instructions. Check for crossed or loose wires inside the box. Wrong wiring can damage the fan motor or bulb.
Checking For Overloaded Circuit
Too many devices on one circuit cause overloads. This can trip breakers or blow fuses. Reduce the load by moving some devices to other circuits. An overloaded circuit can damage switches and wiring.
Frequently Asked Questions
How Do I Safely Add A Fan Switch To A Light Switch?
Turn off power at the breaker before starting. Use a voltage tester to confirm no power. Follow wiring diagrams carefully. Connect the fan switch wires correctly. Secure all connections and cover with a switch plate. Safety is crucial to avoid electric shock.
Can I Control A Fan And Light With One Switch?
Yes, but you need a double switch or separate controls. One switch controls the light; the other controls the fan. This setup provides independent operation for both fixtures. It requires additional wiring and a compatible switch.
What Tools Are Needed To Add A Fan Switch?
You need a screwdriver, wire stripper, voltage tester, wire nuts, and electrical tape. A drill may be required for mounting. Always use insulated tools for safety. Proper tools ensure a secure and safe installation.
Is It Necessary To Hire An Electrician For This Task?
Hiring an electrician is recommended if you lack electrical experience. Incorrect wiring can cause hazards or damage. Professionals ensure code compliance and safe installation. DIY is possible with knowledge but proceed cautiously.
Conclusion
Adding a fan switch to a light switch can improve room comfort. The steps are simple and clear. Always turn off power before starting work. Use the right tools for safety and ease. Double-check your wiring to avoid problems. This small change helps control both light and air.
Enjoy a cooler, well-lit space with one switch. Take your time and follow instructions closely. You can do this project yourself with care.