Are you tired of struggling with that tricky ceiling fan light switch? Changing it might seem complicated, but it doesn’t have to be.
Imagine fixing it yourself quickly and safely, saving money and gaining confidence in your home repairs. In this guide, you’ll find simple steps that anyone can follow, even if you’ve never done this before. Keep reading, and by the end, you’ll know exactly how to change your ceiling fan light switch without hassle.
Your home will feel brighter—and you’ll feel proud of the job you did!
Tools And Materials Needed
Changing a ceiling fan light switch requires specific tools and materials. Having the right items ready makes the task easier and safer. This section lists everything needed for a smooth switch replacement.
Basic Tools
A screwdriver set is essential. Use both flathead and Phillips screwdrivers to remove the switch cover and screws. A voltage tester helps check if the power is off. Wire strippers make preparing wires easier and safer.
Materials Required
Buy a replacement ceiling fan light switch that matches your fan model. Electrical tape helps secure wire connections. Wire nuts join wires safely. Always choose materials rated for electrical use.
Safety Equipment
Wear insulated gloves to protect against electric shock. Safety goggles shield your eyes from dust and debris. A sturdy ladder or step stool helps reach the fan comfortably and safely.
Safety Precautions
Changing a ceiling fan light switch requires careful attention to safety. Electrical work can cause shocks or damage if done carelessly. Follow simple safety steps to protect yourself and your home.
Taking safety precautions helps you complete the job smoothly. It lowers risks and keeps everything working well after the repair.
Turn Off The Power
Always switch off the power at the circuit breaker first. Do not rely on the wall switch alone. Use a voltage tester to confirm no electricity flows to the fan.
Use Proper Tools
Use tools designed for electrical work, like insulated screwdrivers. Avoid metal tools without handles that protect against shocks.
Wear Safety Gear
Wear safety goggles to protect your eyes from dust or debris. Use gloves to reduce the chance of electric shock.
Work In A Well-lit Area
Good lighting helps you see wires and connections clearly. Avoid working in dark or dimly lit spaces.
Follow Manufacturer Instructions
Read the fan’s manual before starting. Follow all steps carefully to avoid mistakes.
Locate The Ceiling Fan Light Switch
Finding the ceiling fan light switch is the first step in changing it. The switch controls the light attached to your fan. Knowing its location saves time and effort.
Many ceiling fans have their light switch in different places. Some switches are on the fan itself. Others might be on the wall or part of a remote control.
Check The Fan Body
Look closely at the fan’s base or near the light fixture. Some fans have a small toggle or pull chain. This chain often turns the light on and off.
Look For A Wall Switch
Check the wall near the fan’s room entrance. A wall switch sometimes controls only the light. Other times, one switch controls both fan and light.
Inspect The Remote Control
If your fan has a remote, it may have a light button. This remote lets you control the light without touching the fan or wall.
Turn Off Power To The Fan
Turning off the power to the ceiling fan is the first and most important step. It keeps you safe from electric shocks. Before you touch any wires or switches, make sure the power is off.
Safety cannot be ignored. Always double-check the power status to avoid accidents. This step saves you from serious injury or damage.
Locate The Circuit Breaker
Find your home’s circuit breaker box. It is usually in the basement, garage, or utility room. Look for the switch labeled for the ceiling fan or room.
Switch Off The Correct Breaker
Flip the breaker switch to the off position. This stops electricity from flowing to the fan. If unsure, turn off the main breaker for the whole house.
Test The Fan’s Power
Try turning on the fan or light. If it does not work, the power is off. If it still runs, check the breaker again or use a voltage tester.
Remove The Fan Light Cover
Removing the fan light cover is the first step to change the ceiling fan light switch. This cover protects the light bulbs and the switch inside. Taking it off carefully helps avoid damage and lets you access the parts you need to work on.
Most fan light covers are easy to remove. Some covers twist off, while others have small screws. Knowing how your cover attaches saves time and prevents frustration. Always handle the cover gently to keep it safe.
Turn Off The Power
Before touching the fan, turn off the power from the main switch. This step keeps you safe from electric shock. Confirm the power is off by trying the light switch. No light means it is safe to proceed.
Identify The Type Of Cover
Look closely at the fan light cover. Some covers twist counterclockwise to open. Others have screws around the edge. Spotting the type helps you use the right method to remove it.
Remove Screws If Present
Use a screwdriver to remove screws holding the cover. Keep the screws in a safe place. Losing screws makes it hard to put the cover back later.
Twist Off The Cover
If the cover twists off, hold it firmly and turn it left. It should loosen and come off easily. Don’t force it. If it does not budge, check for hidden screws.
Lift The Cover Carefully
Once loose, lift the cover gently away from the fan. Avoid dropping it on the floor. Set the cover on a soft surface to prevent cracks or scratches.
Disconnect The Old Switch
Disconnecting the old ceiling fan light switch is an important step. It ensures safety and prepares for the new switch installation. Take your time and follow the steps carefully. Avoid rushing to prevent any electrical problems.
Turn Off Power At The Circuit Breaker
Locate the correct circuit breaker for the fan. Switch it off to cut power. Double-check that the fan light does not turn on. This step protects you from electric shock.
Remove The Switch Cover Plate
Use a screwdriver to take off the cover plate. Keep screws in a safe place. This exposes the old switch and wiring for easy access.
Test For Electricity
Use a voltage tester on the wires. Confirm that no current is flowing. This extra check keeps you safe during the job.
Disconnect The Wires From The Old Switch
Note the wire positions before disconnecting. Unscrew the wire connectors or terminals. Carefully pull the wires away from the switch.
Remove The Old Switch From The Box
Unscrew the switch from the electrical box. Gently pull the switch out but keep wires free. Prepare the space for the new switch.
Identify And Connect Wires
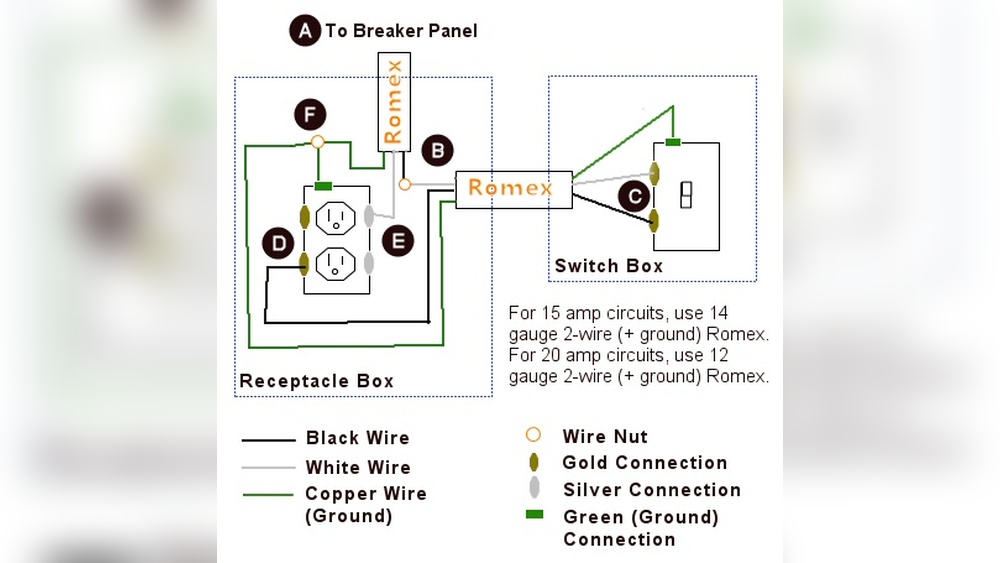
Identifying and connecting wires is a key step in changing a ceiling fan light switch. It ensures the fan and light work correctly and safely. Knowing which wires do what helps avoid mistakes and electrical hazards.
Wires in a ceiling fan often look alike but have different jobs. Each wire carries electricity differently. Understanding their function makes the wiring process smooth and safe.
Identify The Common Wire Colors
Ceiling fan wires usually come in three colors: black, white, and green or copper. Black wires carry power to the fan motor. White wires are neutral and complete the circuit. Green or copper wires ground the fan to prevent shocks.
Locate The Light Switch Wires
The light switch wires connect the fan’s light kit to your home’s power. These wires are often blue or black with a stripe. They control the light separately from the fan motor. Identifying these wires helps connect the switch properly.
Use A Voltage Tester For Safety
Before touching wires, use a voltage tester. It checks if wires have electricity. This tool protects from shocks. Test each wire to confirm power is off before proceeding.
Connect Wires Correctly
Match wires by color and function. Connect black to black, white to white, and green to the ground wire. Attach the light switch wire to the blue or striped wire. Secure connections with wire nuts for safety.
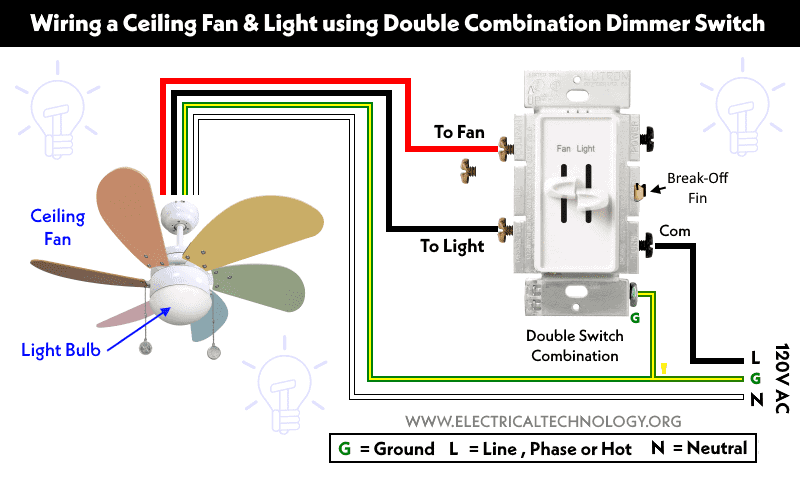
Credit: www.electricaltechnology.org
Install The New Light Switch
Installing the new light switch in your ceiling fan is a key step. This part controls the fan light and makes it easy to turn on or off. Follow clear steps to ensure safety and proper wiring. Take your time to connect each wire correctly. This prevents electrical problems and keeps your fan working well.
Turn Off Power At The Circuit Breaker
Always start by switching off the power. Find the right breaker in your panel. Flip it to off to stop electricity flow. Double-check with a tester to be sure power is off. This step avoids electric shocks during installation.
Connect The Wires To The New Switch
Match the wires from the fan to the switch terminals. Usually, black or red wires carry power. Attach them to the switch screws. Secure the ground wire to the green screw. Use wire nuts for any extra wires. Tight connections prevent shorts or loose contacts.
Secure The Switch In The Wall Box
Push the wires gently inside the wall box. Place the switch in its spot. Screw it in firmly but do not overtighten. The switch should sit flush with the wall. This keeps it stable and easy to use.
Attach The Switch Cover Plate
Put the cover plate over the switch. Align the screw holes carefully. Tighten the screws just enough to hold the plate. Avoid cracking the plastic by overtightening. A neat cover gives a clean look to your installation.
Test The New Switch
Testing the new switch is a key step after installation. It ensures the ceiling fan light works correctly and safely. This process helps find any wiring mistakes or faults before finalizing the setup.
Careful testing saves time and prevents damage. It also confirms the switch operates smoothly without any flickering or interruptions.
Turn The Power Back On
First, restore power at the circuit breaker. This allows electricity to flow to the fan and switch. Never test the switch without power, as it won’t work.
Operate The Switch
Flip the switch slowly to check the light’s response. The light should turn on and off without delay. Listen for any buzzing or unusual sounds. Smooth operation means the switch is installed properly.
Observe The Light Behavior
Watch the ceiling fan light for flickering or dimming. A steady light shows good electrical contact. Flickering may signal loose wiring or a faulty switch. Fix these issues before finishing.
Use A Voltage Tester
A voltage tester can confirm if current passes through the switch. Place the tester on the switch terminals. A reading means electricity flows properly. No reading suggests wiring problems to check again.
Check The Fan Operation
Test the fan controls to ensure the switch does not affect them. Both fan and light should work independently. Proper function indicates safe and correct wiring.
Credit: www.protoolreviews.com
Reassemble The Fan Light
Reassembling the fan light is the last step after fixing the switch. It brings the fan back to its full function. Careful reassembly ensures safety and proper operation. Follow these steps to put everything back correctly.
Secure The Light Bulb Holder
Start by placing the light bulb holder back in position. Align it with the fan’s wiring and mounting points. Tighten any screws gently but firmly to hold it in place. Avoid over-tightening to prevent damage.
Attach The Light Bulbs
Insert the light bulbs into their sockets carefully. Use bulbs with the right wattage as recommended by the fan manufacturer. Twist each bulb until it fits snugly. This prevents flickering or loose connections.
Fix The Glass Shades Or Covers
Put the glass shades or covers back over the light bulbs. Align them properly with the mounting brackets or screws. Secure the covers without forcing them to avoid cracks. This step protects the bulbs and adds style.
Test The Fan Light
Turn on the power and test the light switch. Check if the bulbs light up correctly. If the light works, the reassembly is successful. If not, double-check the connections and switch installation.
Troubleshooting Common Issues
Troubleshooting common issues helps fix problems fast. Changing a ceiling fan light switch can seem tricky. Some problems appear often. Knowing how to check and solve them saves time and money.
Many problems come from simple mistakes. Wiring errors, faulty switches, or power problems cause the light to fail. Testing parts step-by-step helps find the cause. This guide shows key issues and how to handle them.
Checking The Power Source
Start by checking if the power is on. Use a voltage tester or a simple bulb tester. Make sure the circuit breaker is not tripped. Sometimes the problem is a power outage or a blown fuse. Without power, the switch and light will not work.
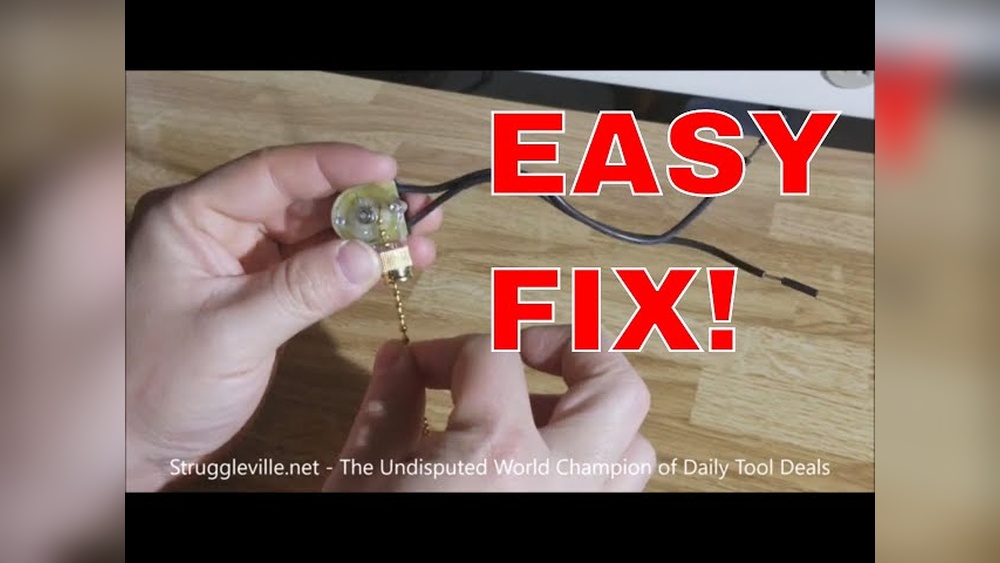
Testing The Light Switch
Remove the switch cover carefully. Use a multimeter to test the switch. Set the multimeter to continuity mode. Press the switch and watch the reading. No continuity means the switch is broken. Replace the switch if it does not work.
Inspecting The Wiring Connections
Loose or wrong wiring causes many issues. Turn off the power before touching wires. Check all wire connections. Look for loose, disconnected, or damaged wires. Tighten all screws and reconnect wires properly. Correct wiring ensures the switch works right.
Examining The Light Bulbs
Sometimes the problem is the bulb. Remove the bulb and test it in another lamp. If it does not light, replace it. Use the right type of bulb for the fan. Using the wrong bulb can cause flickering or no light.
Checking The Fan Remote Control
Many fans use remote controls for the light. Test the remote batteries and replace if needed. Make sure the remote is paired with the fan. Reset the remote and fan if the light does not respond. Remote problems can seem like switch issues.

Credit: www.youtube.com
Frequently Asked Questions
How Do I Turn Off Power Before Changing Fan Switch?
Always switch off the circuit breaker for the fan’s power. Test the switch with a voltage tester to confirm no electricity flows. This ensures safety while replacing the ceiling fan light switch.
What Tools Are Needed To Change A Ceiling Fan Light Switch?
You typically need a screwdriver, voltage tester, wire strippers, and electrical tape. These tools help safely remove the old switch and install the new one without damage.
Can I Replace The Ceiling Fan Switch Myself?
Yes, if you follow safety steps and have basic electrical knowledge. Turn off power, use proper tools, and carefully disconnect and reconnect wires. Otherwise, hire a professional electrician.
How Do I Identify Wires For The Ceiling Fan Light Switch?
Look for wires connected to the switch terminals. Usually, black or red wires control power; white is neutral. Use a wiring diagram if unsure to avoid incorrect connections.
Conclusion
Changing a ceiling fan light switch is simple and safe. Turn off the power before starting any work. Follow each step slowly and carefully. Use the right tools for a smooth process. Testing the switch after installation is important. Doing it yourself can save money and time.
Now, you can enjoy better control of your ceiling fan light. Don’t rush—take your time and stay safe. This small project makes a big difference in your home.