Have you ever noticed your brake lights not working, even when you press the pedal? This small problem can be more than just annoying—it can be a safety risk for you and others on the road.
The good news is, fixing it yourself by replacing the brake light switch is easier than you think. In this guide, you’ll learn simple steps to get your brake lights working again quickly and safely. Keep reading—you’ll save money and gain confidence in handling your car’s basic repairs.
Credit: www.wideworldofindoorsports.com
Signs Of A Faulty Brake Light Switch
The brake light switch plays a vital role in vehicle safety. It activates the brake lights when you press the brake pedal. A faulty switch can cause brake lights to fail or stay on. Recognizing the signs early helps prevent accidents and costly repairs. Here are some common signs of a bad brake light switch.
Common Symptoms
The brake lights may not turn on at all. Or they might stay on even when the pedal is not pressed. You might notice the cruise control stops working. The car may have trouble shifting gears from park to drive. Sometimes, the brake pedal feels unusual or loose. These are clear signals of a brake light switch problem.
Safety Risks
Brake lights that do not work confuse drivers behind you. This increases the chance of rear-end collisions. Constantly lit brake lights can drain the car battery. Faulty switches may cause the cruise control to fail suddenly. This leads to a loss of vehicle control. Fixing the switch promptly keeps everyone safer on the road.

Credit: www.yourmechanic.com
Tools And Materials Needed
Replacing a brake light switch is a simple task with the right tools and parts. Gathering everything before starting saves time and avoids frustration. This section lists what you need to complete the job safely and efficiently.
Essential Tools
- Screwdriver set (flathead and Phillips)
- Socket wrench with various sizes
- Needle-nose pliers
- Multimeter (to test electrical connections)
- Flashlight or work light
- Gloves for hand protection
Replacement Parts
- New brake light switch compatible with your vehicle
- Electrical tape (for securing wires)
- Zip ties (to keep wires organized)
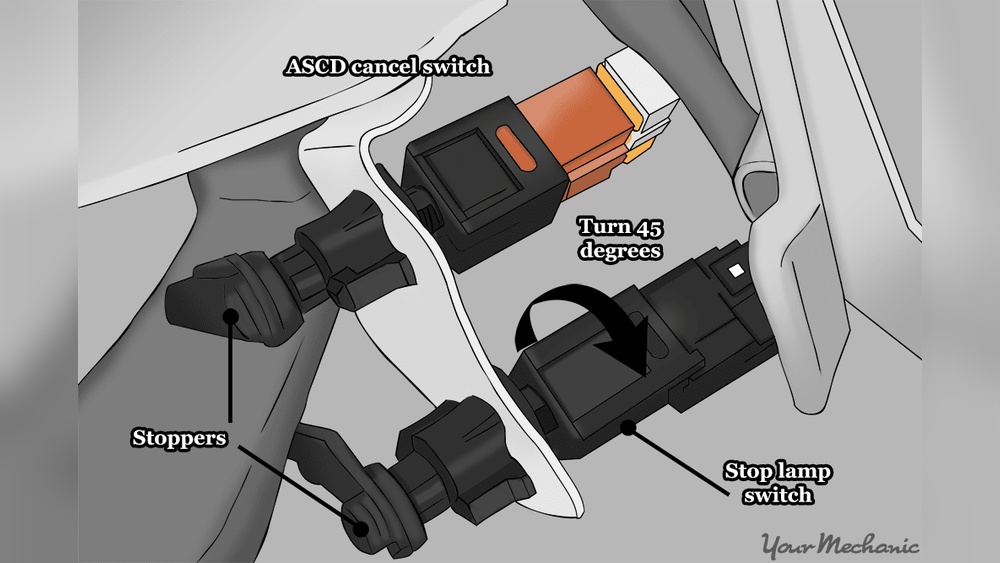
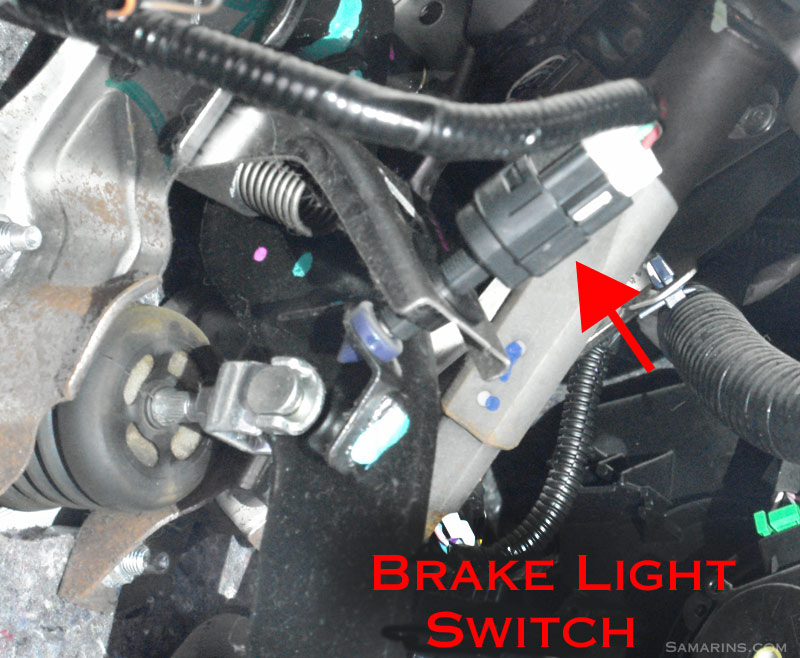
Locating The Brake Light Switch
Finding the brake light switch is the first step to replace it. This small part controls your brake lights. Knowing its exact location saves time and effort. The switch sits near the brake pedal. Some cars may have it in slightly different spots. Understanding where to look helps you start the repair quickly.
Position In Vehicle
The brake light switch is usually mounted on the brake pedal arm. It sits right behind the pedal itself. When you press the pedal, the switch activates the brake lights. In most cars, it is close to the top of the pedal assembly. Sometimes, it is attached to the brake booster or firewall. The switch has a small plunger or button that the pedal presses.
Access Tips
Accessing the brake light switch can be tight. Clear the area under the dashboard near the driver’s feet. Move any floor mats or panels blocking your view. Use a flashlight to see better in dim spaces. Wear gloves to protect your hands from sharp edges. You might need to sit or lie on the floor for a good angle. Taking your time avoids breaking clips or wires.
Removing The Old Switch
Removing the old brake light switch is the first step in the replacement process. It requires care and the right steps to avoid damage. Follow these simple steps to remove the switch safely and prepare for the new one.
Start by ensuring your safety and protecting your car’s electrical system. Then, disconnect the switch from its connections carefully. Finally, detach the switch from its mount without forcing any parts.
Disconnecting The Battery
Always disconnect the car battery before working on electrical parts. This prevents short circuits and shocks. Use a wrench to loosen the negative terminal. Remove the cable and move it away from the battery. This step keeps you and your car safe.
Unplugging The Connector
Locate the brake light switch under the dashboard. Find the electrical connector attached to it. Press the tab or clip on the connector gently. Pull it straight out without twisting. Avoid pulling on the wires to prevent damage.
Detaching The Switch
The brake light switch usually mounts with a clip or screws. Check how it is fixed in your car. If clips hold it, press or lift them to release the switch. If screws hold it, use the right screwdriver to remove them. Take out the switch carefully to avoid breaking any parts.
Installing The New Switch
Installing the new brake light switch is a key step in restoring your vehicle’s safety. The process requires care and attention to ensure the switch works correctly. Follow these steps to position, secure, and adjust the switch properly.
Positioning The Switch
Start by placing the new switch in the same spot as the old one. Look for the mounting bracket near the brake pedal arm. Align the switch so its plunger touches the brake pedal arm gently. The switch should not press the pedal but be close enough to detect movement.
Securing And Connecting
Once the switch is positioned, fasten it with the screws or clips provided. Tighten them just enough to hold the switch firmly without over-tightening. Next, connect the electrical wiring harness to the switch. Make sure the connector clicks into place to ensure a good connection.
Adjusting The Switch
Test the switch by pressing the brake pedal slowly. The brake lights should turn on as the pedal moves. Adjust the switch position slightly if the lights do not activate properly. The goal is to have the brake lights come on immediately when the pedal is pressed and turn off when released.
Testing The New Brake Light Switch
Testing the new brake light switch is a key step after installation. This ensures the brake lights work correctly and keep you safe on the road. A simple test can confirm if the switch is properly connected and functioning.
Checking Brake Lights
Start by sitting in the driver’s seat. Press the brake pedal gently. Look at the rear of your vehicle or use a mirror to see the brake lights. The lights should turn on immediately when you press the pedal.
If the lights do not come on, check the switch connection. Make sure the wires are secure and the switch is correctly positioned. Adjust or reconnect as needed, then test again.
Ensuring Proper Function
Release the brake pedal and watch the lights turn off. They should go off right away without delay. Press and release the pedal a few times to check for consistent operation.
Also, check the brake lights with the engine on and off. Confirm the switch works in both conditions. Proper function means safe signaling to drivers behind you.
Troubleshooting Common Issues
Troubleshooting common issues with the brake light switch helps fix problems fast. It saves time and avoids unnecessary repairs. Knowing what to check can make the process smoother. Some problems are easy to spot and fix. Others need a bit more attention. Here are two common issues with brake light switches.
Switch Not Activating Lights
The brake light switch may fail to turn on the brake lights. This can happen if the switch is worn out or damaged. Dirt or debris can block the switch from working properly. Check the switch for physical damage first. Make sure it is connected firmly to the brake pedal. Use a multimeter to test if the switch has power. Replace the switch if it shows no electrical signal. A faulty switch will not send the signal to the brake lights.
Brake Lights Staying On
Brake lights that stay on can cause battery drain and confusion. This usually means the brake light switch is stuck or misaligned. The switch might be pressing down all the time. Inspect the switch position near the brake pedal. Adjust the switch so it moves freely when the pedal is released. Check for broken springs or stuck parts inside the switch. Replace the switch if it cannot return to its normal position. This will stop the brake lights from staying on.
Maintenance Tips For Longevity
Keeping your brake light switch in good shape saves money and stress. Simple care steps extend its life. Regular attention stops problems before they start. This section covers easy tips for lasting switch performance.
Regular Inspections
Check the brake light switch often. Look for loose wires or damage. Test the lights to see if they turn on properly. Early checks catch issues fast. Fix small problems before they grow. This keeps your brake light switch working well.
Cleaning And Care
Keep the switch clean from dirt and dust. Use a soft cloth to wipe the area gently. Avoid using water or harsh chemicals. Clean contacts help the switch work smoothly. Good care prevents corrosion and wear. This simple step makes a big difference.

Credit: www.youtube.com
Frequently Asked Questions
What Tools Are Needed To Replace A Brake Light Switch?
You need a screwdriver, pliers, and a replacement brake light switch. A flashlight helps in tight spaces. Always disconnect the battery before starting to avoid electrical issues.
How Do I Know If My Brake Light Switch Is Faulty?
Common signs include brake lights not illuminating or staying on continuously. You may also notice cruise control problems or difficulty shifting out of park.
How Long Does It Take To Replace The Brake Light Switch?
Replacing the brake light switch usually takes 15 to 30 minutes. It depends on your vehicle model and your mechanical experience.
Can I Replace The Brake Light Switch Myself?
Yes, if you have basic mechanical skills and tools, you can replace it. Follow safety procedures and your vehicle’s manual for guidance.
Conclusion
Replacing the brake light switch is easier than it seems. Follow the steps carefully and take your time. A working brake light switch keeps you safe on the road. Check your work before finishing to avoid issues. This simple fix saves money and keeps your car reliable.
You can do this yourself with basic tools. Stay safe and confident while driving.