Your brake lights are one of the most important safety features on your vehicle. If they don’t work, you risk accidents and costly repairs.
But how do you know if your brake light switch is the problem? Testing it yourself is easier than you think—and it can save you time and money. You’ll learn simple steps to check your brake light switch quickly and accurately.
Keep reading to make sure your brakes are signaling properly every time you hit the pedal.
Credit: premierautotrade.com.au
Brake Light Switch Basics
The brake light switch is a small but important part of your car’s safety system. It controls the brake lights that alert drivers behind you when you slow down or stop. Without a working switch, your brake lights may not turn on. This can cause accidents or even get you a ticket.
Understanding the basics of the brake light switch helps you spot problems early. It also makes testing and replacing the switch easier. Below are key points about its purpose, location, and common issues.
Purpose And Location
The brake light switch tells your car’s lights to turn on when you press the brake pedal. It acts like a switch that closes an electric circuit to light up the brake lamps. This switch also helps with other functions, like cruise control or transmission lock.
You usually find the brake light switch near the top of the brake pedal arm. It is mounted on the brake pedal bracket inside the driver’s side footwell. This position allows the switch to activate every time the pedal moves.
Common Issues
Brake light switches can fail due to wear or damage. The most common problem is the switch not turning the lights on or off properly. This can happen if the switch is stuck, loose, or has faulty wiring.
Other issues include brake lights staying on all the time or flickering. Sometimes the switch’s internal parts wear out, causing poor contact. Dirt, dust, or corrosion can also affect switch performance.
Tools Needed For Testing
Testing a brake light switch needs a few basic tools. These tools help check the switch safely and accurately. Having the right tools makes the process easier and faster.
Multimeter
A multimeter measures electrical signals in the brake light switch. It checks voltage, current, and resistance. This tool shows if the switch works properly or not. Choose a digital multimeter for clear readings.
Screwdrivers And Wrenches
Screwdrivers and wrenches help remove and tighten parts of the switch. Use the correct size to avoid damage. These tools allow easy access to the switch for testing.
Safety Gear
Safety gear protects you during testing. Wear gloves to avoid electric shocks and cuts. Safety glasses protect your eyes from dust and debris. Always use safety gear to stay safe.
Preparing For The Test
Preparing for the test is an important step before checking your brake light switch. Proper preparation helps you work safely and effectively. It also ensures you get accurate test results. Follow simple steps to prepare your vehicle and access the switch without trouble.
Accessing The Switch
The brake light switch is usually located near the brake pedal. Find the area under the dashboard on the driver’s side. You might need to remove a panel or cover to reach it. Use a flashlight to see clearly in tight spaces. Take your time to avoid damaging parts around the switch.
Ensuring Vehicle Safety
Park the vehicle on a flat surface and turn off the engine. Engage the parking brake to stop the car from moving. Disconnect the battery to prevent electrical shocks or short circuits. Wear gloves and safety glasses to protect your hands and eyes. Keep the workspace clean and free of obstacles.
Testing The Brake Light Switch
Testing the brake light switch ensures your brake lights work properly. Faulty switches can cause safety issues on the road. Simple tests help find problems early and save repair costs. Follow these steps to test the brake light switch quickly and safely.
Visual Inspection
Start by checking the brake light switch for visible damage. Look for broken parts, loose wires, or corrosion. Make sure the switch is securely mounted near the brake pedal. Dirt or grime can block the switch from working properly. Clean the area gently with a dry cloth. A quick look can reveal obvious problems.
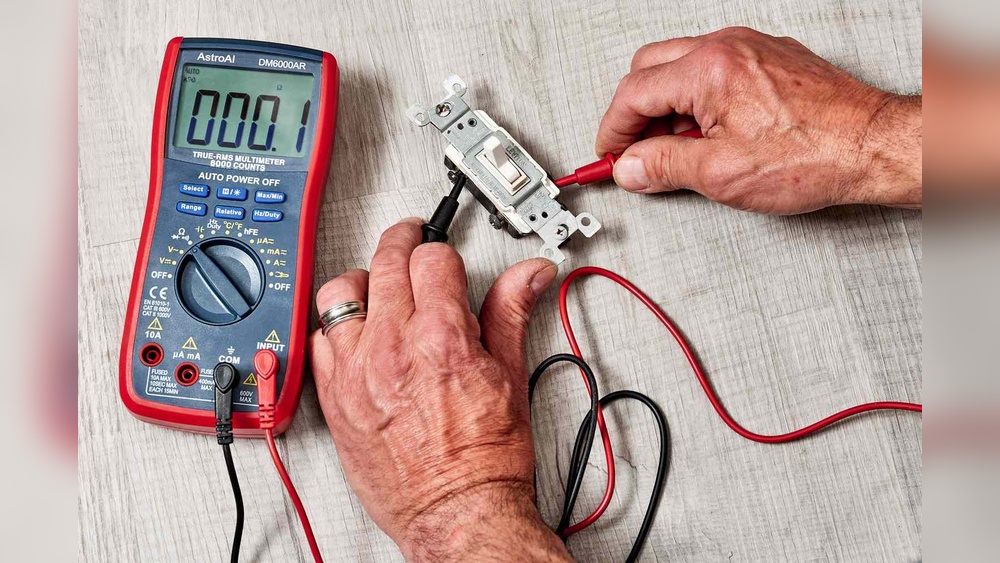
Continuity Test With Multimeter
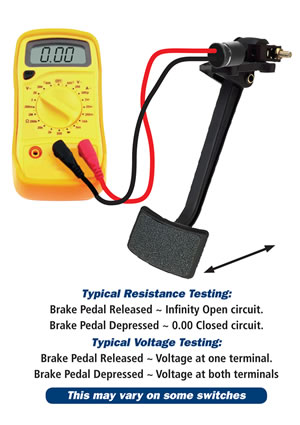
Use a multimeter to test the switch’s electrical continuity. Set the multimeter to the continuity or resistance mode. Disconnect the switch from the wiring harness. Place the multimeter probes on the switch terminals. Press the brake pedal and watch the multimeter. The reading should change when the pedal is pressed. No change means the switch may be faulty.
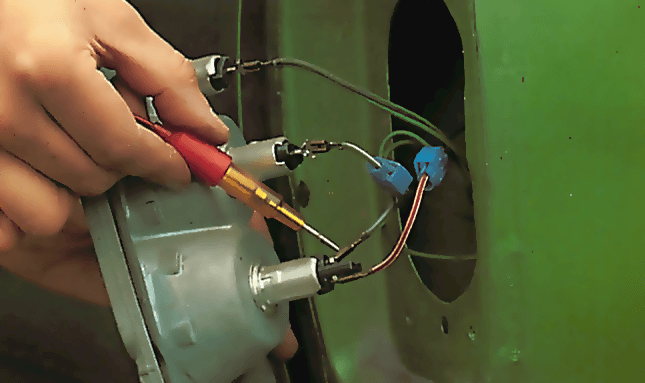
Voltage Test
Check the voltage to confirm the switch gets power. Turn the car ignition on without starting the engine. Use a multimeter set to DC voltage mode. Connect the positive probe to the switch input wire. Connect the negative probe to a good ground point. The voltage should match the car battery voltage. Press the brake pedal and check voltage at the output wire. Voltage should appear when pressed and disappear when released.
Interpreting Test Results
Interpreting the test results of your brake light switch is a key step. It tells you if the switch works properly or not. Understanding these results helps decide your next move. Clear signs show whether the switch needs repair or replacement.
Signs Of A Faulty Switch
The brake lights stay on even when the pedal is up. Lights do not come on when pressing the brake. Flickering lights while braking indicate a bad switch. The brake pedal feels different or sticks. These are clear signs of a faulty brake light switch.
When To Replace
Replace the switch if it fails any test. If brake lights do not respond correctly, change it. Switches older than five years might need replacement. Damage to the switch or its wiring means replacement. Do not ignore faulty switches for safety reasons.
Replacing The Brake Light Switch
Replacing the brake light switch is a simple fix to keep your brake lights working. This small part tells the brake lights to turn on when you press the brake pedal. If it fails, your brake lights may not light up, which is unsafe and illegal. Follow these steps to remove and install a new brake light switch correctly. Proper adjustment ensures the switch works well every time you press the brake.
Removal Steps
First, disconnect the battery to avoid electric shocks. Locate the brake light switch near the brake pedal. Unplug the electrical connector from the switch carefully. Remove any clips or screws holding the switch in place. Gently pull the switch away from the brake pedal arm. Keep the old switch for comparison with the new one.
Installing A New Switch
Take the new brake light switch and compare it with the old one. Attach the new switch to the brake pedal arm in the same way. Secure the switch with clips or screws removed earlier. Reconnect the electrical connector to the new switch. Check that the wiring is not loose or damaged before moving on.
Adjusting The Switch Position
The switch must sit correctly to work properly. Adjust the switch so it activates when the brake pedal moves. Press and release the brake pedal a few times to test. The brake lights should turn on and off smoothly. Tighten any adjustment screws to lock the switch in place. Double-check the brake light operation before finishing.
Final Checks
After testing the brake light switch, perform final checks to ensure everything works correctly. These checks confirm the switch functions well and the brake lights respond as they should. This step helps avoid any safety issues on the road. Take your time and check carefully.
Testing Brake Lights Function
Press the brake pedal gently. Watch the brake lights at the back of the car. They should light up immediately when the pedal is pressed.
Ask someone to help if needed. They can watch the lights while you press the pedal. Check both brake lights to make sure they work.
Release the brake pedal. The lights should turn off right away. If the lights stay on or flicker, the switch may need adjustment or replacement.
Troubleshooting Remaining Issues
If the brake lights do not work, check the brake light switch wiring. Look for loose or damaged wires. Fix any issues found.
Check the fuse related to the brake lights. Replace it if it is blown. Sometimes the problem is as simple as a bad fuse.
Make sure the brake light bulbs are not burned out. Replace any faulty bulbs. Use the correct type of bulb for your vehicle.
If problems continue, the brake light switch itself might be faulty. Consider replacing the switch for safe driving.

Credit: www.youtube.com
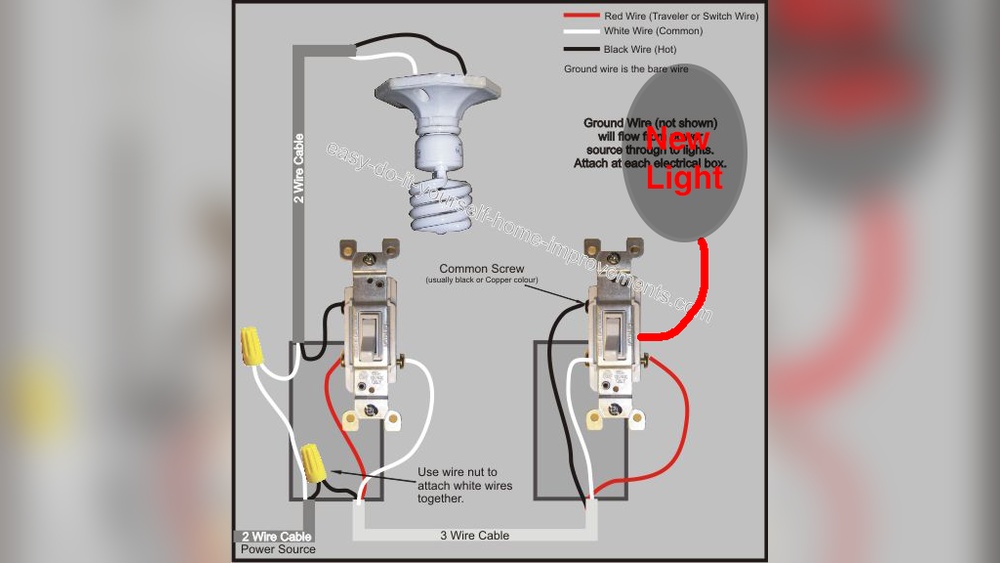
Credit: www.howacarworks.com
Frequently Asked Questions
How Do You Test A Brake Light Switch?
To test a brake light switch, use a multimeter to check for continuity. Press the brake pedal and observe if the switch activates and sends power to the brake lights. A functioning switch will complete the circuit, turning the brake lights on.
What Tools Are Needed To Test Brake Light Switches?
You need a multimeter or test light, basic hand tools, and safety gloves. A multimeter helps measure electrical continuity. Test lights indicate power flow. These tools make brake light switch testing simple and accurate.
How Can I Tell If My Brake Light Switch Is Faulty?
A faulty brake light switch causes brake lights to stay on or not light up. You might notice difficulty shifting out of park or cruise control issues. Testing with a multimeter confirms if the switch is defective.
How Long Does It Take To Test A Brake Light Switch?
Testing a brake light switch usually takes 5 to 10 minutes. It involves locating the switch, accessing its connector, and checking electrical continuity with a multimeter. The process is quick and easy for most vehicles.
Conclusion
Testing a brake light switch keeps your car safe on the road. A simple test helps find problems early. Follow steps carefully to check the switch’s function. Fixing issues fast avoids bigger troubles later. Regular checks make sure your brake lights work well.
This helps you and other drivers stay safe. Stay alert and keep your car in good shape. Safety starts with small, easy actions like this.