Is your brake light acting up or staying on even when you’re not pressing the pedal? The problem might be your brake light switch stopper.
Knowing how to replace this small but important part can save you time, money, and stress. In this guide, you’ll find simple, clear steps to fix the issue yourself. Keep reading, and you’ll be back on the road with confidence in no time.
Credit: www.youtube.com
Signs Of A Faulty Brake Light Switch Stopper
The brake light switch stopper plays a key role in vehicle safety. It helps control the brake lights, alerting drivers behind you. A faulty switch stopper can cause brake lights to fail or stay on. This creates confusion and increases accident risk. Knowing the signs helps catch problems early and ensures timely repair.
Recognizing warning signs can save money and avoid unsafe driving. Watch for changes in how your brake lights behave. Early detection keeps your vehicle safe on the road.
Common Symptoms To Watch For
Brake lights that do not turn on when pressing the pedal. Lights staying on even after releasing the brake. Flickering or dim brake lights during stops. Warning lights on the dashboard related to brakes. Difficulty shifting out of park in automatic cars. Delayed response of brake lights when braking.
Impact On Vehicle Safety
Non-working brake lights confuse other drivers. This raises the chance of rear-end collisions. Faulty brake signals reduce your ability to communicate on the road. Emergency braking becomes riskier without clear lights. Fixing the switch stopper protects you and others. It keeps your vehicle compliant with traffic laws.

Credit: www.amazon.com
Tools And Materials Needed
Replacing a brake light switch stopper requires specific tools and materials. Having the right items ready makes the task easier and safer. This section lists what you need before starting the job.
Gathering all tools and parts in advance saves time. It helps avoid interruptions and frustration during the replacement process.
Essential Tools List
- Screwdrivers (flathead and Phillips)
- Socket wrench set
- Pliers
- Flashlight or work light
- Multimeter for electrical testing
- Gloves to protect your hands
- Safety glasses for eye protection
Replacement Parts Selection
Choose a brake light switch stopper that fits your vehicle model. Check your car manual or part number for accuracy. Using the correct part prevents future issues.
Opt for parts from trusted brands or dealers. Quality parts last longer and work better. Avoid cheap or generic stoppers that may fail quickly.
Preparing Your Vehicle
Preparing your vehicle is a key step before replacing the brake light switch stopper. It helps you work safely and avoid damage. Taking time to get ready makes the process easier and quicker.
Follow simple steps to prepare your vehicle well. This ensures the brake light switch area is ready for repair or replacement.
Ensuring Safety Before Starting
Park your car on a flat surface. Turn off the engine and remove the key from the ignition. Engage the parking brake to prevent the car from moving. Wear gloves to protect your hands from dirt and sharp parts. Disconnect the car battery to avoid electrical shocks. Safety comes first in any car repair task.
Accessing The Brake Light Switch Area
Locate the brake pedal inside the driver’s side footwell. The brake light switch is usually attached near the top of the brake pedal arm. Clear any panels or covers blocking access to the switch. Use a flashlight to see better in tight spaces. Keep tools nearby for easy reach during the replacement. Good access helps you work without frustration.
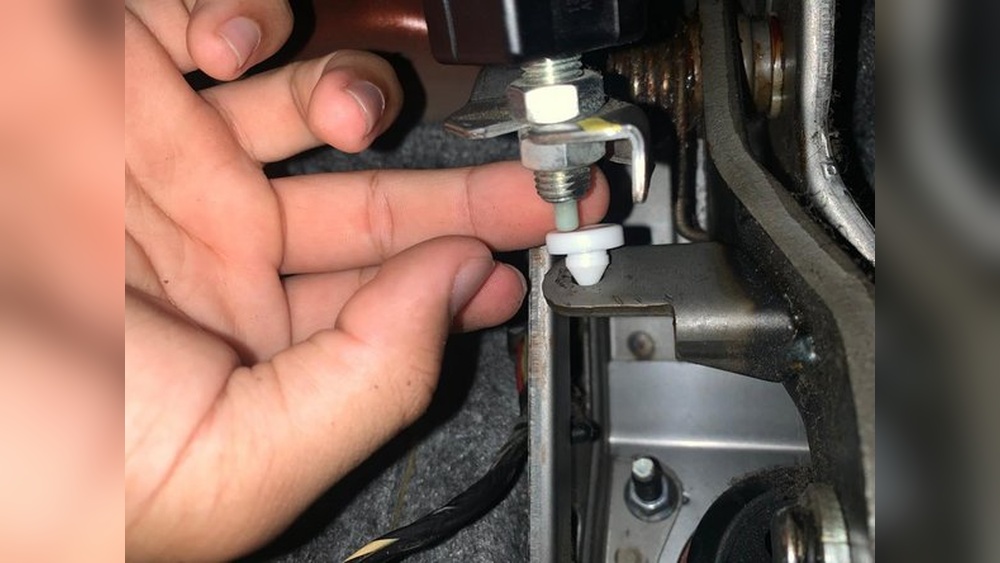
Credit: www.2carpros.com
Removing The Old Brake Light Switch Stopper
Removing the old brake light switch stopper is a key step in replacing it properly. This part helps control the brake lights, so it must work well. Taking out the old stopper carefully ensures the new one fits and works correctly.
This section shows how to find the switch stopper and remove it step-by-step. Follow these clear steps to avoid damage and make the process smooth.
Locating The Switch Stopper
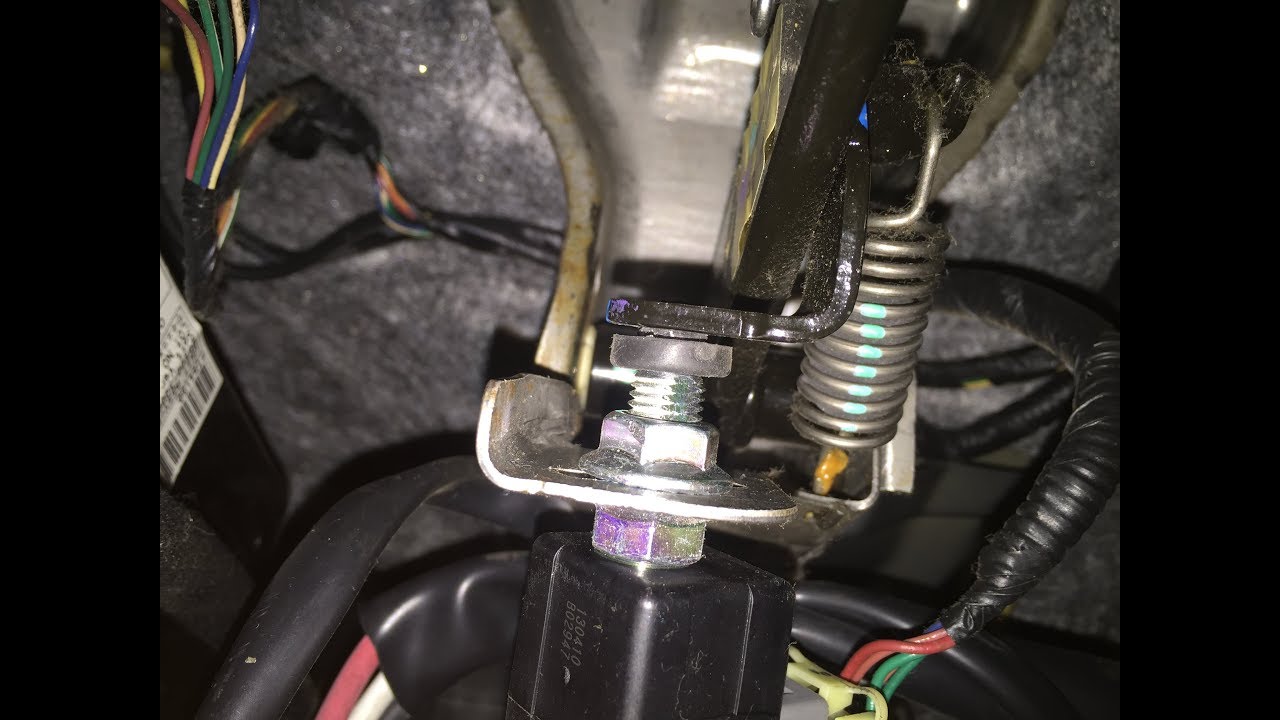
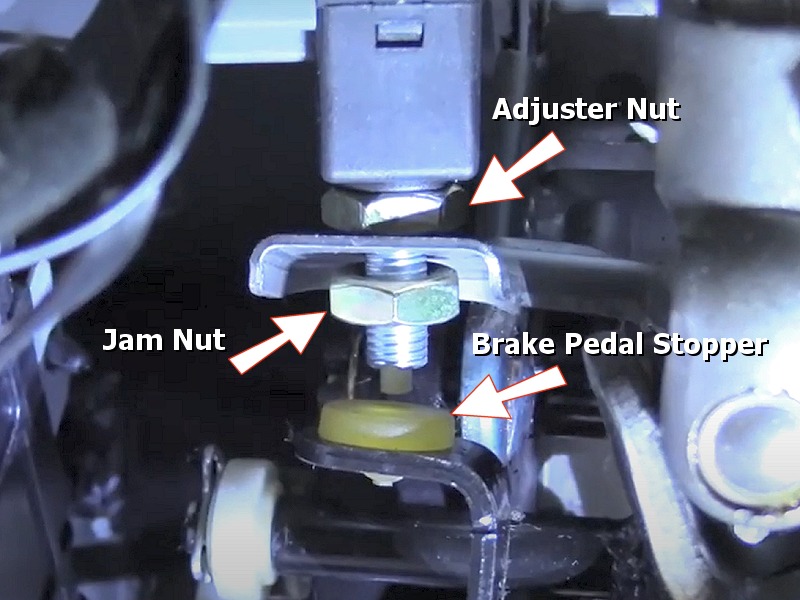
The brake light switch stopper sits near the brake pedal. It connects the brake pedal to the brake light switch. Find it by looking under the dashboard on the driver’s side. It usually attaches to a small bracket close to the pedal arm. Check for a small plastic or metal piece linked to the brake light switch.
Step-by-step Removal Process
First, disconnect the car battery to avoid electrical issues. Next, press the brake pedal to see how the stopper moves. Use a flashlight if needed to see better. Then, locate the clip or screw holding the stopper in place. Use a screwdriver or pliers to remove it carefully.
Pull the stopper gently from its position. Avoid forcing it to prevent damage to the brake light switch or pedal. Check if any wires connect to the stopper and disconnect them carefully. Keep the old stopper safe in case you need it for reference.
Installing The New Brake Light Switch Stopper
Installing the new brake light switch stopper is a key step for proper brake function. This part controls the brake lights, alerting drivers behind you when you slow down. Careful installation ensures safety and avoids electrical issues.
Proper Alignment And Placement
Place the new stopper exactly where the old one was. Check the brake pedal arm and switch position closely. The stopper must fit snugly to trigger the switch correctly. Misalignment can cause lights to stay on or not work.
Use gentle pressure to adjust the stopper. It should not be loose or too tight. Confirm the brake pedal moves freely without obstruction. Correct placement helps the brake light respond instantly.
Securing The Stopper In Place
Once aligned, secure the stopper firmly. Use screws or clips that came with the part. Tighten fasteners enough to hold the stopper steady. Avoid over-tightening to prevent damage.
Test the brake pedal after installation. Press and release it to see if the brake lights activate properly. A steady stopper keeps the switch working long-term without slipping.
Testing The Replacement
Testing the replacement brake light switch stopper is important. It ensures the new part works correctly. Proper testing helps keep you safe on the road. Follow these steps to check the switch and fix problems fast.
Verifying Brake Light Operation
Press the brake pedal slowly. Ask someone to watch the brake lights. The lights should turn on as soon as you press the pedal. Release the pedal and check that the lights go off. Repeat this step a few times. The brake lights must respond every time. This shows the switch stopper works well.
Troubleshooting Common Issues
If the brake lights do not turn on, check the wiring first. Look for loose or damaged wires near the switch. Clean any dirt or rust around the connection. Make sure the switch is properly aligned with the pedal. Adjust the stopper if the pedal presses too far or not enough. Test the lights again after each fix. If problems remain, the switch or the stopper may be faulty.
Maintenance Tips For Brake Light Switch
Maintaining the brake light switch is important for safe driving. This small part controls your brake lights, alerting others when you slow down or stop. Proper care helps avoid brake light failure and costly repairs. Follow simple maintenance tips to keep the switch working well.
Regular Inspection Routines
Check the brake light switch regularly. Look for loose wires or damaged parts. Test the brake lights to ensure they turn on and off correctly. Pay attention to any delay or flickering of the lights. Inspect the area around the switch for dirt or corrosion that may cause problems.
Extending The Lifespan Of Components
Keep the switch clean by wiping it gently with a dry cloth. Avoid using water or harsh chemicals near the switch. Tighten any loose bolts or screws carefully. Replace worn or broken parts immediately to prevent further damage. Use the brake pedal smoothly to reduce stress on the switch and surrounding components.
Frequently Asked Questions
What Tools Are Needed To Replace A Brake Light Switch Stopper?
You need a screwdriver, pliers, and a replacement stopper. A flashlight helps for better visibility. Ensure your tools are clean and in good condition.
How Long Does It Take To Replace A Brake Light Switch Stopper?
The replacement usually takes 15 to 30 minutes. It depends on your experience and vehicle model. Following clear steps speeds up the process.
Can I Replace The Brake Light Switch Stopper Myself?
Yes, with basic mechanical skills, you can replace it. Follow safety precautions and detailed instructions carefully. If unsure, consult a professional mechanic.
What Are Signs Of A Faulty Brake Light Switch Stopper?
Brake lights staying on or not lighting up are key signs. The brake pedal might feel unusual or stuck. Timely replacement prevents safety hazards.
Conclusion
Replacing the brake light switch stopper is simple and important. It keeps your brake lights working well. This helps other drivers know when you stop. You save money by doing it yourself. Follow the steps carefully and take your time.
Check the lights after replacing the stopper. Safe driving depends on good brake lights. Keep your car in good shape for safety. You can handle this task with confidence. Stay alert and drive safely every day.