Have you ever wished you could control two lights from just one switch? Imagine the convenience of turning on your hallway light without walking across the room.
If you’re looking to make your home smarter and more efficient, learning how to jump power from one light switch to another is a simple trick you need to know. This guide will show you exactly how to do it safely and easily, even if you’re not an expert.
Keep reading, and you’ll discover a straightforward way to upgrade your lighting setup that saves time, effort, and energy.

Credit: diy.stackexchange.com
Tools And Materials Needed
Before starting to jump power from one light switch to another, gather all tools and materials. Having everything ready helps the work go smoothly. It also keeps you safe and saves time.
Basic Tools
Start with essential tools. A screwdriver set is a must for removing switch covers. Wire strippers help remove insulation from wires. Use needle-nose pliers to bend and hold wires. A voltage tester checks if power is off before working.
Materials Needed
Get the right wires for the job. Use electrical wires rated for your home’s voltage. Wire nuts connect wires safely. Electrical tape secures wire nuts and adds protection. Switches should match the ones already installed.
Safety Equipment
Safety is important. Wear insulated gloves to protect against electric shocks. Safety glasses shield your eyes from dust or sparks. Use a sturdy ladder if the switches are high on the wall.
Safety Precautions Before Starting
Working with electricity can be dangerous. Safety is the top priority before jumping power from one light switch to another. Taking the right steps helps prevent accidents and injuries. Follow these safety precautions carefully.
Turn Off The Main Power
Always switch off the main power supply before starting. This stops electricity from flowing through the wires. Use a voltage tester to confirm the power is off. Never trust the switch position alone.
Use Proper Tools
Use insulated tools made for electrical work. Avoid metal tools without insulation. Insulated tools protect you from electric shocks. Keep tools clean and in good condition.
Wear Safety Gear
Wear rubber-soled shoes to reduce shock risk. Use safety gloves designed for electrical work. Avoid wearing wet clothes or jewelry. Safety gear adds an important layer of protection.
Work In A Dry Environment
Ensure the work area is dry and free of moisture. Water conducts electricity and increases shock risk. Clean spills and avoid working in damp places. A dry environment keeps you safer.
Understand The Wiring
Know the wiring layout before touching anything. Study the circuit diagram or use a tester. Incorrect wiring can cause short circuits or fires. Clear understanding reduces mistakes and hazards.
Identify The Existing Wiring Setup
Start by checking the wires connected to your current light switch. Look for power, ground, and load wires to understand the setup. This helps in safely jumping power to another switch.
Understanding Your Current Wiring
Start by turning off the main power supply. This step keeps you safe from electric shocks. Remove the cover plate of the switch you want to work on. Use a screwdriver to open the switch box carefully.
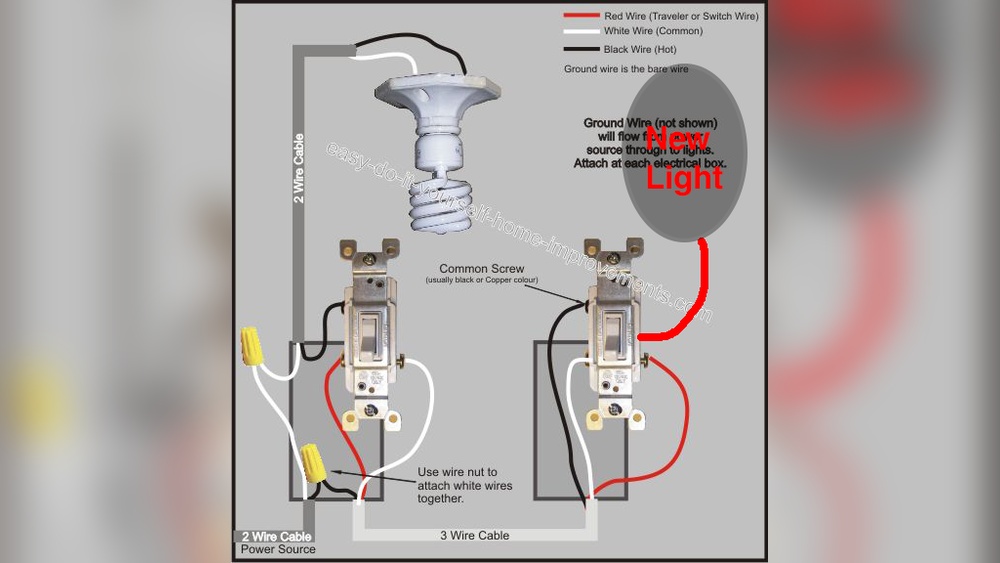
Look inside and note the wires connected to the switch. Most switches have a black (hot) wire, a white (neutral) wire, and a green or bare copper ground wire. Sometimes, you may see red wires for travelers in three-way switches.
Identifying Wire Functions
Use a voltage tester to check which wire carries power. The hot wire usually carries current to the switch. The neutral wire completes the circuit and carries current back. The ground wire protects from electrical faults.
Label each wire with tape or a marker. This labeling helps when you connect wires to the new switch. Keep photos of the wiring setup for reference later.
Checking For Existing Power Source
Look for the power source feeding the switch. Power can come from the breaker box or another switch box. Notice if the power enters the switch box or the light fixture box first.
This step tells you where to tap power safely. You want to jump power from a switch that already has a live wire. Understanding this saves time and prevents errors.
Turn Off Power At The Circuit Breaker
Safety is the first step when working with electricity. Always turn off power at the circuit breaker before starting any wiring project. This simple action stops electricity from flowing to the switches. It prevents shocks or short circuits that can cause harm.
Many people forget this step, but it is the most important. Never trust the light switch alone to cut power. The circuit breaker controls the entire electrical circuit, making it the safest point to stop power.
Locate Your Circuit Breaker Panel
Find the circuit breaker panel in your home. It is often in the basement, garage, or utility room. The panel contains switches that control electricity to different parts of your house. Each switch is labeled with the area or room it powers. This helps you find the right breaker to turn off.
Identify The Correct Breaker
Look for the breaker that controls the light switch you plan to work on. Labels may not be clear or missing. Test by turning off one breaker at a time and checking if the light switch loses power. This method helps confirm the correct breaker safely.
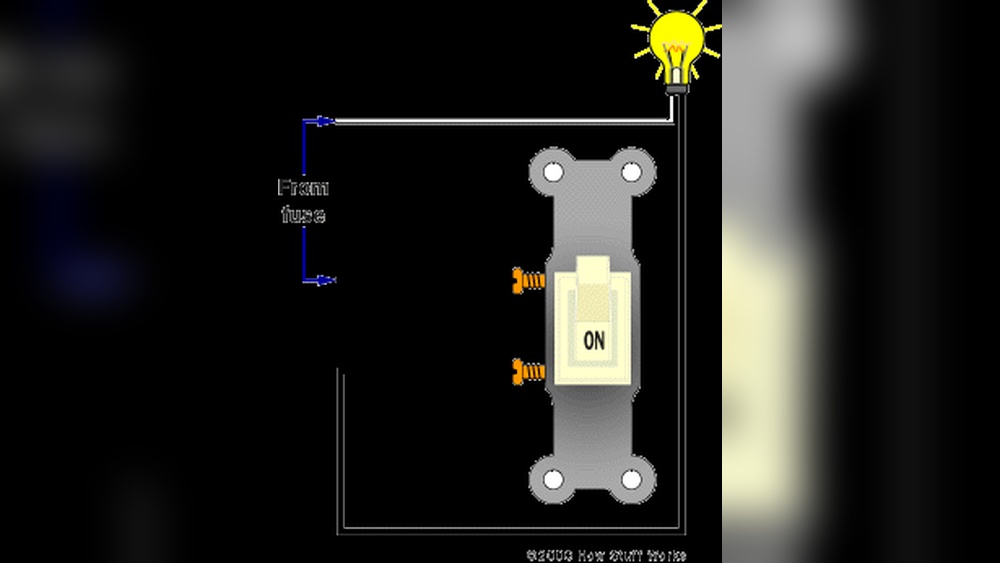
Switch Off The Power
Flip the breaker switch to the OFF position. You may hear a click. This means the power is now off for that circuit. Double-check by toggling the light switch to ensure the light does not turn on. This confirms no electricity flows to the switch.
Remove The Light Switch Covers
Removing the light switch covers is the first step to jump power from one switch to another. It gives you clear access to the wiring behind the switches. Always make sure the power is off at the breaker before starting. Safety first.
With the covers off, you can see the screws holding the switches in place. This makes it easier to work on the wiring. The covers protect the wires and switch parts, so removing them is necessary for any electrical work.
Tools Needed To Remove Light Switch Covers
You only need a screwdriver to remove most light switch covers. A flathead or Phillips screwdriver works well. Choose the right size to avoid damaging the screws or cover.
How To Remove The Switch Cover Safely
Turn off the circuit breaker to cut power to the switches. Use a screwdriver to remove the screws on the cover plate. Gently pull the cover away from the wall once screws are out.
What To Do After Removing The Covers
Check the wiring behind the switch for any damage. Keep the screws and covers nearby to reattach later. Now you can start connecting wires to jump power to the other switch.
Locate The Power Source Wire
Locating the power source wire is a key step to jump power from one light switch to another. This wire carries electricity from your home’s main power supply. You must find it carefully to ensure safety and proper wiring.
Power source wires usually come from the electrical panel or fuse box. They are often black or red but can vary. Identifying the correct wire helps avoid electrical hazards and wiring mistakes.
Turn Off The Main Power
Start by turning off the main power at the breaker box. This stops electricity flow and keeps you safe. Use a tester to confirm no power is running through the wires.
Remove The Switch Cover
Unscrew the switch plate covering the light switch. Gently pull the switch out from the wall box. This exposes the wires connected to the switch.
Identify The Hot Wire
The hot wire carries current to the switch. It is usually black or red. Use a voltage tester to find the live wire. The wire with power when the breaker is on is the hot wire.
Check The Neutral And Ground Wires
Neutral wires are usually white and carry current back. Ground wires are bare or green and protect from shocks. Knowing these helps avoid mixing wires during the jump.
Run A New Wire Between Switches
Running a new wire between switches is a clear way to jump power from one switch to another. This method ensures both switches control the same light or device safely and effectively. It involves adding a cable that carries power directly between the two switches.
This approach works well when the existing wiring does not allow power to flow between switches. It also helps in setups where you want one switch to control multiple lights or outlets.
Turn Off Power Before Starting
Always switch off the circuit breaker before handling wires. This step prevents electric shocks and keeps the work safe. Use a voltage tester to confirm the power is off.
Choose The Right Cable
Select a cable that matches your home’s wiring and electrical code. Usually, a 14/3 or 12/3 wire is used, depending on the circuit’s amperage. The cable must have enough wires to carry power and ground safely.
Run The Cable Between Switch Boxes
Measure the distance between the two switches to cut the cable to length. Feed the cable through walls or ceilings carefully. Avoid sharp bends or damage to the wire insulation.
Connect The Wires Properly
Match wire colors: black to black, white to white, and green or bare copper to ground. Secure connections with wire nuts and electrical tape. Tight connections prevent loose wires and faults.
Install Switches And Test
Mount the switches back in their boxes. Restore power and test if both switches control the light correctly. Check for any flickering or unusual behavior.
Connect Wires To The New Switch
Connecting wires to the new switch is a key step in jumping power between light switches. This process ensures electricity flows correctly, making both switches work together. Proper wiring prevents shorts and keeps your home safe.
Handle each wire carefully and follow the switch’s instructions. Knowing which wire goes where avoids confusion and errors. Using the right tools makes the job easier and safer.
Identify The Wires
First, find the wires coming from the old switch. Usually, there are three types: live, neutral, and ground. The live wire carries power. The neutral wire completes the circuit. The ground wire protects from shocks.
Use a voltage tester to confirm the live wire. Label each wire to keep track during the process.
Attach The Ground Wire
Connect the ground wire to the green screw or grounding point on the new switch. This wire is often bare copper or green. Tighten the screw securely to ensure a good connection.
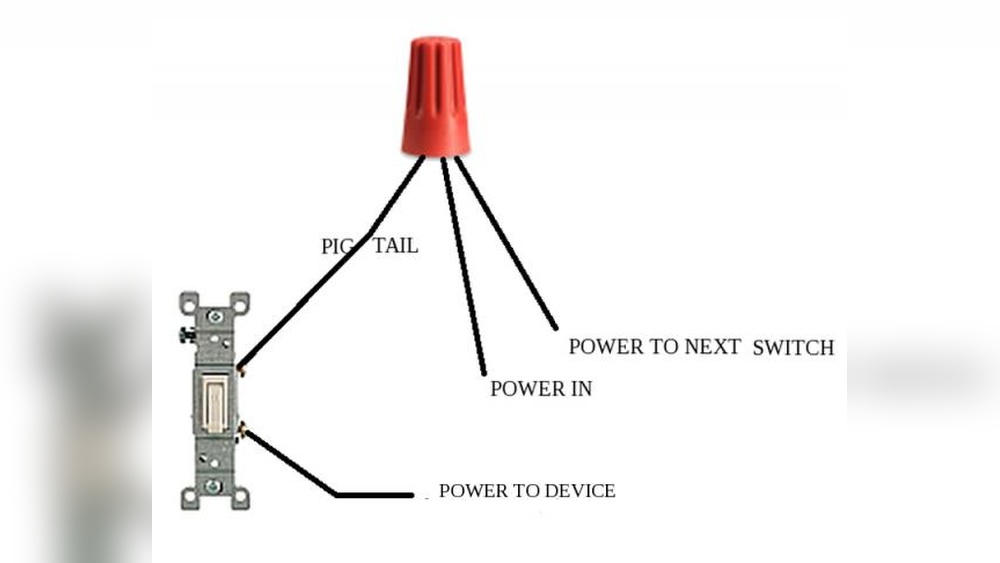
Connect The Live Wire
Attach the live wire to the terminal marked “line” or “live.” This wire usually has black or red insulation. Make sure the wire is wrapped tightly around the screw terminal.
Connect The Load Wire
The load wire goes to the terminal labeled “load.” This wire carries power to the light fixture. It is often black or red but check your wiring colors carefully. Secure the wire firmly under the screw.
Double-check All Connections
Review each connection before closing the switch box. Loose wires can cause sparks or failure. Tug gently on each wire to confirm it is tight. Organize wires neatly to avoid shorts.
Secure Switches And Replace Covers
Securing switches and replacing covers is a vital step in jumping power from one light switch to another. This step ensures safety and a clean finish. Loose switches can cause sparks or electrical faults. Properly secured switches prevent accidents and improve switch function.
After wiring, carefully place the switch back into the box. Use screws to fasten it tightly. Avoid over-tightening, which can crack the switch or wall plate. A firm switch stays steady when you flip it on or off.
Check Switch Alignment
Make sure the switch sits evenly in the box. Misaligned switches can make cover plates hard to fit. Align the switch so the toggle moves smoothly. Proper alignment helps the switch last longer.
Replace The Cover Plate
Choose the correct cover plate for your switch. Place it over the switch carefully. Use screws to secure the plate to the wall. Tighten screws gently to avoid cracking the cover.
Test The Switch
After securing the switch and cover, test the switch. Flip it on and off to check for stability. The switch should feel firm and work without noise. A secure setup reduces electrical risks and improves safety.

Credit: www.youtube.com
Restore Power And Test The Setup
Restoring power and testing the setup are critical steps after jumping power from one light switch to another. This ensures the wiring is correct and the connection works safely. Careful checking prevents damage and keeps your home safe.
Follow these steps to restore power and verify the setup functions as intended. Safety comes first. Double-check everything before turning the power back on.
Turn On The Circuit Breaker
Locate the circuit breaker panel. Find the switch you turned off earlier. Flip the breaker back to the ON position. This restores electrical power to the switches.
Listen for any unusual sounds. Smell for burning odors. If anything seems odd, turn the breaker off again and inspect the wiring.
Test The Light Switches
Flip each light switch to check if the lights turn on. Test both the original and the new switch. Both should control the light correctly.
Try switching on and off several times. Confirm the lights respond without flickering or delay. This proves the jump connection works well.
Check For Safety And Stability
Observe the switches and lights for a few minutes. Make sure nothing heats up or sparks. Check for loose wires or connections.
If everything looks stable and safe, the job is done. If not, cut power again and review your setup carefully.
Troubleshooting Common Issues
Troubleshooting common issues helps solve problems quickly when jumping power between switches. Simple errors can stop the system from working. Check each step carefully to find the cause. Safety is important. Always turn off power before testing wires or connections.
Check For Loose Connections
Loose wires cause flickering or no power at all. Look for screws that are not tight. Make sure wires are wrapped well around terminals. Re-tighten any loose connections. This fixes many common problems fast.
Test The Circuit Breaker
The breaker may trip and cut power to switches. Look at the breaker panel. Reset any tripped breakers by flipping them off and on. If the breaker trips again, there might be a short circuit or overload.
Verify The Correct Wiring Setup
Wrong wiring stops power from jumping properly. Follow wiring diagrams carefully. Identify line, load, and traveler wires correctly. Use a voltage tester to confirm wires carry power. Correct mistakes before restoring power.
Inspect For Damaged Wires
Wires can wear out or break inside walls. Check for signs of damage like frayed insulation or burn marks. Replace damaged wires immediately. Damaged wires cause shorts and can be dangerous.
Test The Switches Themselves
Switches can fail over time. Use a multimeter to test switch function. Replace any faulty switch. New switches ensure smooth power transfer between points.

Credit: www.youtube.com
Frequently Asked Questions
What Does Jump Power From One Switch To Another Mean?
Jumping power means connecting electricity from one switch to another. It allows control of the same light from two locations. This method is useful for convenience and energy efficiency in homes or offices.
Is It Safe To Jump Power Between Light Switches?
Yes, it is safe if done correctly. Always turn off the main power before working. Use proper wiring techniques and follow electrical codes to avoid hazards.
What Tools Are Needed To Jump Power Between Switches?
You need a voltage tester, wire stripper, screwdriver, electrical tape, and jumper wires. These tools help ensure safe and effective installation.
Can I Jump Power From A Light Switch To An Outlet?
No, it is not recommended. Light switch circuits and outlet circuits have different wiring setups. Mixing them can cause electrical problems or hazards.
Conclusion
Jumping power from one light switch to another saves time and effort. It allows control of multiple lights from different spots. Always turn off the main power before starting work. Use the right tools and follow safety steps carefully. This simple skill helps with home lighting projects.
Practice makes the process easier and safer. Keep learning to improve your electrical skills. Stay safe and enjoy better light control in your home.