
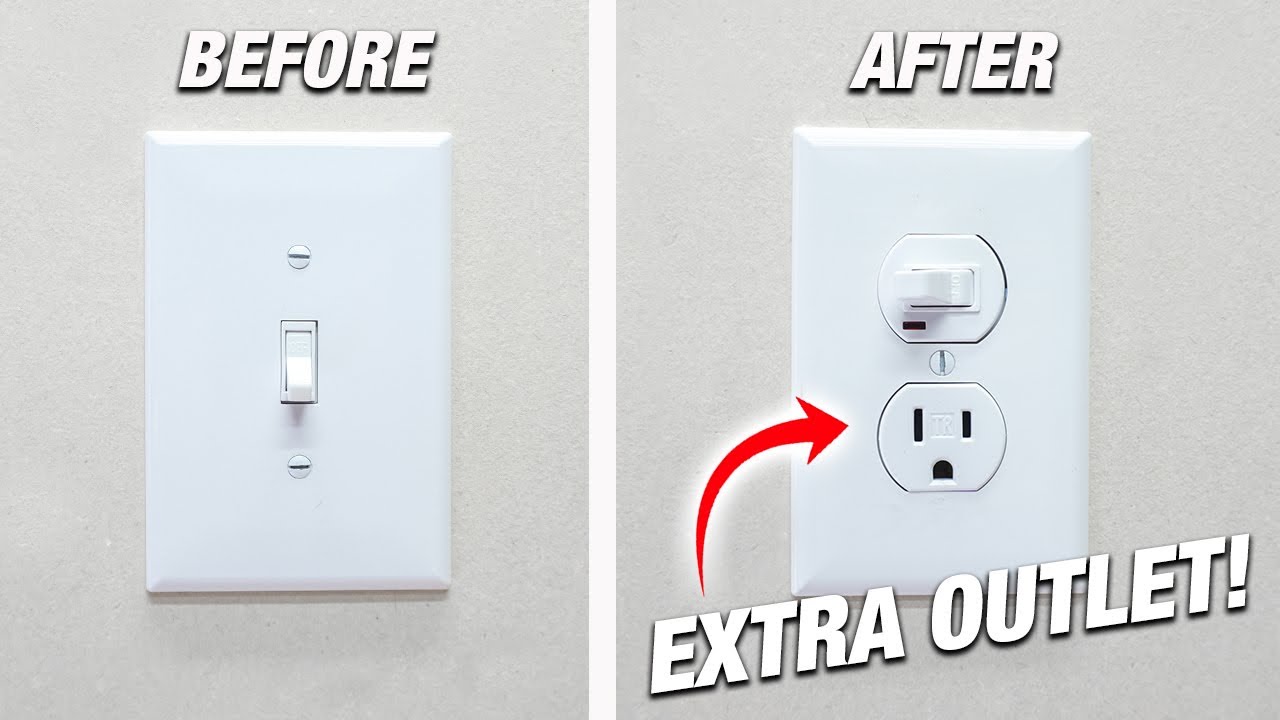
Have you ever found yourself wishing for an extra outlet right where your light switch is? Maybe you want to power a device without running long cords across the room.
What if you could transform that simple light switch into a convenient outlet? This change can save you time, reduce clutter, and make your space more functional. You’ll learn exactly how to turn a light switch into an outlet safely and easily.
Keep reading, and you’ll discover step-by-step guidance that anyone can follow—even if you’re not an expert. Your home setup is about to get a smart upgrade!
Tools And Materials Needed
Before changing a light switch into an outlet, gather all necessary tools and materials. Having everything ready makes the process safer and faster.
Each item plays a key role. Using the right tools prevents damage to your wiring and devices.
Basic Tools Needed
- Flathead screwdriver for removing switch plate
- Phillips screwdriver to unscrew the switch
- Wire stripper for removing insulation from wires
- Voltage tester to ensure power is off
- Needle-nose pliers for bending and holding wires
Materials Required
- Electrical outlet compatible with your home’s voltage
- Outlet cover plate to fit the new outlet
- Wire nuts for safe wire connections
- Electrical tape for extra insulation
- Replacement wires if the current ones are damaged or too short
Safety Equipment
- Insulated gloves to protect from electric shock
- Safety glasses to guard your eyes
- Flashlight or portable light for better visibility
Safety Precautions
Safety is the top priority when converting a light switch into an outlet. Electricity can cause serious harm or damage if not handled properly. Taking the right precautions keeps you and your home safe.
Before starting, turn off the power at the circuit breaker. This step stops electricity flow to the switch you work on. Use a voltage tester to confirm the power is off. Never trust the switch position alone.
Use insulated tools only. They protect against accidental electric shocks. Avoid metal or damaged tools during the work. Wear rubber-soled shoes for extra safety. Stay dry and work in well-lit areas.
Turn Off Power At The Circuit Breaker
Locate the breaker that controls the switch’s circuit. Flip it to the off position. Test the switch with a voltage tester. Confirm no power is present before proceeding. This step prevents shocks and injuries.
Use A Voltage Tester To Confirm Power Is Off
A voltage tester checks for live wires. Touch the tester to the switch wires. If it beeps or lights up, power is still on. Repeat testing multiple times. Never skip this essential safety check.
Wear Protective Gear And Use Insulated Tools
Gloves and safety glasses protect against sparks and debris. Insulated screwdrivers and pliers reduce shock risks. Avoid touching bare wires with bare hands. Keep your workspace clean and organized to avoid accidents.
Understand Local Electrical Codes And Regulations
Electrical rules vary by location. Check local codes before starting the project. Some areas require permits or inspections. Follow all regulations to ensure safe and legal work. Consult a professional if unsure.
Identify The Switch Type
Before changing a light switch into an outlet, find out what type of switch you have. This step is very important. It helps you avoid electrical problems. Different switches work in different ways.
Knowing the switch type also helps you pick the right tools and parts. It makes the project safer and easier.
Single-pole Switch
A single-pole switch controls one light or device from one location. It has two terminals and a ground screw. This switch is the most common in homes.
Look for a simple on/off toggle. If your switch matches this, it is a single-pole switch.
Three-way Switch
A three-way switch controls lights from two places. It has three terminals plus a ground screw. The switch looks similar to the single-pole but has an extra terminal.
This switch is used in hallways or staircases. Identify it by checking if two switches control the same light.
Four-way Switch
A four-way switch works with two three-way switches. It controls lights from three or more places. This switch has four terminals and a ground screw.
Four-way switches are less common. They are usually in larger rooms or long hallways.
Dimmer Switch
A dimmer switch adjusts light brightness. It may have a dial or slider. Some dimmers have more wires than regular switches.
Check if your switch changes light levels. If yes, it is a dimmer switch.
Credit: www.youtube.com
Turn Off The Power
Turning off the power is the first and most important step. It keeps you safe while working on electrical parts. Never start without cutting the electricity. Even a small shock can cause serious injury.
Before touching the switch or outlet, make sure the power is off. This step protects you and your home from damage. Take time to do it right.
Locate The Main Circuit Breaker
Find your home’s main circuit breaker box. It is usually in the basement, garage, or utility room. Open the box carefully and look for the switch that controls the room where you work.
Switch Off The Correct Breaker
Turn the breaker switch to the OFF position. This stops electricity flow to the light switch. Double-check by flipping the switch to see if the light goes off.
Use A Voltage Tester
Test the wires with a voltage tester before starting work. It confirms no electricity is flowing. This simple tool adds an extra safety layer.
Wear Safety Gear
Wear insulated gloves and safety glasses. These protect against accidental shocks and sparks. Always use the right gear when handling electrical parts.
Remove The Switch Cover
Removing the switch cover is the first step in changing a light switch into an outlet. This step helps you see the wiring behind the switch. It also makes the process safer by giving you clear access to the wires.
Take your time with this step. A careful approach prevents damage to the wall or the switch. This part is simple but important for the rest of the work.
Gather The Right Tools
Use a flathead or Phillips screwdriver. Check the screws on the switch cover to pick the right tool. Having the right screwdriver makes the removal quick and easy.
Turn Off Power
Switch off the circuit breaker for the switch. This step stops electric shocks during the work. Always double-check that the power is off before touching wires.
Unscrew The Switch Cover
Remove the screws holding the switch cover in place. Keep the screws safe for later use. Gently pull the cover away from the wall after all screws are out.
Inspect The Switch Box
Look inside the switch box carefully. Check for any signs of damage or loose wires. This inspection helps you plan the next steps safely.
Credit: www.oneprojectcloser.com
Disconnect The Switch
Disconnecting the switch is the first key step to change it into an outlet. This step ensures safety and prepares the wiring for the new outlet. Always turn off power at the breaker box before touching any wires. Use a voltage tester to confirm no electricity flows to the switch. Safety first.
After power is off, remove the switch cover plate. Unscrew the switch from the electrical box. Carefully pull the switch out without damaging the wires. Take note of how the wires connect to the switch. This helps during the wiring of the outlet.
Turn Off Power At The Breaker
Locate the correct circuit breaker for the switch. Flip it to the off position. Test the switch with a voltage tester. Confirm there is no live current. Never assume the power is off.
Remove The Switch Cover Plate
Use a screwdriver to remove screws. Gently lift the cover plate from the wall. Set the plate and screws aside safely. Avoid damaging the wall or plate.
Unscrew The Switch From The Box
Loosen the screws holding the switch. Pull the switch out slowly. Do not pull by the wires. Keep wires intact for the next step.
Identify And Label The Wires
Look at each wire connected to the switch. Usually, there are two or three wires. Mark each wire with tape and a label. This step prevents confusion later.
Prepare The Outlet Wiring
Preparing the outlet wiring is a key step to turn a light switch into an outlet. Safety and accuracy matter most. Careful work helps avoid electrical problems and keeps your home safe.
Before starting, turn off the power at the circuit breaker. Confirm power is off using a voltage tester. This prevents shocks while working on wires.
Identify The Wires In The Switch Box
Open the switch cover plate carefully. Check the wires inside the box. Usually, you find a hot wire, a neutral wire, and a ground wire. Knowing each wire’s role is important before connecting the outlet.
Disconnect The Switch From The Circuit
Remove the screws holding the switch. Gently pull the switch out from the box. Detach the wires from the switch terminals. Keep the wires separate to avoid confusion later.
Prepare The Wires For Outlet Connection
Strip about half an inch of insulation from each wire end. Use wire strippers for clean cuts. Straighten the wire ends for easy attachment to the outlet screws or terminals.
Check Wire Length And Condition
Ensure wires are long enough to reach the outlet terminals. If wires are damaged or too short, replace or extend them safely. Good wire condition helps secure strong connections.

Credit: diy.stackexchange.com
Install The Outlet
Installing the outlet is the key step in changing a light switch into a power source. This process involves careful wiring and securing the outlet in place. Follow each step to ensure safety and functionality.
Start by switching off the power at the circuit breaker. This stops electricity and keeps you safe during the work. Double-check by testing the switch with a voltage tester.
Remove The Light Switch
Unscrew the switch plate and the switch itself. Pull the switch gently out of the wall box. Take note of how the wires connect to the switch.
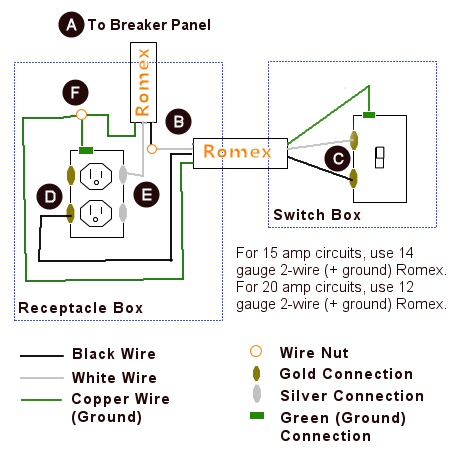
Connect The Outlet Wires
Attach the black (hot) wire to the brass terminal. Connect the white (neutral) wire to the silver terminal. Attach the green or bare wire to the ground terminal.
Secure The Outlet In The Box
Push the wires back carefully into the wall box. Screw the outlet firmly into place. Make sure it is level and does not move.
Attach The Outlet Cover Plate
Place the cover plate over the outlet. Screw it in securely. This protects the wiring and gives a clean look.
Restore Power And Test
Turn the circuit breaker back on. Test the outlet with a device or outlet tester. Confirm the outlet works correctly and safely.
Test The Outlet
Testing the outlet is a vital step after turning a light switch into an outlet. It confirms the wiring is correct and the outlet works safely. Without testing, you risk electric shock or damage to devices.
Use simple tools and follow safety steps carefully. Check every part to ensure the outlet is ready to use.
Prepare Your Tools
Gather a voltage tester or a multimeter. These tools show if electricity flows properly. Also, have a small screwdriver ready to open the outlet cover if needed.
Turn On The Power
Switch the circuit breaker back on. This restores power to the outlet you changed. Be cautious and avoid touching wires during this step.
Test For Voltage
Place the tester’s probes into the outlet slots. A reading or light means power is present. No reading means the outlet is not live and needs checking.
Check The Ground
Test the ground slot for proper connection. This slot protects against electric shocks. A correct ground ensures safety for all devices.
Try Plugging In A Device
Use a small lamp or phone charger. Plug it into the new outlet. If it powers on, the outlet works fine.
Inspect For Any Issues
Look for sparks, burning smells, or loose parts. These signs mean a problem exists. Turn off power immediately and fix the issue before use.
Replace The Cover Plate
Replacing the cover plate is the last step in turning a light switch into an outlet. It protects the wiring and gives a clean look.
Choosing the right cover plate is important. It must fit the new outlet and match the room’s style.
Remove The Old Cover Plate
Start by unscrewing the old cover plate. Use a screwdriver for this task. Keep the screws safe for reuse. Remove the plate gently to avoid damage.
Select A New Cover Plate
Pick a cover plate designed for an outlet. Check the size and shape carefully. Plastic or metal plates work well. Match the color with the wall or outlet.
Install The New Cover Plate
Place the new cover plate over the outlet. Align the screw holes correctly. Insert the screws and tighten them gently. Do not overtighten to avoid cracking.
Troubleshooting Tips
Troubleshooting is key when turning a light switch into an outlet. Small mistakes can stop the outlet from working or cause safety issues. Understanding common problems helps fix them fast. This section covers easy steps to solve frequent issues.
Check The Power Source
First, ensure the circuit breaker is on. No power means the outlet won’t work. Use a voltage tester to confirm power at the switch wires. Sometimes power comes from the switch, not the outlet box. Knowing this guides correct wiring.
Inspect The Wiring Connections
Loose or wrong connections cause outlets to fail. Tighten all wire nuts and screws. Match wire colors: black or red for hot, white for neutral, and green or bare for ground. Wrong wires can trip breakers or cause shocks.
Test The Outlet With A Device
Plug a simple device like a lamp or phone charger. No power means a wiring or breaker problem. Flick the switch and see if power changes. The outlet should always have power, unlike a light controlled by the switch.
Look For Damaged Components
Cracks or burns on the outlet or switch show damage. Replace any damaged parts. Damaged outlets risk fire and should never be used. Use only parts rated for outlet use, not light switches.
Verify Grounding
Proper grounding prevents shocks and device damage. Check if the outlet box and wires are grounded. Use a tester to confirm. No ground means adding a ground wire or using a GFCI outlet for safety.
Frequently Asked Questions
Can I Convert A Light Switch Into An Electrical Outlet?
Yes, you can convert a light switch into an outlet by rewiring. Ensure you turn off the power first. Follow local electrical codes and safety guidelines for proper installation.
What Tools Are Needed To Change A Switch To An Outlet?
You will need a screwdriver, wire stripper, voltage tester, and a new outlet. Safety gear like gloves is recommended. These tools help you safely remove the switch and install the outlet.
Is It Safe To Replace A Light Switch With An Outlet?
Yes, it is safe if you follow electrical codes. Turn off the power before starting. If unsure, hire a licensed electrician to avoid hazards and ensure compliance.
How Do I Know If My Circuit Can Handle An Outlet?
Check the circuit breaker rating and current load. Outlets require a dedicated circuit for heavy appliances. Consult an electrician if you are unsure about your wiring capacity.
Conclusion
Turning a light switch into an outlet can save space and add convenience. Always follow safety rules to avoid accidents. Make sure to turn off the power before starting the work. Use the right tools and materials for the job.
If unsure, ask a professional for help. This simple change can make your room more useful. Take your time and do it carefully. Small projects like this can improve your home step by step.


