Are you tired of harsh, bright lights that ruin the mood in your room? Connecting a dimmer switch to your light can give you full control over brightness, creating the perfect atmosphere anytime you want.
But if you’re worried it sounds complicated or risky, don’t be. In this guide, you’ll learn exactly how to connect a dimmer switch to your light safely and easily, even if you’ve never done electrical work before. Keep reading, and by the end, you’ll have the confidence to transform your lighting—and your space—with just a few simple steps.
Tools And Materials Needed
Preparing to connect a dimmer switch to a light requires specific tools and materials. Having the right items makes the job safer and easier. This section lists everything needed to complete the task smoothly.
Essential Tools
A few basic tools help with wiring and installation. A screwdriver is necessary to remove and attach switch plates. Wire strippers cut and strip insulation from wires. A voltage tester checks if wires carry electricity. Needle-nose pliers help bend wires and hold small parts. Electrical tape insulates wire connections for safety.
Required Materials
The main material is the dimmer switch compatible with your light fixture. Make sure the dimmer matches the bulb type, like LED or incandescent. Wire connectors, often called wire nuts, join wires securely. You may also need extra electrical wire if the existing one is too short or damaged.
Safety Gear
Safety comes first. Use insulated gloves to protect hands from electric shocks. Safety glasses shield your eyes from sparks or debris. A flashlight helps if the work area is dark. Always turn off power at the circuit breaker before starting.
Safety Precautions
Safety is the top priority when connecting a dimmer switch to a light. Electricity can be dangerous if not handled properly. Taking the right safety steps protects you and your home from harm. Follow these precautions carefully before starting your project.
Always switch off the power at the circuit breaker. Do not rely on just the wall switch. Use a voltage tester to confirm the wires have no electricity. This step prevents electric shock during installation.
Use Proper Tools And Equipment
Choose insulated tools made for electrical work. Avoid using damaged or worn tools. Wear safety gloves and goggles to protect your hands and eyes. These tools help you work safely and efficiently.
Read The Dimmer Switch Instructions
Every dimmer switch has specific installation steps. Read the manual carefully before starting. Follow the wiring diagrams exactly as shown. This ensures correct and safe connection to your light.
Check Wire Types And Ratings
Verify that the dimmer switch matches your wire type and voltage. Using incompatible parts can cause short circuits or fires. Use wire connectors rated for electrical use. Proper wire handling is essential for safety.
Work In A Dry Environment
Keep the work area dry and well-lit. Avoid working in damp or wet places. Water and electricity create a high risk of shock. A dry environment keeps you safer during installation.
Secure Loose Wires Properly
Make sure all wires are tightly connected and insulated. Use electrical tape or wire nuts as needed. Loose wires can cause sparks or shorts. Proper connections reduce the risk of electrical faults.
Identify The Wires
Before connecting a dimmer switch to a light, you must identify the wires correctly. This step ensures safety and proper function. Knowing each wire’s role helps avoid mistakes. Always turn off the power before handling wires.
Locate The Power Source
The power source wire brings electricity to the switch. It is usually black or red. Use a voltage tester to confirm it carries current. This wire connects to the dimmer switch’s input terminal.
Distinguish The Load Wire
The load wire carries electricity from the switch to the light. Often, it is black or red too but separate from the power wire. This wire connects to the dimmer switch’s output terminal. Identifying it ensures the light responds to the switch.
Find The Ground Wire
The ground wire is a safety feature. It is usually green or bare copper. This wire connects to the dimmer switch’s ground screw. It helps prevent electric shocks and protects your home.

Credit: www.gelighting.com
Turn Off The Power
Turning off the power is the first step before connecting a dimmer switch to a light. It keeps you safe from electric shocks. Always treat electricity with respect and caution.
Electric current can cause serious injury. Never work on wiring without cutting the power first. Safety must come before anything else.
Locate The Circuit Breaker
Find the circuit breaker box in your home. It usually sits in the basement or a utility room. Open the box and look for the switch controlling your light.
Switch Off The Correct Breaker
Turn off the breaker that powers your light fixture. Flip the switch to the “off” position. This stops electricity from flowing to the light and switch.
Double-check The Power Is Off
Use a voltage tester or a simple light bulb to check. Make sure the light does not turn on. Confirming power is off protects you during work.
Remove The Existing Switch
Removing the existing switch is the first step in connecting a dimmer switch to your light. This process prepares your wiring for the new dimmer. Careful removal helps avoid damage and keeps everything safe.
Turn off the power at the circuit breaker. This stops electricity flow to the switch. Use a voltage tester to confirm no power is present. Safety first.
Gather Necessary Tools
Prepare a flathead screwdriver, a Phillips screwdriver, and a voltage tester. These tools make the process easier and safer. Have them ready before you start.
Remove The Switch Cover Plate
Use the screwdriver to take off the cover plate. Unscrew the screws holding it in place. Keep the screws safe; you might need them later.
Unscrew The Existing Switch
Loosen the screws that hold the switch to the electrical box. Pull the switch out carefully, exposing the wires. Handle the wires gently to avoid damage.
Identify And Disconnect The Wires
Check the wires attached to the switch. Usually, there are two or three wires. Note their positions or take a photo for reference. Unscrew the terminal screws to disconnect the wires safely.
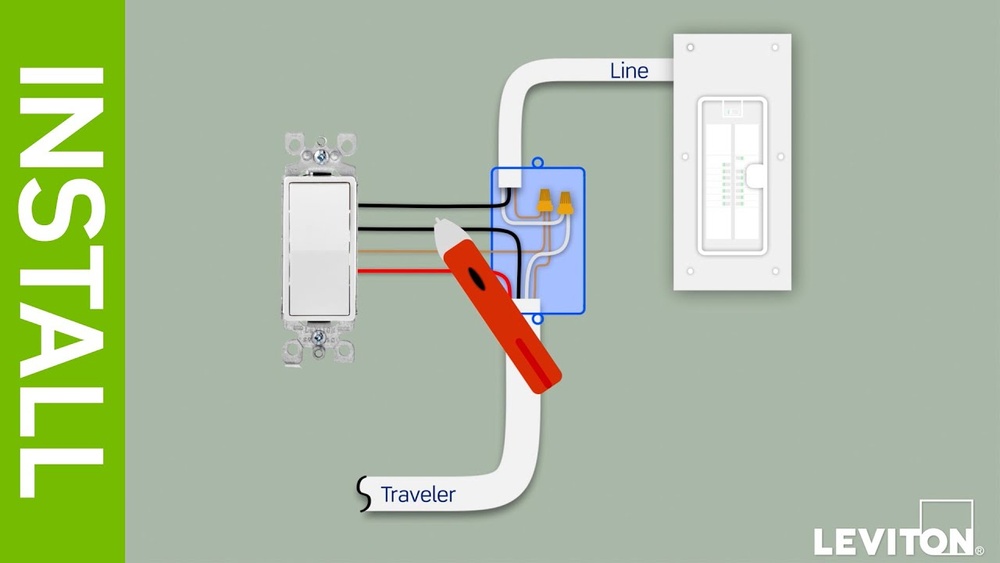
Connect The Dimmer Switch Wires
Connecting the dimmer switch wires is a key step in installing a dimmer switch. This process controls the flow of electricity to the light fixture. Proper wiring ensures the dimmer works safely and smoothly. Follow these steps carefully to connect each wire correctly.
Attach The Load Wire
Identify the load wire from your wall box. This wire sends power to the light fixture. Connect the load wire to the dimmer switch’s load terminal. Use a wire connector to secure the connection. Make sure the wire is tight and stable.
Connect The Line Wire
Find the line wire, which brings power from the circuit breaker. Attach it to the dimmer switch’s line terminal. Twist the wires together and use a wire nut for safety. Check the connection for firmness to avoid loose contacts.
Secure The Ground Wire
Locate the ground wire, usually green or bare copper. Connect it to the dimmer switch’s ground terminal or green screw. Use a wire connector if needed. Grounding protects you from electrical shocks and ensures safety.
Mount The Dimmer Switch
Mounting the dimmer switch is an important step in the installation process. It secures the switch to the wall and connects it to your lighting system. Proper mounting ensures safety and functionality. This step requires attention to detail and basic tools.
Follow these simple steps to mount your dimmer switch correctly. Take your time and check each connection before finalizing the installation.
Start by turning off the power at the circuit breaker. This prevents electrical shock during installation. Use a voltage tester to confirm the power is off. Safety first.
Attach The Dimmer Switch To The Wall Box
Place the dimmer switch into the wall box carefully. Align the screw holes on the switch with those on the box. Use a screwdriver to tighten the screws. Make sure the switch sits flush against the wall.
Secure The Switch Plate
After mounting the switch, place the switch plate over it. Align the plate with the screw holes. Tighten the screws gently. Avoid over-tightening to prevent cracking the plate.
Turn the power back on at the circuit breaker. Test the dimmer switch by adjusting the light level. Check that the light dims smoothly and the switch works well. Troubleshoot if the light does not respond correctly.

Credit: www.youtube.com
Restore Power And Test
Restoring power and testing your dimmer switch is the final step in installation. It confirms that everything works correctly and safely. You should take care to follow each step carefully for the best results.
Turn On The Circuit Breaker
Locate the circuit breaker that controls the light. Flip it to the ON position. This restores electricity to the dimmer switch and light fixture. Be sure the breaker is fully on before testing the switch.
Check The Dimmer Switch Function
Press the dimmer switch to turn on the light. Slowly slide or turn the dimmer control. Watch the light dim and brighten smoothly. The light should respond without flickering or cutting out.
Test Different Light Levels
Adjust the dimmer to several levels. Try low, medium, and high settings. Confirm the light changes intensity at each level. This ensures the dimmer switch is working properly.
Look For Any Issues
Listen for buzzing or humming sounds near the switch. Check for flickering or uneven light. If you notice problems, turn off the breaker and review wiring. Fix any errors before restoring power again.
Troubleshooting Common Issues
Troubleshooting common issues with dimmer switches helps keep your lights working smoothly. Simple problems can stop the dimmer from working right or cause flickering. Sometimes, the switch gets too hot, which is a safety risk. Understanding these issues saves time and prevents damage.
Dimmer Not Working
Check if the power is on at the breaker. Loose wiring can stop the dimmer from working. Make sure the dimmer switch matches your light type. LED bulbs need compatible dimmers. Replace the dimmer if it feels warm but does not control lights.
Flickering Lights
Flickering often means the bulb and dimmer do not match. Use dimmable bulbs for dimmer switches. Tighten all wire connections to avoid flicker. Old bulbs may flicker more. Try changing the bulb or the dimmer to fix flickering.
Switch Overheating
Overheating shows the dimmer is overloaded or faulty. Check the dimmer’s wattage rating and compare it to the total bulb wattage. Do not use bulbs with higher wattage than the dimmer supports. If the switch stays hot, replace it to avoid fire risk.

Credit: support.brilliant.tech
Frequently Asked Questions
How Do I Safely Connect A Dimmer Switch To A Light?
Turn off the power at the breaker before starting. Connect the dimmer switch wires to the corresponding light and power wires. Use wire nuts to secure connections. Finally, mount the switch and restore power to test functionality.
Can I Use Any Dimmer Switch For My Light?
No, choose a dimmer compatible with your light type. LED, incandescent, and CFL bulbs require specific dimmers. Check the dimmer’s packaging or manual for compatibility details before purchasing.
What Tools Are Needed To Install A Dimmer Switch?
Basic tools include a screwdriver, wire stripper, voltage tester, and wire nuts. These tools help safely remove the old switch, strip wires, and connect the dimmer switch properly.
How Do I Know If My Dimmer Switch Is Working?
After installation, turn the power back on and adjust the dimmer. The light should smoothly brighten or dim without flickering or buzzing. If not, check wiring or compatibility.
Conclusion
Connecting a dimmer switch to your light brings control and comfort. It lets you set the right mood with ease. Always ensure safety by turning off power before starting. Follow simple steps and use the right tools. This small change can improve your room’s look and feel.
Take your time and check your work carefully. Enjoy the soft glow and energy savings a dimmer offers. Simple, smart, and effective—lighting made better.