If you’ve ever worked with a hydraulic floor jack, you know how frustrating it can be when it stops lifting smoothly. One common culprit is the check balls inside the jack.
These small parts are crucial for your jack’s performance, but when they get stuck or dirty, your jack can fail right when you need it most. You’ll learn exactly how to remove and clean those check balls step-by-step. By the end, you’ll have your floor jack working like new again—saving you time, money, and a lot of hassle.
Ready to fix your jack and get back to work? Let’s dive in.
Tools Needed
Removing check balls from a hydraulic floor jack needs the right tools. Using proper tools makes the job easier and safer. You avoid damage to the jack and save time.
Gather all tools before starting. This helps keep the work smooth and organized. Below are the essential tools you will need.
Socket Wrench Set
A socket wrench set helps remove bolts and screws. Different sizes fit various parts of the jack. Choose the right size to avoid stripping bolts.
Flathead Screwdriver
A flathead screwdriver is useful for prying and loosening small parts. It helps access the check ball without causing damage. Use it gently to avoid scratches.
Needle-nose Pliers
Needle-nose pliers grip small parts firmly. They help remove the check ball carefully from tight spaces. These pliers give better control during removal.
Clean Cloth
A clean cloth wipes away dirt and oil. Keeping parts clean helps see the check ball clearly. It also prevents dirt from entering the jack.
Hydraulic Jack Fluid
Hydraulic jack fluid is needed to refill the jack after removing the check ball. Check your jack’s manual for the correct type. Proper fluid keeps the jack working well.
Safety Precautions
Always wear gloves and safety glasses before handling hydraulic parts. Avoid sudden movements to prevent spills or injuries. Keep the work area clean and well-lit for better control.
Wear Protective Gear
Always wear safety glasses to protect your eyes from fluid sprays. Use gloves to keep your hands safe from oil and sharp parts. Wear long sleeves to protect your skin from contact with hydraulic fluid.
Work In A Well-ventilated Area
Hydraulic fluid can release fumes that are harmful. Choose a space with good airflow. Avoid working in closed or small rooms.
Secure The Jack Properly
Place the jack on a flat, stable surface before starting. Make sure it cannot move or tip over. Use blocks or stands if needed for extra stability.
Release Pressure Slowly
Hydraulic systems can hold pressure that causes sudden fluid release. Open valves slowly to release pressure step by step. Avoid quick movements that may cause accidents.
Keep Tools And Area Clean
Clean your tools and work area before and after the job. Dirt can enter the system and cause damage. A tidy space helps prevent slips and mistakes.
Locate The Check Balls
Start by finding the check balls inside the hydraulic floor jack. They are small, round parts that control fluid flow. Usually, they sit near the pump or valve area.
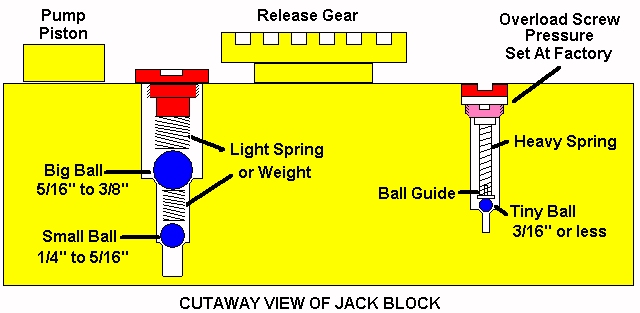
Understanding The Role Of Check Balls
Check balls control the flow of hydraulic fluid inside the jack. They act like tiny valves. These balls allow fluid to move in one direction only. This action helps lift and hold the jack securely. If a check ball gets stuck or lost, the jack will not work properly.
Tools Needed To Find Check Balls
Start by gathering basic tools. You will need a wrench, screwdriver, and a flashlight. A clean cloth helps wipe off dirt and grease. Having a magnetic tray can keep small parts safe. These tools make locating check balls easier and safer.
Opening The Hydraulic Floor Jack
Place the jack on a flat surface. Use the wrench to remove the oil fill plug. Slowly open the jack’s casing if possible. Be careful not to damage any parts. Clean around the openings to see inside clearly.
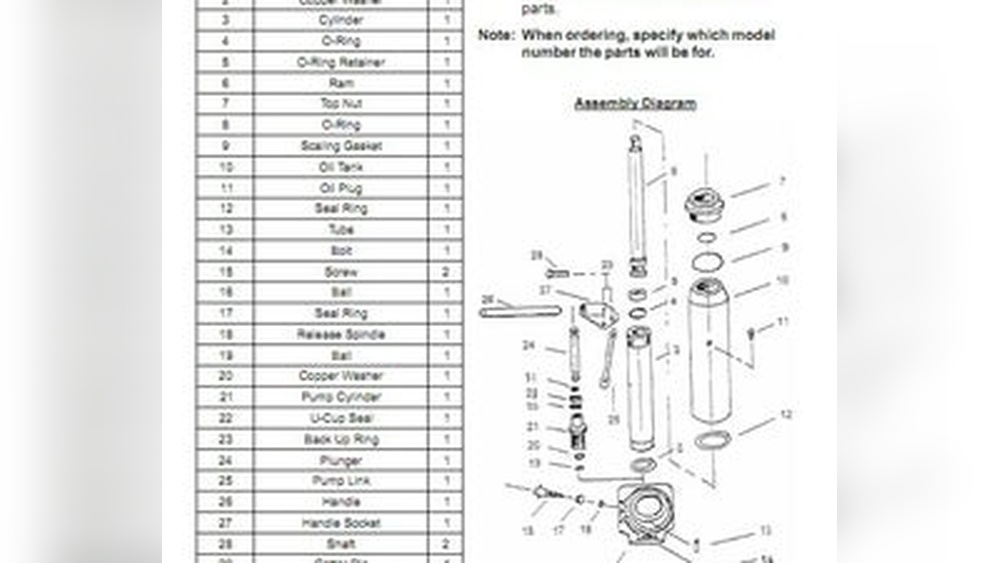
Where To Look For Check Balls
Check balls are inside the pump assembly and valve body. Look near the release valve and the pump piston. They often sit in small cavities or seats. Use a flashlight to inspect these areas closely. Keep parts organized as you remove them.

Credit: www.instructables.com
Drain Hydraulic Fluid
Draining the hydraulic fluid is the first step in removing check balls from a hydraulic floor jack. Old fluid can hold dirt and debris that block the check balls. Removing the fluid helps clear the system and makes the repair easier. Follow these simple steps to drain the fluid safely and cleanly.
Prepare The Jack For Draining
Place the floor jack on a flat, stable surface. Make sure it is fully lowered. This prevents spills and makes draining easier. Keep a container ready to catch the old fluid. Wear gloves to protect your hands from the hydraulic fluid.
Locate The Drain Plug
Find the drain plug on the jack’s hydraulic reservoir. It usually sits at the bottom or side of the reservoir. Use a wrench or screwdriver to remove the plug carefully. Keep the plug safe for reinstallation later.
Drain The Hydraulic Fluid
Let the fluid flow into the container slowly. Avoid splashing or spilling the fluid. Wait until all the liquid drains out. Tilt the jack slightly if needed to remove leftover fluid. Dispose of the old fluid properly according to local rules.
Disassemble The Jack
To remove check balls from a hydraulic floor jack, start by disassembling the jack carefully. This step lets you reach the internal parts where check balls sit. Follow the process slowly to avoid damage.
Disassembly requires basic tools and a clean workspace. Keep all parts organized for easy reassembly later.
Remove Pump Assembly
First, find the pump assembly on the jack’s side. Use a wrench to loosen and remove bolts holding it. Gently pull the pump assembly out. This exposes parts inside the jack. Avoid forcing parts to prevent breaks.
Access Valve Components
Next, remove the valve cover near the pump area. Use a screwdriver to take out screws carefully. Inside, you will see valve components including the check balls. Take note of their position before removal. Clean the area with a cloth to remove dirt and oil.
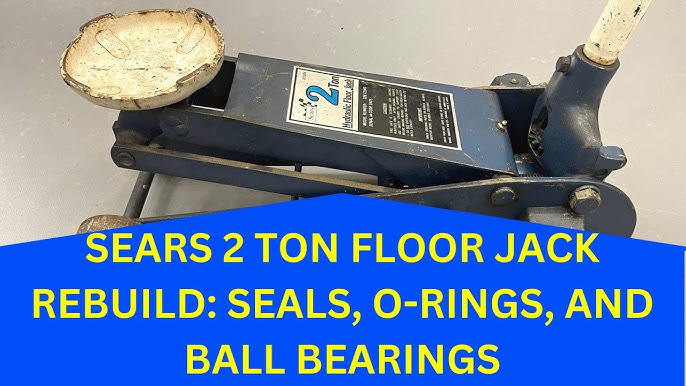
Credit: www.youtube.com
Remove Check Balls
Removing check balls from a hydraulic floor jack is a key step in its maintenance. These small balls help control fluid flow inside the jack. Over time, they can wear out or get stuck. Removing them carefully ensures the jack works smoothly again.
Proper removal also prevents damage to other parts inside the jack. Follow the steps below to take out the check balls safely and check their condition.
Extract Balls Carefully
Use a small magnet or tweezers to remove the check balls. Do this slowly to avoid scratching the valve seats. Keep track of each ball; they are small and easy to lose. Handle them gently to keep their shape intact. Clean any dirt or debris around the balls before removal.
Inspect For Damage
Look closely at each check ball for cracks or dents. Any damage can stop the jack from sealing properly. Replace balls that show signs of wear or corrosion. Also, check the valve seats for scratches or wear. Clean or repair these areas to ensure a tight seal when reassembled.
Clean And Replace Parts
Cleaning and replacing parts of a hydraulic floor jack is key to its smooth operation. Dirt, rust, and worn pieces can stop the jack from working well. Taking time to clean and change parts helps keep the jack safe and strong. This step makes sure the check balls and other parts work correctly. Follow the steps below to clean and replace parts carefully.
Clean Check Ball Seats
Start by removing any dirt or oil from the check ball seats. Use a clean cloth or a soft brush. Avoid harsh tools that can scratch the seats. Clean seats help the check balls seal tightly. This keeps the jack from leaking fluid or losing pressure. Check every seat for rust or damage. Clean seats improve the jack’s lifting power and safety.
Replace Worn Components
Look closely at the check balls and springs for signs of wear. Cracks, dents, or flattening mean replacement is needed. Old parts can cause the jack to fail. Use parts that fit your jack model exactly. New check balls and springs restore proper movement and sealing. Regular replacement extends the jack’s life and prevents accidents. Keep spare parts handy for quick fixes.
Reassemble The Jack
After cleaning and removing the check balls, it is time to reassemble the hydraulic floor jack. Proper reassembly is important for the jack to work safely and smoothly. Take your time and follow each step carefully.
Reinstall Valve Components
Start by putting the valve parts back in place. Insert the check balls carefully into their slots. Make sure each ball sits firmly and does not move around. Place the valve springs and seals exactly where they were before. Tighten any screws or bolts gently, avoiding overtightening. This keeps the valve components secure and ready to control fluid flow.
Secure Pump Assembly
Next, reattach the pump assembly to the jack body. Align the pump with its mounting points. Insert the bolts and tighten them with a wrench. Check that the pump moves freely without sticking. Reconnect any hoses or fittings removed earlier. Secure all connections to prevent leaks during use. This step ensures the jack will lift and hold weight safely again.
Refill Hydraulic Fluid
Refilling the hydraulic fluid is a key step after removing check balls from a hydraulic floor jack. The fluid helps the jack lift heavy loads smoothly. Without enough fluid, the jack may not work well or could get damaged. This section explains how to refill the hydraulic fluid correctly.
Prepare The Jack For Refilling
Start by placing the jack on a flat surface. Make sure it is clean and stable. Open the release valve to lower the jack completely. This makes the fluid level easier to check. Remove the fill plug or cap from the hydraulic reservoir carefully.
Choose The Right Hydraulic Fluid
Select the fluid recommended by the jack’s manufacturer. Using the wrong fluid can harm the pump and seals. Commonly, hydraulic jack oil or light machine oil works well. Avoid using brake fluid or motor oil, as they can cause problems.
Refill The Fluid Slowly
Pour the hydraulic fluid into the reservoir slowly. Fill until the fluid reaches the bottom of the fill hole. Do not overfill, as this can cause leaks or pressure issues. Check the fluid level with a clean tool or by eye.
Remove Air From The System
After refilling, pump the handle several times. This helps remove trapped air inside the jack. Keep the release valve closed while pumping. Open the valve briefly to release air bubbles. Repeat until the jack works smoothly without jerking.
Credit: www.hyjacks.com
Test The Jack
After removing check balls from your hydraulic floor jack, testing the jack is essential. This step confirms the jack works correctly and safely. Testing helps find any issues before using the jack for lifting tasks. Follow these checks to ensure your jack performs well.
Check For Leaks
Look closely at the jack for oil leaks. Pay attention to seals and joints. Leaks indicate problems with the hydraulic system. If you see oil dripping or wet spots, the jack needs repair. No leaks mean the system holds pressure properly.
Verify Lifting Performance
Place the jack under a solid object. Pump the handle slowly and watch the lift. The jack should lift smoothly without jerks or noise. It should hold the weight steadily without dropping. If it fails, check the hydraulic fluid and check balls again.
Frequently Asked Questions
How Do I Safely Remove Check Balls From A Hydraulic Jack?
To safely remove check balls, first release all hydraulic pressure. Use a clean cloth and gentle tools to avoid damage. Follow the manufacturer’s instructions carefully to prevent injury and jack malfunction.
What Tools Are Needed To Remove Check Balls?
You typically need a flathead screwdriver, pliers, and a clean rag. Sometimes, a magnetic pickup tool helps retrieve small check balls. Always use tools that won’t scratch or damage the jack components.
Why Remove Check Balls From A Hydraulic Floor Jack?
Removing check balls is essential during maintenance or repair. It allows cleaning, replacement, or troubleshooting of hydraulic issues. Proper removal ensures your jack functions smoothly and safely over time.
How Can I Prevent Damage When Removing Check Balls?
Avoid using excessive force or sharp objects. Work in a clean area to prevent dirt contamination. Follow step-by-step guides or videos to ensure correct removal and prevent damage.
Conclusion
Removing check balls from a hydraulic floor jack is simple with the right steps. Take your time and follow the process carefully. Clean parts help the jack work smoothly and safely. Regular checks keep your jack in good shape. Small fixes now prevent bigger problems later.
Keep tools and workspace organized for easy work. This guide helps you save money and extend jack life. Try these tips next time your jack needs attention. You will feel confident handling basic jack repairs yourself.