Have you ever tried to remove a metal drywall anchor and ended up frustrated or damaging your wall? You’re not alone.
These little anchors are tough and tricky, but with the right steps, you can get them out cleanly and easily. You’ll discover simple, effective methods to remove metal drywall anchors without leaving a mess behind. Keep reading, and you’ll save time, protect your walls, and get your space looking perfect again.
Types Of Metal Drywall Anchors
Metal drywall anchors come in different types. Each type holds weight differently and fits various wall needs. Knowing these types helps in choosing the right one and removing them properly.
Expansion Anchors
Expansion anchors open up inside the wall. They grip the drywall tightly to hold heavy objects. When you insert a screw, the anchor expands behind the drywall. This makes removal a bit tricky but possible with care.
Threaded Anchors
Threaded anchors screw directly into the drywall. They have sharp threads that bite into the wall. These anchors create a strong hold without needing a drill. Removing them usually involves unscrewing gently to avoid damage.
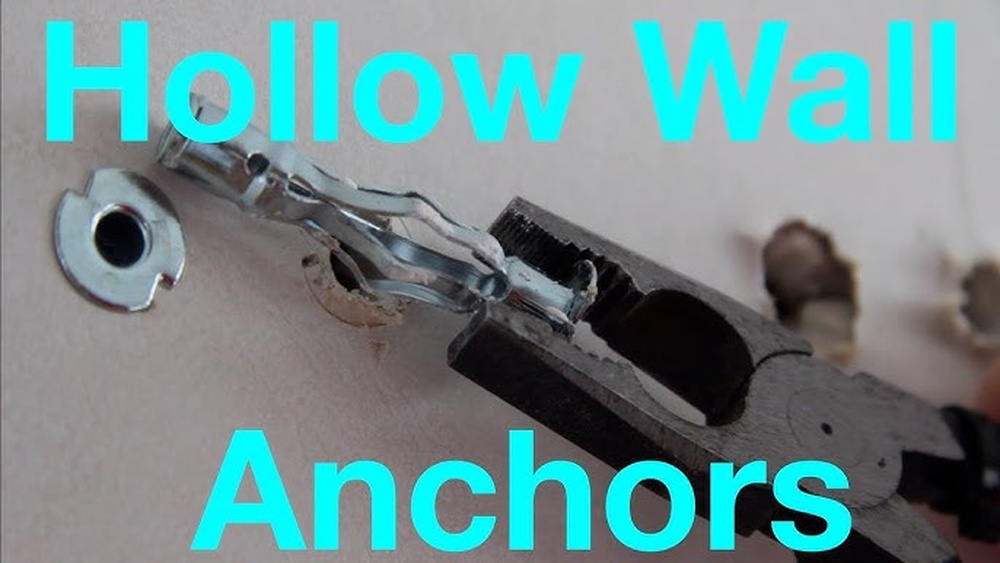
Toggle Bolts
Toggle bolts have wings that open inside the wall. They spread the load over a large area. This makes them good for heavy items. To remove toggle bolts, you must first collapse the wings. Then, pull the bolt out carefully.

Credit: www.reddit.com
Tools Needed For Removal
Removing metal drywall anchors requires the right tools. Having these tools ready makes the job easier and cleaner. Each tool plays a specific role in the removal process. Using the correct tools prevents wall damage and saves time.
Pliers And Screwdrivers
Pliers help grip and pull out the anchor from the wall. Needle-nose pliers work best for small or tight spaces. Screwdrivers are useful if the anchor has a visible screw. Turn the screw slightly to loosen the anchor before pulling it out.
Drill And Bits
A drill speeds up the removal of stubborn anchors. Use a drill bit slightly smaller than the anchor’s diameter. Drill carefully to avoid making large holes. This method works well for anchors stuck deep inside the wall.
Utility Knife
A utility knife cuts around the anchor’s edge cleanly. This tool helps loosen the drywall around the anchor. Score gently to avoid damaging the wall surface. It also allows easier anchor removal by freeing it from the drywall.
Prep Before Removing Anchors
Preparing the wall and the surrounding area before removing metal drywall anchors is important. Proper preparation helps avoid damage and keeps the workspace safe. It also makes the removal process smoother and faster.
Taking a few simple steps before you start will save time and effort. This section explains how to clear the area and protect surfaces around the anchors.
Clear The Area
Remove any furniture or objects near the wall. This creates space to work freely. Clearing the area prevents accidents and keeps your belongings clean.
Dust and debris often fall during anchor removal. Having a clear area helps you clean up quickly afterward. Also, make sure the floor is free of rugs or mats that could slip.
Protect Surrounding Surfaces
Cover nearby surfaces with a drop cloth or old sheet. Protect paint, floors, and furniture from scratches and dust. Use painter’s tape to hold the covering in place.
Place cardboard or a small tray under the anchor to catch falling debris. This keeps the workspace tidy and reduces cleanup time. Protection reduces repair work after anchor removal.

Credit: www.youtube.com
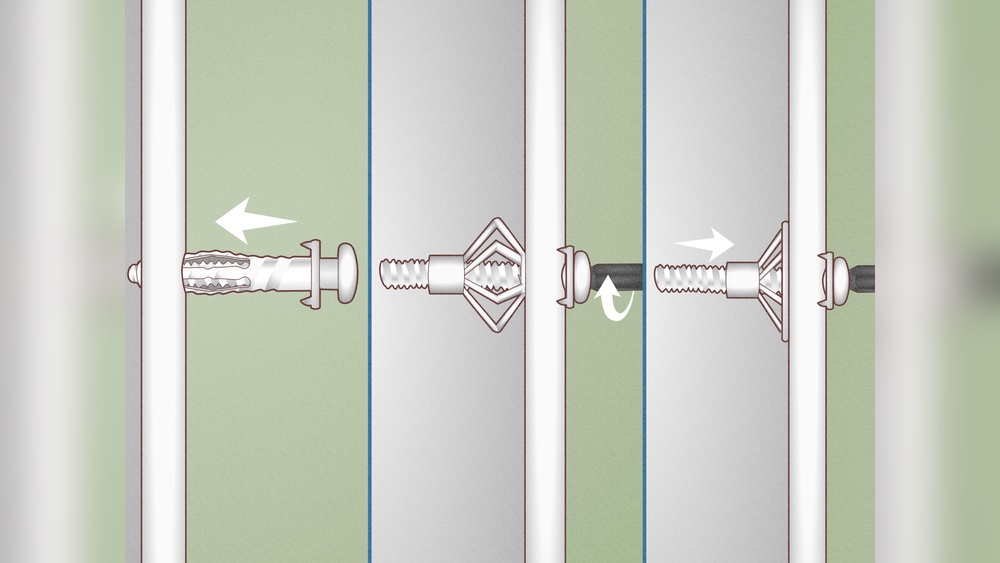
Removing Expansion Anchors
Expansion anchors are common in drywall. They hold heavy items securely. Removing them needs care to avoid wall damage.
Two simple ways work well. One is unscrewing the anchor. The other is prying it out. Both methods are easy and effective.
Unscrewing Method
Start by turning the screw counterclockwise. This loosens the anchor inside the wall. Use a screwdriver with a good grip.
Once loose, pull the anchor gently out of the wall. If it resists, try twisting more before pulling. Patience helps prevent wall damage.
Keep the screw and anchor together while pulling. This makes removal cleaner and quicker. Avoid forcing or yanking hard.
Prying Out The Anchor
Use a flathead screwdriver or pliers for this method. Insert the tool between the anchor and wall surface.
Apply gentle pressure to lift the anchor out. Work slowly around the edges to loosen it. Avoid pushing too hard.
Once loose, pull the anchor out completely. This method works best if unscrewing fails. Always protect the wall during prying.
Removing Threaded Anchors
Removing threaded metal drywall anchors needs care and the right tools. These anchors screw into the wall and hold items firmly. Removing them without damaging the wall is important. Use the correct method for a clean finish.
Backing Out With Pliers
Start by gripping the anchor with needle-nose pliers. Turn the anchor counterclockwise to unscrew it. Pull gently while turning to ease it out. If the anchor spins without moving, stop to avoid damage. This method works well for anchors that are not too tight.
Drilling Out Stubborn Anchors
Use a drill with a bit slightly smaller than the anchor. Drill slowly into the center of the anchor. The goal is to break or loosen it inside the wall. Remove the broken pieces carefully after drilling. This method helps when the anchor won’t back out with pliers.
Removing Toggle Bolts
Removing toggle bolts from drywall can be tricky. These anchors spread behind the wall, making them strong but hard to remove. Knowing how to take them out safely helps avoid wall damage. Follow simple steps to remove toggle bolts with ease.
Collapsing The Toggle
First, try to collapse the toggle wings. Use pliers to hold the bolt head. Pull gently while pushing the wings toward the wall. The wings should fold and release from behind the drywall. If the wings don’t collapse, do not force them. Forcing can damage the wall further.
Cutting And Pushing Through
If collapsing fails, cut the bolt shaft near the wall surface. Use a hacksaw or metal cutter for this. After cutting, push the remaining toggle into the wall cavity. The toggle will stay inside but won’t harm the wall. Patch the hole afterward with spackle or putty for a smooth finish.
Fixing Holes After Removal
Removing metal drywall anchors often leaves holes in your wall. Fixing these holes is important for a smooth, clean finish. Proper repair makes the wall ready for painting or decorating. Follow simple steps to clean, fill, and paint the damaged area.
Cleaning The Hole
Start by removing any loose debris inside the hole. Use a brush or vacuum to clear dust and dirt. This step helps the filler stick better to the wall. Make sure the hole is dry before moving to the next step.
Filling And Sanding
Fill the hole with a lightweight spackling compound or wall filler. Use a putty knife to apply the filler smoothly. Let it dry completely; drying time varies by product. After drying, sand the area gently with fine-grit sandpaper. Sand until the surface is flush with the wall. Wipe away dust with a clean cloth.
Painting Touch-ups
Match the paint color to your wall for best results. Use a small brush to apply paint over the repaired spot. Apply thin layers to blend the patch with the wall. Let each layer dry before adding another. The wall looks like new after a few coats.
Tips For Easier Anchor Removal
Removing metal drywall anchors can be tricky without damaging the wall. Using the right methods helps make the process smoother and safer. These tips focus on making anchor removal easier while protecting your wall’s surface.
Using Lubricants
Lubricants reduce friction between the anchor and the wall. Apply a small amount of lubricant like WD-40 around the anchor. Let it sit for a few minutes. This softens any paint or debris holding the anchor tight. The anchor will slide out more easily.
Applying Gentle Pressure
Use steady, gentle pressure to pull or twist the anchor. Avoid sudden or harsh movements that may widen the hole. A pair of pliers works well for gripping the anchor head. Slowly work it loose without forcing it out too fast.
Avoiding Wall Damage
Protect the wall by placing a thin cloth or tape around the anchor. This cushions the surface from scratches and dents. Use tools carefully and avoid deep prying. Patch any small holes quickly with spackle to keep the wall smooth.

Credit: www.youtube.com
Frequently Asked Questions
How Do You Remove Metal Drywall Anchors Safely?
To remove metal drywall anchors safely, use pliers to grip and pull them out gently. Avoid damaging the drywall by pulling slowly and steadily. If the anchor resists, twist it slightly to loosen before pulling. Patch any holes afterward for a smooth wall finish.
What Tools Are Needed To Remove Metal Drywall Anchors?
You will need needle-nose pliers or regular pliers to grip the anchor. A screwdriver can help twist or pry the anchor loose. Additionally, a putty knife and spackle are useful for repairing the wall after removal.
Can Metal Drywall Anchors Damage The Wall During Removal?
Yes, metal drywall anchors can cause damage if pulled out carelessly. Pulling too hard or fast may tear the drywall paper. Use gentle, steady pressure and proper tools to minimize wall damage and ensure easier repair.
How Do You Fix Holes After Removing Metal Drywall Anchors?
Fill holes with spackle or wall filler using a putty knife. Smooth the surface evenly and let it dry completely. Sand the area lightly for a seamless finish. Finally, repaint to match the wall color.
Conclusion
Removing metal drywall anchors does not have to be hard. Use the right tools and take your time. Gently pull or twist the anchor to avoid wall damage. If needed, fill any holes with spackle and sand smooth. Clean the area before repainting for a fresh look.
With patience, your wall will look like new again. Keep these tips handy for future projects. Simple steps lead to great results every time.