Are you looking to add a second light switch to your existing setup but don’t know where to start? You’re in the right place.
Adding a light switch might sound tricky, but with the right steps, you can do it yourself safely and efficiently. Imagine controlling your lights from two different spots—making your space more convenient and functional. Keep reading, and you’ll discover easy-to-follow instructions that anyone can handle, even if you’re not an expert.
Let’s make your home lighting smarter, one switch at a time.
Tools And Materials Needed
Before adding a light switch to an existing one, gather all needed tools and materials. Having everything ready makes the job easier and safer.
Prepare the right items to work efficiently. The right tools help avoid mistakes and save time.
Tools Required
- Screwdriver set – for removing and attaching screws
- Wire stripper – to remove insulation from wires
- Voltage tester – to check if wires are live
- Drill – for making new holes if needed
- Measuring tape – to measure wire lengths
- Utility knife – to cut electrical tape or wires
- Needle-nose pliers – for bending and holding wires
Materials Needed
- New light switch – matching the existing type
- Electrical wires – usually 14 or 12 gauge
- Wire nuts – to connect wires safely
- Electrical tape – for insulation
- Switch box – if adding a new one
- Wall plate – to cover the new switch
- Cable clamps – to secure wires inside the box
Safety Precautions
Safety is the top priority when adding a light switch to an existing one. Electrical work can be dangerous without proper care. Taking the right safety steps protects you from shocks and accidents.
Follow these safety rules closely. They help ensure a smooth and safe installation process.
Turn Off The Power
Always switch off the power at the circuit breaker. Double-check by testing the switch with a voltage tester. Never start work if the power is still on.
Use Proper Tools
Use insulated tools made for electrical work. They reduce the risk of electrical shock. Avoid using damaged or worn-out tools.
Wear Safety Gear
Wear rubber-soled shoes and safety goggles. Gloves made for electrical work add extra protection. Keep your clothes tight to avoid catching on wires.
Work In A Dry Area
Make sure your work area is dry. Water increases the risk of electric shock. Avoid working in damp or wet conditions.
Understand Wiring Basics
Know the wiring colors and their functions. Incorrect wiring can cause short circuits or fires. Use wiring diagrams to guide your work.
Do Not Overload Circuits
Check the existing circuit load before adding a switch. Overloading causes breakers to trip or wires to overheat. Balance the load to keep the system safe.
Consult A Professional If Unsure
Call an electrician if you feel unsure. Professional help prevents mistakes and hazards. Safety comes first, always.
Choosing The Right Switch
Choosing the right switch is key to adding a new light switch easily and safely. The switch controls how the light works. Picking the correct type helps avoid wiring problems and ensures good use.
Many switch types exist. Each type works differently and fits certain needs. Knowing the options helps pick the best one for your space and wiring setup.
Standard Single-pole Switch
This switch turns lights on or off from one spot. It is simple and common in most homes. Use this switch if the new light works from one place only.
Three-way Switch
This switch lets you control a light from two locations. Good for long rooms or hallways. Use it if you want to add control from two places.
Dimmer Switch
Dimmer switches adjust light brightness. They help save energy and set mood lighting. Make sure your bulbs support dimming before choosing this switch.
Smart Switch
Smart switches work with apps or voice control. They add convenience and modern features. Check your home’s Wi-Fi and wiring to ensure compatibility.

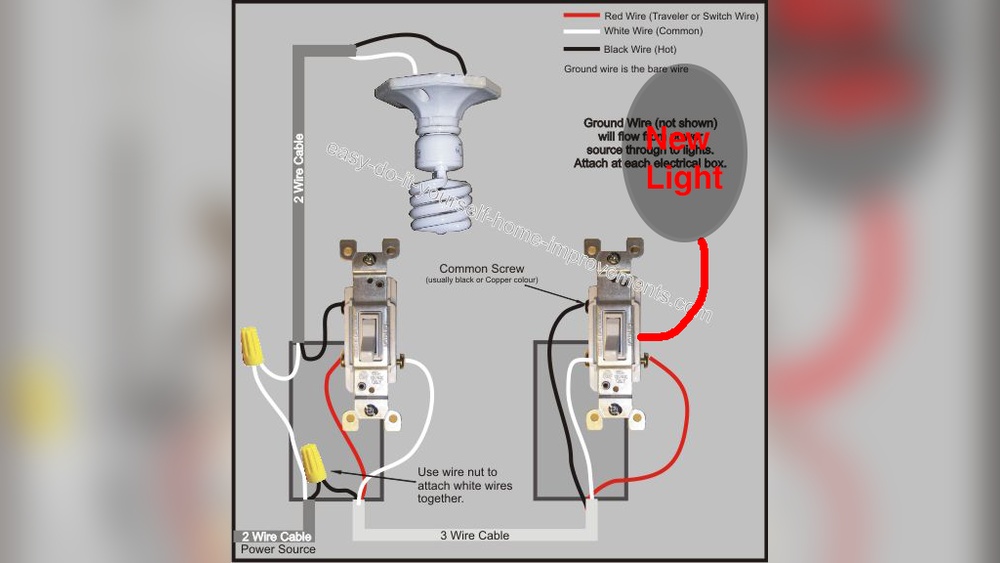
Credit: www.do-it-yourself-help.com
Turning Off The Power
Turning off the power is the first and most important step before starting electrical work. It keeps you safe from electric shocks and prevents damage to your wiring. Never skip this step.
Make sure you cut power to the right circuit. This will stop electricity flow to the switch you want to work on.
Locate The Circuit Breaker
Find your home’s main electrical panel. It usually sits in a basement, garage, or utility room. Look for the breaker that controls the light switch circuit.
Switch Off The Correct Breaker
Flip the breaker handle to the OFF position. This stops power from reaching the switch and its wires. If unsure, switch off the main breaker to cut power to the whole house.
Test The Power Is Off
Use a voltage tester or a simple light bulb tester on the switch wires. Confirm no electricity flows before touching any wiring. This step ensures your safety.
Keep The Breaker Off During Work
Leave the breaker off until you finish installing the new switch. Turning power back on too early is dangerous and can cause shocks or short circuits.
Removing The Existing Switch Cover
Removing the existing switch cover is the first step in adding a new light switch. This task prepares the area for safe and easy access to the wiring. Taking off the cover also helps to check the condition of the switch and the box behind it.
Always turn off the power at the breaker before touching the switch cover. Safety first. Use a screwdriver to remove the screws holding the cover in place. Keep the screws safe for later use.
Gather The Right Tools
Before starting, have a flathead or Phillips screwdriver ready. The type depends on the screws on your switch cover. Having the right tool speeds up the process.
Switch Off The Power
Locate your home’s main breaker panel. Turn off the power to the light switch you will work on. Test the switch to confirm no electricity flows.
Remove The Screws Carefully
Use the screwdriver to unscrew the cover plate. Turn the screws counterclockwise gently. Avoid stripping the screws or damaging the wall.
Take Off The Cover Plate
Once screws are out, gently pull the cover plate away. If it sticks, wiggle it lightly. Do not force it hard to prevent damage.
Inspect The Switch And Wiring
Look at the switch and wires inside the box. Check for any signs of damage or wear. This helps plan your next steps safely.
Identifying Wires And Connections
Adding a light switch to an existing one requires knowing your wires well. This step is crucial for safety and function. It helps avoid mistakes that can cause damage or injury.
Wires inside a switch box usually have different colors. Each color has a specific role. Recognizing these colors and their purpose makes installation easier.
Common Wire Colors And Their Roles
Black wires carry power to the switch. They are called “hot” wires. White wires usually return power to the light fixture and are known as “neutral.”
Green or bare copper wires are for grounding. Ground wires protect against electrical shocks. Knowing these colors helps you connect the new switch correctly.
Using A Voltage Tester To Identify Wires
A voltage tester checks if a wire has electricity. Before touching wires, always turn off the power. Use the tester to confirm no current flows through the wires.
Test each wire separately. This step ensures safety and avoids electric shocks. If unsure, do not proceed without professional help.
Understanding Wire Connections In The Switch Box
Inside the switch box, wires connect to screws or push-in holes. Black wires usually connect to brass screws. White wires may be twisted together with a wire nut.
Ground wires attach to green screws or the metal box itself. Take time to observe these connections before adding the new switch. This prevents wrong wiring and switch failure.
Wiring The New Switch
Wiring the new switch is a key step in adding a light switch to an existing setup. This task involves connecting wires safely and correctly. Proper wiring ensures the new switch works well with the current electrical system.
Understanding the wiring process helps avoid common mistakes. This section breaks down the steps into simple parts. Follow each step carefully to make the wiring secure and functional.
Identify The Wires In The Existing Switch Box
Turn off the power at the circuit breaker before starting. Remove the switch cover and use a tester to confirm no power. Look for three types of wires: hot, neutral, and ground. The hot wire usually has black or red insulation. The neutral wire is white. The ground wire is green or bare copper.
Prepare The New Switch For Wiring
Choose a switch that matches your electrical system. Strip about half an inch of insulation from the wire ends. Use wire strippers for a clean cut. Avoid nicking the wire itself. Check the new switch terminals for labeling: common, traveler, or ground.
Connect The Wires To The New Switch
Attach the ground wire to the green screw on the switch. Connect the hot wire to the common terminal. If the switch is a three-way, connect traveler wires to traveler terminals. Tighten screws firmly but do not overtighten. Make sure wires are secure and no copper is exposed.
Test The Connections And Mount The Switch
Turn the power back on at the breaker. Test the switch by flipping it on and off. If the light works, the wiring is correct. Turn off the power again before final assembly. Carefully push the wires into the box and screw the switch in place. Replace the switch cover plate.
Securing The Switch And Cover
Securing the switch and cover is the final step in adding a new light switch. It keeps everything safe and neat. A loose switch or cover can cause problems later. Tightening the screws properly holds the switch firmly. The cover protects wires and gives a finished look.
Take your time to check the switch position. Make sure it sits straight and flush with the wall. A crooked switch can look bad and feel awkward to use. Also, verify that no wires are pinched or exposed before securing the cover.
Align The Switch Properly
Place the switch in the electrical box carefully. Align the screw holes with the box holes. This makes it easy to screw in without forcing. Press the switch gently against the box to avoid bending wires.
Tighten Screws Evenly
Use a screwdriver to tighten screws slowly. Do not overtighten, which can crack the switch plate. Tighten one screw halfway, then the other. This keeps the switch balanced and secure. Check that the switch does not move after tightening.
Attach The Cover Plate
Fit the cover plate over the switch. Line up the screw holes with the switch screws. Insert screws and tighten them gently. The cover should sit flat against the wall. Avoid gaps between the cover and wall.
Final Safety Check
Look for any loose wires or gaps. Make sure the switch moves smoothly up and down. Test the switch by turning the light on and off. A stable switch and cover ensure safe and easy use.
Testing The New Switch
Testing the new switch is an important step after installation. It helps ensure the switch works properly and safely. Follow these simple steps to check if everything is set right.
Turn On The Power
Start by turning the power back on at the circuit breaker. This restores electricity to the switch and light. Never test the switch with power off.
Check The Switch Operation
Flip the new switch on and off. The light should respond immediately. If the light does not turn on, the wiring may need a review.
Look For Flickering Or Dim Lights
Watch the light closely. Flickering or dim lights can mean poor connections. Tighten wires or check for loose parts inside the switch box.
Test All Connected Lights
Make sure all lights connected to the switch work. Sometimes one bulb or fixture may cause issues. Replace faulty bulbs if needed.
Use A Voltage Tester
A voltage tester can check if power flows correctly through the switch. Touch the tester to the switch terminals carefully. No power means a wiring problem.

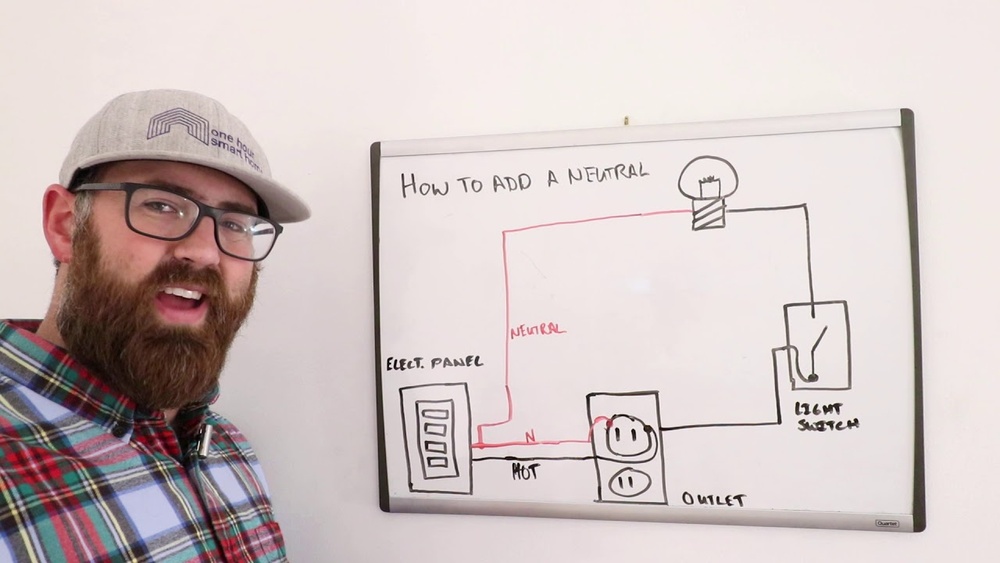
Credit: www.youtube.com
Troubleshooting Common Issues
Troubleshooting common issues helps solve problems when adding a new light switch. Many beginners face small errors that stop the switch from working. Identifying these problems quickly saves time and effort. This guide explains easy fixes for common mistakes during installation.
Check For Loose Wiring Connections
Loose wires often cause switches not to work. Turn off power before checking. Tighten all wire nuts and screws firmly. Make sure wires connect to the right terminals. A loose wire can stop electricity flow.
Verify Power Supply To The Switch
No power means the switch cannot control the light. Use a voltage tester to check for current. Test the wires inside the switch box. If no power, check the breaker or fuse. Reset the breaker if it tripped.
Confirm Correct Switch Type
Using the wrong switch can cause issues. Single-pole switches work for one light. Three-way switches control lights from two places. Match the switch type to your setup. Wrong type means the switch won’t work properly.
Inspect The Light Bulb And Fixture
The problem might be the light, not the switch. Test the bulb in another fixture. Check if the fixture has power. Replace bulbs that are burnt out. Fix fixture wiring if needed.
Test The Switch Itself
The switch may be defective. Swap it with a new one to test. A faulty switch needs replacement. Always buy switches from trusted brands. Cheap switches can fail quickly.

Credit: www.youtube.com
Frequently Asked Questions
How Do I Safely Add A Light Switch To An Existing One?
Turn off the power at the circuit breaker first. Use a voltage tester to confirm no electricity flows. Follow wiring diagrams carefully and use proper tools. If unsure, consult a licensed electrician to avoid hazards.
What Tools Are Needed To Add A New Light Switch?
You need a screwdriver, wire stripper, voltage tester, electrical tape, and wire connectors. Having a drill and fish tape helps in pulling wires through walls. Using the right tools ensures a safe and efficient installation.
Can I Control One Light From Two Switches?
Yes, using a three-way switch setup allows control from two locations. This requires additional wiring and specific switches. It’s ideal for hallways or large rooms for convenience. Proper wiring knowledge is essential for this setup.
How Do I Identify The Wires In My Existing Light Switch?
Typically, black wires are hot, white are neutral, and green or bare are ground. Use a voltage tester to confirm the live wire. Label wires before disconnecting to avoid confusion during installation.
Conclusion
Adding a light switch to an existing one can be simple and useful. Follow safety steps carefully to avoid problems. Use the right tools and check your wiring twice. Take your time and do not rush the work. This small change can make your room more convenient.
Always turn off power before starting any electrical task. With patience and care, you can do it yourself. Enjoy better control of your lighting with ease.